Another breakfast turned dinner. It’s kinda my thing right now. Breakfast all day long. This dish is quick, flavorful, satisfying- exactly what I want to have up my sleeve for a rushed weeknight or a lazy weekend morning. And you know how I feel about anything served in a tortilla with salsa and cheese. If it happens to have a fried egg cooked right on top all the better. I almost felt silly writing out this recipe. It’s painfully simple to make (albeit possibly messy) and although I suggested a few choice toppings, you can add whatever you want to your huevos. (I’m considering avocado next go-around.) I found Smitten Kitchen’s detailed photos of the process helpful when it came to flipping the tortilla and egg. The hardest part is keeping your yolk in the skillet and off the wall.
Huevos Rancheros
INGREDIENTS
corn tortillas
sharp cheddar, shredded
eggs
black beans (or refried beans)
salsa fresca
cilantro, chopped
sour cream
hot sauce (optional)
DIRECTIONS
1. Preheat a skillet over medium heat. Lightly grease it with cooking spray. Add a corn tortilla and cook until lightly browned on one side. Flip and sprinkle with cheese. Once the cheese has begun to melt, crack an egg over the center of the tortilla. Season the egg with salt and pepper. Cook until the whites have begun to set before carefully flipping the tortilla. Cook until the yolk is still runny or set (however you like your eggs). Remove from the heat and repeat. Serve toped with black beans, salsa fresca, cilantro, sour cream, and hot sauce (optional).
Can you believe I’ve never made an omelette/omelet (same thing- spell it however you want) until now? I have no idea why not! It just never crossed my mind. It might have something to do with not being much of a breakfast person. But that’s changing. And I admit that my first attempt at an omelette was intimidating. I was completely flustered by the process. A good omelette (as I learned after reading bunches of recipes) is soft and fluffy and neatly folded. That’s a lot to live up to. And then there’s the decision of what to stuff it with. Oh the possibilites…
For the filling I sauteed a few summer vegetables, garlic, and onion, and topped it with a little lot of cheese. Easy. To the omelette itself I incorporated fresh chives, although any fresh herb would work. I followed a basic recipe that produced a near-perfect omelet (based on the above description) on three separate attempts. (With only minimal sweating involved.) This will be my go-to recipe from here on out. And if I can do it, so can you.
Summer Veggie Omelette
INGREDIENTS
Omelette:
2-3 large eggs (I used 2)
1 Tbsp. water
fresh herbs, chopped (chives, basil, etc.)
salt and freshly ground black pepper
butter, to grease the pan
Filling:
drizzle extra virgin olive oil
onion, thinly sliced
garlic, minced
bell pepper, diced
fresh corn, kernels sliced off
zucchini, diced
tomato, seeded and diced
salt and freshly ground black pepper, to taste
cheese (Cheddar, Gruyere, Gouda, etc.)
DIRECTIONS
1. To prepare the filling, heat a drizzle of olive oil in a large skillet over medium heat. Add the onion, garlic, and bell pepper, and saute until tender. Stir in the corn and zucchini and continue to cook until tender-crisp. Remove from the heat and stir in the tomatoes. Season to taste with salt and freshly ground black pepper.
2. To prepare the omelette, crack the eggs into a small bowl. Add 1 Tbsp. water, a generous pinch of salta and pepper, and any fresh herbs. Gently whisk with a fork to combine.
3. Heat a 6-8 inch skillet over medium-high heat. Once the pan is HOT, add the butter, making sure it coats the bottom of the pan. Slowly pour in the egg mixture. Tilt the pan to spread the egg mixture evenly. Once the eggs firm up a little, use a spatula to gently direct the eggs away from the sides and into the middle. Tilt the pan to allow the remaining liquid to flow into the space left at the sides of the pan.
4. Continue to cook for another minute or so until the eggs begin to set. While the middle is still a little runny, add the filling (about 1/3 cup per omelette) near the center and sprinkle with cheese. Use a spatula to fold the sides of the omelette over the middle (or simply fold it in half like I did). Let it continue cooking until the cheese has melted, then slide the omelette off the pan and onto a plate. Garnish with fresh herbs and serve.
Picky eating is my top pet peeve. I get all shook up when people tell me they hate something. Or refuse to try it. It might be a little hypocritical since I used to be picky myself. It wasn’t all that long ago that I had a list of foods I thought I disliked. (My high school self refused barbecue sauce, beans, and generally all seafood- to name a few.) And then something changed (and I highly doubt it was my taste buds). A mental shift occurred when I started cooking and I suddenly wanted to try new things. I not only discovered that I liked most of the foods I was too stubborn to eat before, but also that a single bad experience with an ingredient didn’t mean it was repulsive. Over the last few years of more open-minded eating I have come to the conclusion that there isn’t a single food I don’t like when it’s prepared well.
So I should clarify that what really frustrates me is when people (adults in particular- kids don’t know much better and often learn their picky habits from others) won’t step outside of their culinary comfort zone. And with regularity. It makes eating- and life altogether- much more exciting. And like me, you might learn something about yourself. About how interesting and varied your tastes actually are. About how liberating it feels to not surround yourself with invented limitations. (Do I need to point out that this doesn’t only apply to food?) When you’re open to new experiences (expecting they won’t go well every time, and not shunning a food forever because of a bad encounter), eating becomes much more enjoyable. An adventure. And for everyone else’s sake, you’ll be a lot more pleasant to dine with.
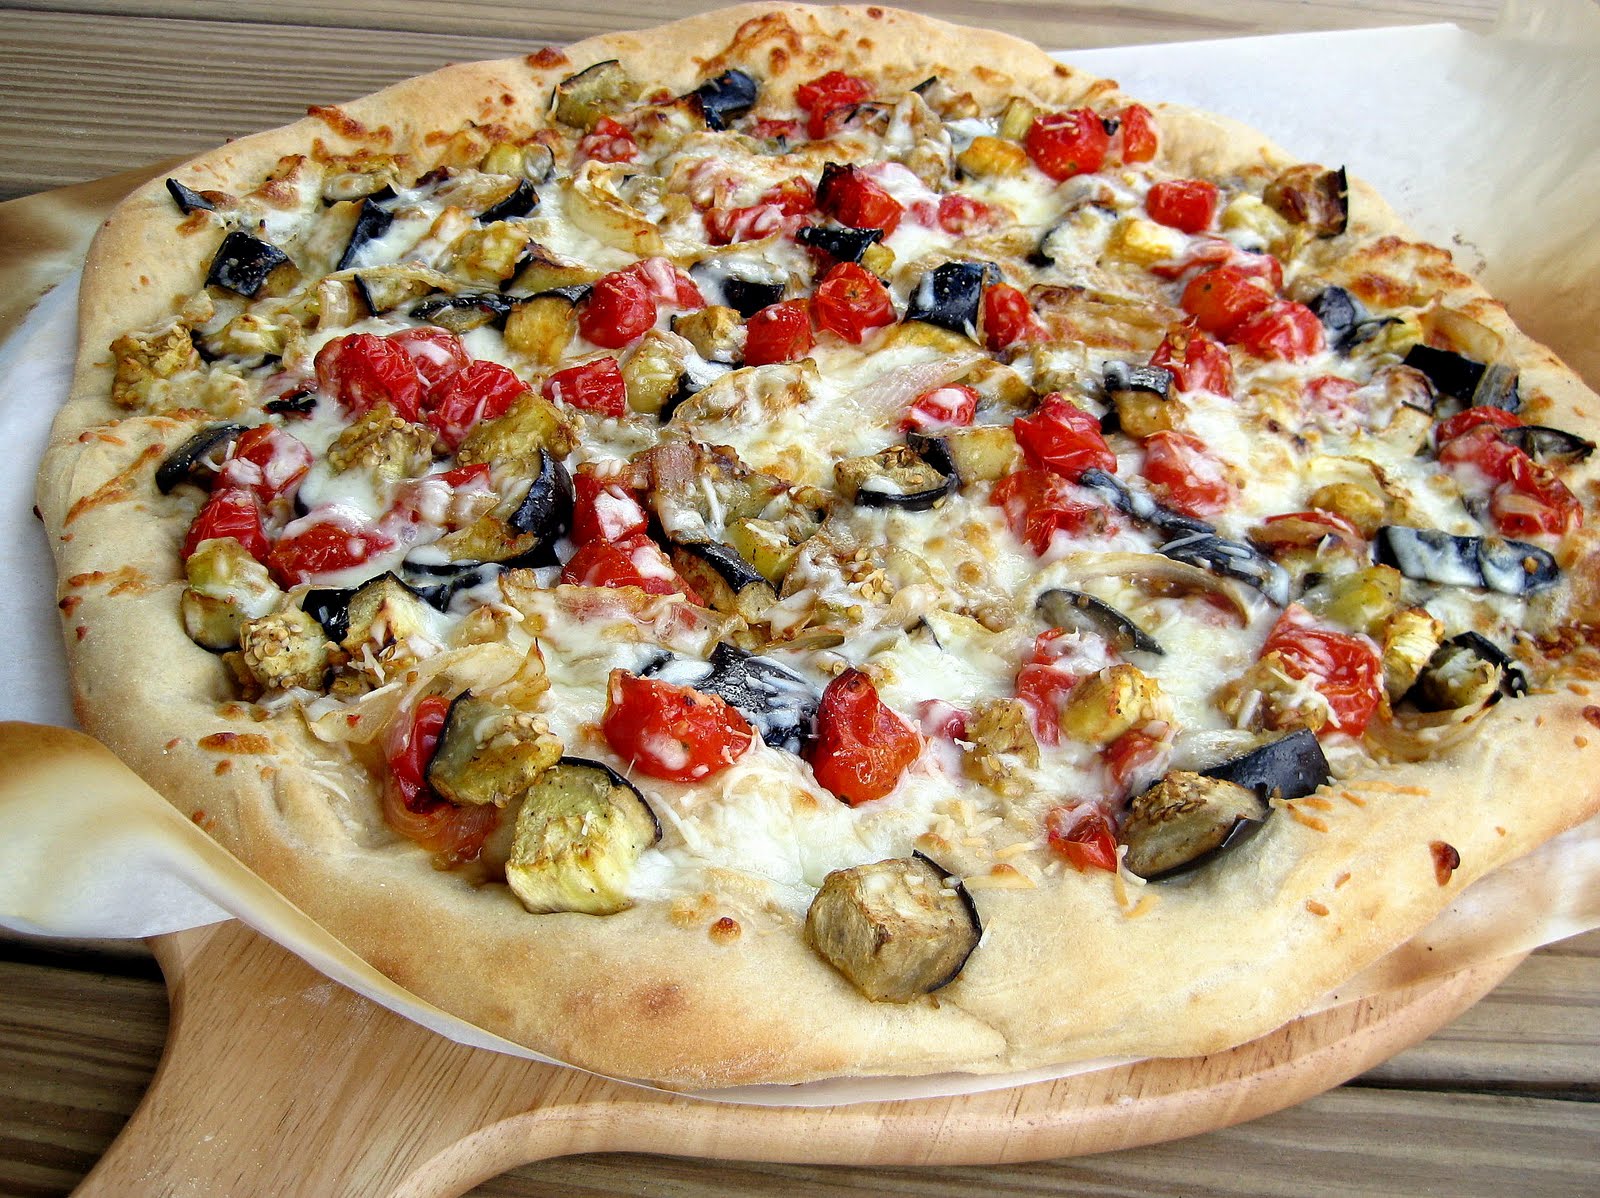
It’s no coincidence that I broached this topic on my eggplant pizza post. I’ve only recently overcome my faux-aversion to this rich purple fruit. Eggplant has a reputation for being somewhat bitter in its raw state. I like how Wikipedia describes the transformation it takes- how eggplant “becomes tender when cooked and develops a rich, complex flavor.” It really can be delicious. We recently had an incredible eggplant parmesan dish that convinced me of this. (Although, admittedly, probably anything would taste good fried and smothered in tomato sauce and cheese.) But nevertheless I was motivated to prepare eggplant at home. And more simply. Since I’ve had great success with this method in the past, I chose roasting. When I found Pioneer Woman’s version of this pizza (which she deems her favorite!), I didn’t look back.
I wasn’t surprised that I loved it. Perhaps a little amazed that I couldn’t stop sneaking roasted bits of eggplant off the baking sheet before they even made it onto the pizza crust. But what really blew my socks off is that our beach-house full of self-proclaimed “picky eaters” (including a large portion of my own family) liked it just as well. I was proud of them for giving it a go. And I could see the satisfaction they felt for trying, and genuinely liking, something new.
Roasted Eggplant Pizza
INGREDIENTS
1 large eggplant, chopped
1 pint grape tomatoes, halved
1 yellow or red onion, chopped
2 cloves garlic, minced
drizzle extra virgin olive oil
kosher salt and freshly ground black pepper
8 oz. fresh mozzarella, sliced or shredded
1/2 cup Parmigiano Reggiano, freshly grated
2. To roast the eggplant, preheat oven to 450 F. Line a large rimmed baking sheet with aluminum foil. Combine the eggplant, tomatoes, onion, and garlic on the baking sheet. Drizzle with olive oil, sprinkle with kosher salt and freshly ground black pepper and toss to coat. Spread in an even layer on the baking sheet. (Or onto two baking sheets. The vegetables caramelize better if they have room to breathe.) Roast in the preheated oven 20-25 minutes, turning occasionally, until tender and golden. Remove from the oven and set aside to cool.
3. Keep the oven at 450 F and preheat the pizza stone.
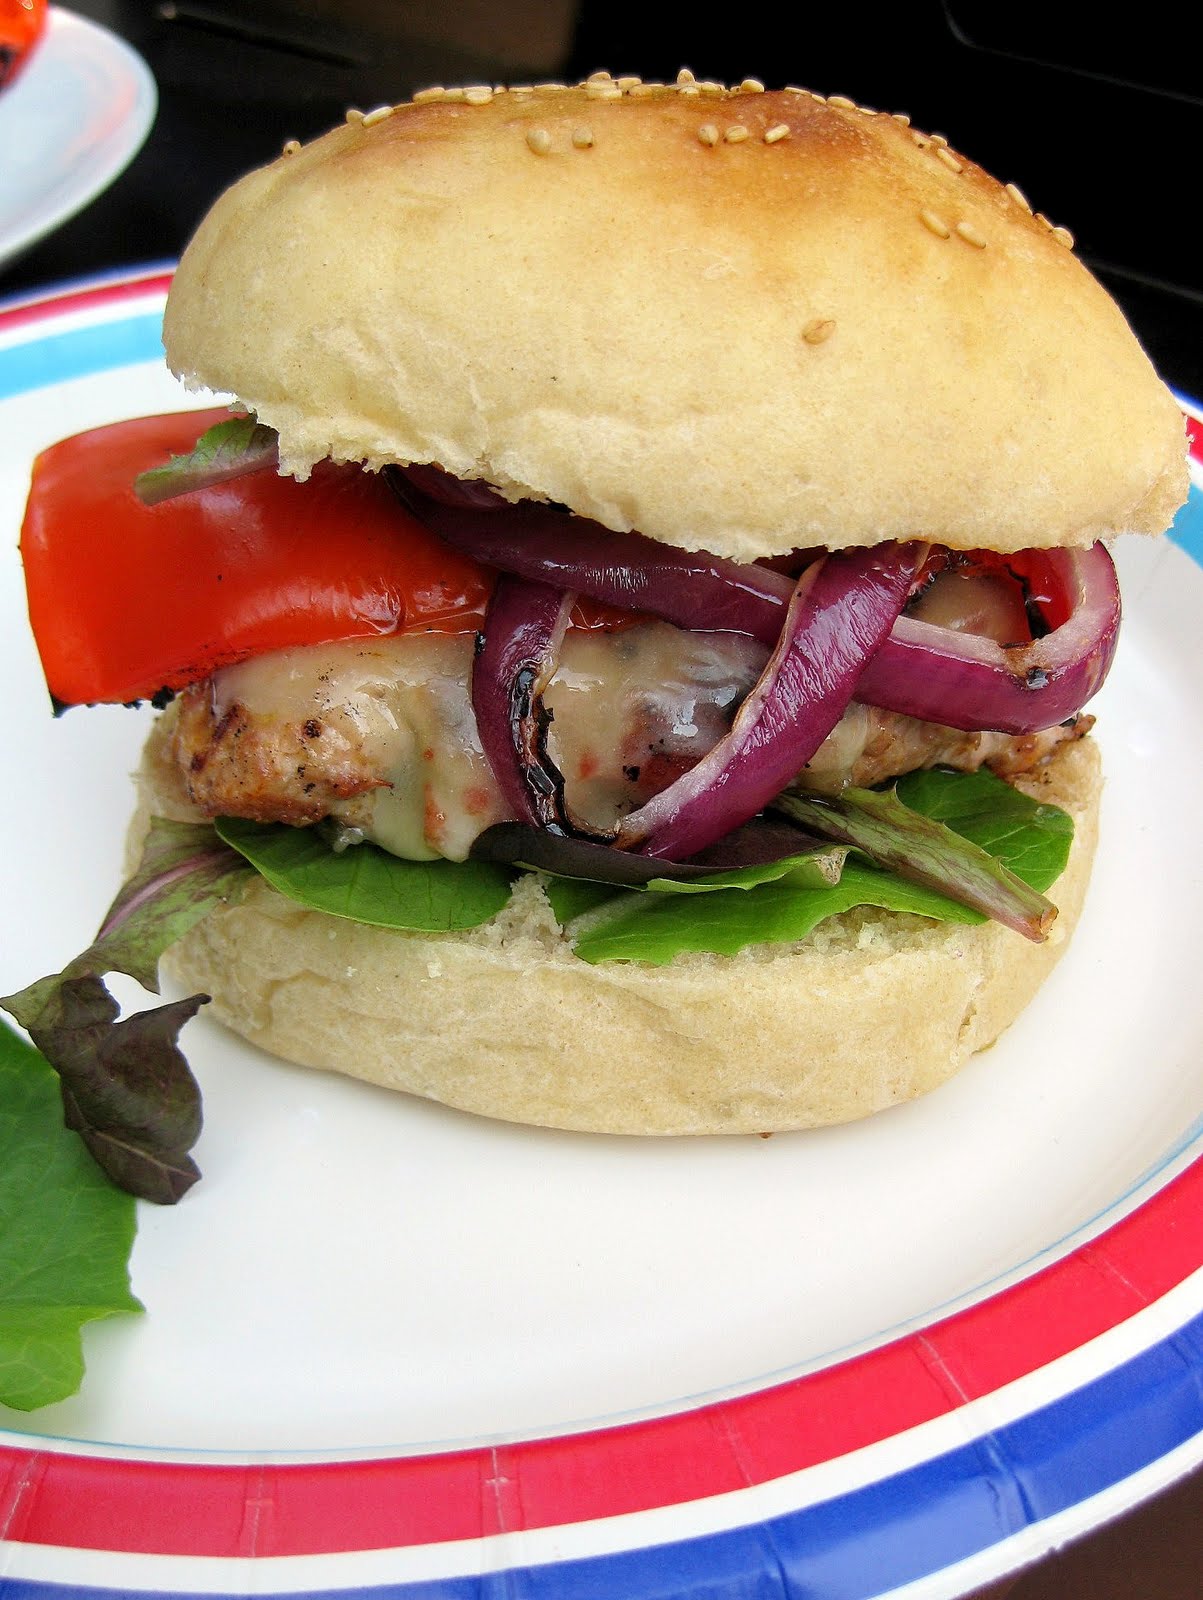
Yes, I’ve shared this one before. But it’s hands down one of my favorite burgers and I decided it deserved a better picture and a second debut. I’m not usually big on putting mayonnaise on anything. Call me a mustard girl. But when you take that mayo, add a little lemon and garlic (and in this case some fabulous spices) and call it aioli, it’s exponentially more appealing. For the juiciest turkey burger I recommend pure ground turkey thigh. And for buttery, soft, and fluffy hamburger rolls (that you’ll want to eat with everything– not just your burger) try this recipe.
8/29/10: This is no girly turkey burger. There’s nothing light or wimpy about it. (OK, it is made with ground turkey breast or thigh, which is much leaner than beef, but you’ll see what I mean.) Because it’s smothered in a blanket of sharp Cheddar cheese and then topped with a dollop of smokey aioli (a spiced mayonnaise-garlic blend). And then there’s tender charred red peppers and onions, peppery arugula, and a soft brioche bun. This is a killer dinner. Thank you Bon Appetit, for making my taste buds sing!
Grilled Turkey Burgers with Smoky Aioli
INGREDIENTS
Smoky Aioli:
1/4 tsp. ground cumin
1/4 tsp. ground corinader
3/4 tsp. smoked paprika
1/4 cup mayonnaise
1 tsp. freshly squeezed lemon juice
1/2 clove garlic, minced
salt and freshly ground black pepper, to taste
1 lb. ground turkey breast or thigh
salt and freshly ground black pepper
extra virgin olive oil
4 thick slices red onion
1 large red bell pepper, quartered
4 slices sharp white cheddar cheese (I used smoked cheddar)
4 whole wheat burger buns
arugula or spring mix
DIRECTIONS
1. To make the aioli, whisk to combine the spices, mayonnaise, lemon juice, and garlic in a small bowl. Season to taste with salt and freshly ground black pepper. Refrigerate until ready to use.
2. Preheat outdoor grill or indoor grill pan to medium-high heat.
3. In a medium bowl, combine the turkey and 2 Tbsp. of the aioli. Form into four evenly sized patties.Sprinkle with salt and pepper.
4. Brush onions and peppers with olive oil and sprinkle with salt and pepper. Grill until tender and slightly charred on each side.
5. Grill turkey burgers, topping with the cheese before they are done cooking to allow the cheese to melt. Place on a bun and top with peppers, onions, smokey aioli, and arugula.
We’re on the verge of a week-long getaway to the beach. Actually, let me clarify. We’ll be cramming with my family (and a few add-ons- friends, girlfriends) into a modest (a.k.a. somewhat small and outdated) beach house. But it’s right on the ocean. And there will be swimming and sunbathing and all sorts of fun involved. My family makes this trip to the Carolina coast every summer. And this is the first time we’re lucky enough to be able to join them! We’ve been looking forward to this for months.
We’ll also be celebrating our 5th anniversary while we’re away. And we have a special little escape planned for just the two of us- involving a charming southern town, dinner out, and a picturesque bed and breakfast. (We decided a crowded beach house wasn’t exactly romantic.) I can’t wait!
There won’t be a whole lot of cooking happening this week. We’ll be relishing the local seafood. And trying to stay out of each others way in the kitchen. But for sure there will be fish tacos and always pizza. (Pizza is my most-requested dish. I’ve become expert at whipping out double, triple, quadruple, etc. etc. batches of pizza dough. I can make enough pizza to feed a small country.)
Before I go I wanted to share this little recipe. For a luscious and dreamy peach ice cream. Now is the time to pick up a basket full of peaches and make yourself this frozen treat. It’s tangy and sweet and smooth (although it could be chunky if you preferred). Not that you would want to wait, but definitely enjoy this ice cream soon after it has been churned. Because of the fruit, it gets frosty and loses some of its creaminess after being frozen for too long.
Peach Ice Cream
INGREDIENTS
1 1/3 lbs. ripe peaches, peeled, pitted, and chopped
1/2 cup water
3/4 cup sugar
1/2 cup sour cream
1 cup heavy cream
1/4 tsp. pure vanilla extract
few drops freshly squeezed lemon juice
DIRECTIONS
1. Combine the peaches and water in a medium saucepan. Cook over medium heat, covered and stirring occasionally, until the peaches are soft and cooked through, about 10 minutes. Remove the pan from the heat, stir in the sugar, and set aside to cool.
2. Add the cooled peaches to a blender or food processor and puree until chunky or smooth. In a medium bowl, whisk to combine the sour cream, heavy cream, vanilla, and lemon juice. Stir in the peaches. Chill the mixture thoroughly in the refrigerator. Once chilled, transfer the mixture to an ice cream maker and freeze according to manufacturer’s instructions.
Note: This ice cream is best enjoyed immediately or soon after churning, as it gets frosty after being in the freezer for very long.


/ 1 COMMENT / Share