Category Archives: Cake

Cranberry Almond Christmas Cake

December 29, 2020

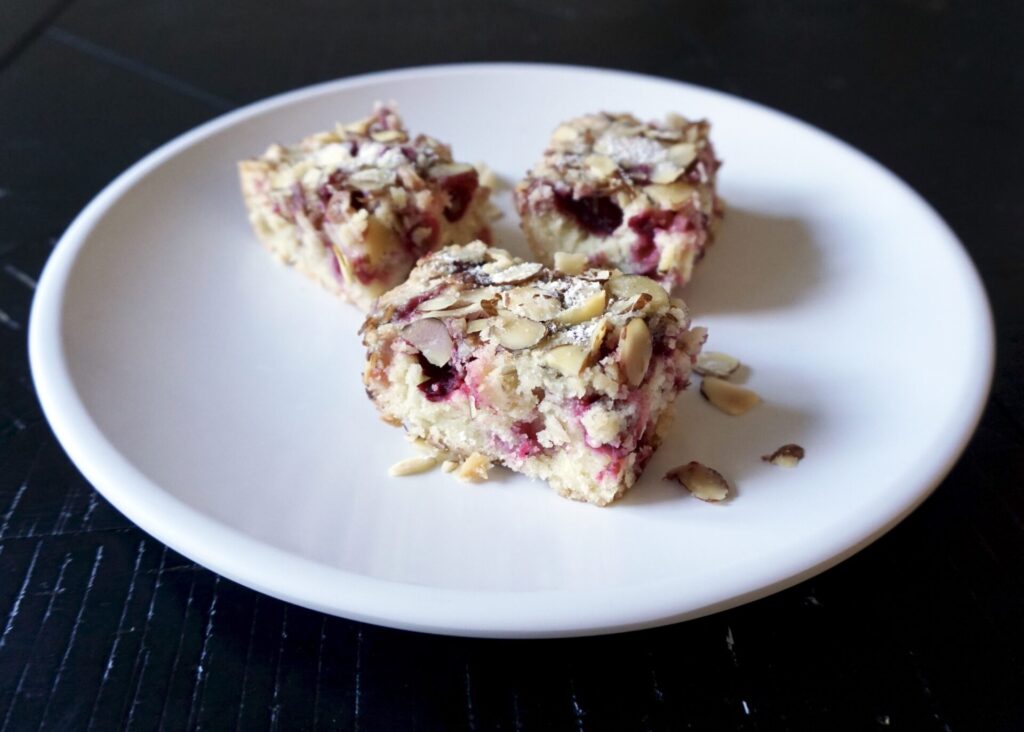
I discovered this recipe last Christmas (we actually served it after cheese fondue for our kid-friendly New Year’s Eve party… I miss parties!) and have been patiently waiting all year to make it again. Just because it’s called Christmas cake doesn’t mean you have to make it during the holidays, but it’s perfectly festive bursting with red cranberries and dusted with a flurry of powdered sugar.

I love this cake for many reasons: First, it’s not too sweet. It’s full of sugar, but the tart berries cut the sweetness. Second, the almonds. The batter is flavored with vanilla as well as almond extract (one of the best scents on earth!) and the top is covered with crunchy toasted almonds. So much flavor! Last, (sorry, this is like 3 things…) it’s tender and moist and totally addictive.

Best of all, this cake is really simple to make. Though I was having an off day this weekend when I baked it (I blame the sinus infection/headaches I’ve been battling) and accidentally started creaming the butter and sugar together. (Which is typical for cookies but won’t work here because you need to beat the eggs first because they provide the leavening.) So I started over but misread the recipe again and started creaming the butter and eggs. After several minutes of trying to figure out why they wouldn’t combine, I realized my mistake and had to start over yet again. Third time was the charm. Don’t be silly like me and please start by creaming your sugar and eggs and all will go well…!

Cranberry Almond Christmas Cake

INGREDIENTS

2 cups sugar
3 large eggs, room temperature
3/4 cup butter, room temperature (salted or unsalted- I used unsalted butter and added 1/4 tsp. sea salt, but salt is optional)
1 tsp. pure almond extract
2 tsp. pure vanilla extract
2 cups all-purpose flour
1 (12-oz.) bag fresh cranberries (or frozen and thawed cranberries, also works with a 10-oz. bag cranberries and will be slightly sweeter)
1 cup sliced almonds
powdered sugar, for dusting (optional)

DIRECTIONS

  1. Preheat oven to 350 F. Butter a 9×13 baking pan (or coat with nonstick cooking spray). Set aside.
  2. In a large mixing bowl, beat sugar and eggs for 5 minutes with an electric mixer on medium. The volume of the mixture will increase by almost half and will be thickened. Do not skip this step. The eggs will work as the leavening the cake needs to rise.
  3. Add butter and extracts (and salt, if using) and beat for 2 more minutes. Slowly add flour and beat until combined. Fold in cranberries.
  4. Using a spatula, pour and smooth into prepared pan. Sprinkle almonds over top.
    Bake for ~45 minutes until a toothpick inserted into the center comes out clean. Let cool completely and dust with powdered sugar (optional) before cutting.

Makes a 9×13 cake.

(Adapted from The Slow Roasted Italian)

Blueberries and Cream Angel Food Cake Trifle

August 28, 2020

This light yet decadent trifle is the perfect summer dessert… It starts with a base of fluffy angel food cake (store-bought or use this amazingly easy recipe to make your own) which is layered with a cream cheese filling, blueberry sauce, and topped with sweetened whipped cream. I’ve got a freezer full of blueberries we picked this summer and so I used those, but I’ve also purchased the tiny wild frozen blueberries (easy to find at Trader Joes’s or Whole Foods) and especially love it made with those. The trifle dish is pretty, but not necessary. Any large bowl or casserole pan will work as well. Bonus if it’s clear so you can see those beautiful layers of cake, cream, and berries!

Blueberries and Cream Angel Food Cake Trifle

INGREDIENTS

Blueberry Filling:
18 oz. fresh or frozen blueberries (I’ve used both regular and wild blueberries)
3 Tbsp. sugar
2 Tbsp. cornstarch
1/3 cup. cold water
1 Tbsp. freshly squeezed lemon juice

Cream:
16 oz. cream cheese, softened to room temperature
2/3 cup half-and-half
2/3 cup sugar

Whipped Cream:
1 1/2 cups heavy cream
3 Tbsp. powdered sugar

1 angel food cake, cut into 1-inch cubes (store-bought or homemade)

DIRECTIONS

  1. For the blueberry filling, in a medium saucepan, combine the blueberries, sugar, cornstarch, water and lemon juice. Bring the mixture to a simmer and cook until thickened, 5-7 minutes, stirring often. Remove from the heat and let cool to room temperature.
  2. For the cream layer, in a blender or with an electric mixer (handheld or stand mixer), whip together the cream cheese, half-and-half, and sugar until smooth and creamy, 2-3 minutes.
  3. For the whipped cream, beat together the heavy cream and powdered sugar until soft peaks form.
  4. To assemble, in a trifle dish, a large glass bowl or a 9X13-inch (or slightly smaller) dish, spread half of the angel food cake cubes. Top with half of the cream, half of the blueberries, dolloping across the top, and then spread half of the whipped cream on top. Repeat the layers. The layers don’t have to be perfect. It’s going to be a little haphazard and messy.
  5. Cover and refrigerate at least 2 hours or up to 24 hours.

(Adapted from Mel’s Kitchen Cafe)

Easy 5 Layer Ice Cream Cake

July 31, 2020

I’ve probably mentioned before that Dustin (my husband) has slightly kiddish taste when it comes to dessert. He’ll try any treat I make (unless he spies a raisin), and sometimes often thinks it’s delicious. But he’ll still complain (or at least hint at the fact) that he’d rather it was a chocolate chip cookie or brownie. Frosting better be buttercream. And when it comes to cake, ice cream cake is the superior choice in his opinion.

I make a lot of fruit desserts- especially in the summer- because that’s what I love most. But when Dustin’s birthday rolled around earlier this month I had to make something to please just him, and this ice cream cake was perfect! And it’s super easy. No fancy molding of ice cream into cake layers required. It consists of a crushed oreo + butter bottom crust, two layers of ice cream (flavors your choice!), a thick spread of fudge (I went the homemade route with this recipe… yum!), and a whipped cream + sprinkle topping. It does require dirtying quite a few bowls and some time in the freezer between each step but once the cake is assembled it can be stashed away and ready to serve when it’s party time! My husband and kids were super impressed and I have a feeling they’ll be requesting this one for many birthdays to come!

Easy 5 Layer Ice Cream Cake

INGREDIENTS

36 Oreos (1 standard package)
1/2 cup unsalted butter, melted
1 quart* chocolate ice cream, softened (I used chocolate ice cream on half and vanilla ice cream on the other half)
1 quart* your choice flavor ice cream, softened (I used cookie dough ice cream)
1 1/2 cups hot fudge (store-bought or homemade)

Whipped Cream:
1 cup heavy cream
2 Tbsp. powdered sugar
1/2 tsp. pure vanilla extract
sprinkles

DIRECTIONS

  1. Make the crust: In a food processor or blender, pulse the whole Oreos into a fine crumb. Stir the cookie crumbs and melted butter together, then press into a 9×13 pan. (No need to grease the pan prior.) Make sure it is very tightly packed– I use the back of a spatula to firmly press it in. Freeze for 15 minutes.
  2. During that time, place the softened chocolate (and/or vanilla) ice cream in a bowl and give it a good stir to rid any frozen lumps. You want a nice smooth, soft ice cream. Spread it on top of the frozen crust. Freeze for 15-30 minutes. (Closer to 30 minutes is ideal.)
  3. During that time, place the 2nd ice cream flavor into a bowl and stir it until it is smooth and very soft. Carefully spread on top of the chocolate ice cream. Freeze for 15-30 minutes. (Closer to 30 minutes is ideal.)
  4. Make sure the hot fudge is spreadable consistency. You may have to slightly heat it. Spread it on top of the ice cream as best you can. Because it is not as cold as the ice cream layer, the two will slightly mesh together as you spread. That’s ok. Freeze for 15-30 minutes. (Closer to 30 minutes is ideal.)
  5. Make the whipped cream: Using a hand mixer or a stand mixer fitted with a whisk attachment, beat the heavy cream, confectioners’ sugar, and vanilla on medium-high speed until stiff peaks form, about 4-5 minutes. Spread on top of hot fudge layer, then top with sprinkles. Cover with aluminum foil and freeze for at least 12 hours before serving (and up to a few days!).
  6. Use a very sharp knife to cut, making sure you are cutting into the crust. Keep leftovers in the freezer.

*Ice Cream: 1 quart of ice cream is 2/3 of a standard 1.5 quart container. So you’ll use a little more than half of the container for each ice cream layer.

Makes a 9×13 ice cream cake.

Adapted from Sally’s Baking Addiction

Mini Cheesecakes

June 12, 2020

A couple years ago my friend Anna (who is an incredibly talented at cakes!) started a baking club for her girls and some friends. They would play and learn to bake something new and always come home with a yummy treat. It became the highlight of Clara’s month! When Anna moved away I promised my girls we could start a baking club of our own and so we did- twice now in our two different homes. It’s always a huge mess but so much fun and I love seeing how excited they get about creating something delicious!

We made these mini cheesecakes for baking club earlier this year (before we all went into isolation). They were simple enough to bake with 5 kids and because they’re so tiny, they’re quick to set up. And they were a huge hit! I didn’t photograph them then, so we made them again last weekend and we still think they’re the best. I stretched the recipe to make 12, but if you want them a little larger just fill 9 muffin cups. We sprinkled some with mini chocolate chips before they went into the oven and the rest we left plain and served with homemade whipped cream and fresh berries.

Mini Cheesecakes

INGREDIENTS

Graham Cracker Crust:
2/3 cup graham cracker crumbs (about 4-5 full sheet graham crackers)
2 Tbsp. unsalted butter, melted
1 Tbsp. sugar

Cheesecake:
one 8-ounce block full-fat cream cheese, softened to room temperature
1/4 cup sugar
1/4 cup full-fat sour cream, at room temperature
1/2 tsp. pure vanilla extract
1 tsp. fresh lemon juice (optional, but recommended)
1 large egg, at room temperature

topping suggestions: mini chocolate chips, salted caramel, lemon curd, strawberry topping, chocolate ganache, fresh fruit or maraschino cherries, homemade whipped cream, or raspberry sauce

DIRECTIONS

  1. Preheat oven to 350 F. Line a 12-count muffin pan with 9-12 liners. This recipe yields only 9-12 mini cheesecakes, (depending how full you fill them). You could skip the liners and spray the pan with non-stick spray or grease with butter, but the mini cheesecakes are pretty stubborn to release from the pan. I recommend using liners to make things easier.
  2. Make the crust: Combine all of the crust ingredients in a medium bowl. Mixture will be sandy. Firmly press a heaping Tablespoon of crust mixture into each liner. (I use closer to 1 and 1/2 Tablespoons of crust per mini cheesecake.) Pre-bake for 5 minutes.
  3. Make the filling: Using a handheld or stand mixer fitted with a paddle or whisk attachment, beat the cream cheese and granulated sugar together on medium-high speed in a large bowl until the mixture is smooth and creamy, about 1 minute. Add the sour cream, vanilla extract, and lemon juice then beat until fully combined. On medium speed, add the egg and beat just until combined. Batter will be thick. Divide the batter between all the liners. (If you want to add mini chocolate chips, sprinkle some on top before you bake the cheesecakes.)
  4. Bake until the edges are set and the centers only slightly jiggle, about 18-20 minutes.
  5. Set the pan on a wire rack and allow cheesecakes to cool at room temperature for 30 minutes, then transfer to the refrigerator and chill for at least 2 hours and up to 1 day. If chilling for longer than 2 hours, loosely cover the cheesecakes. The cheesecakes will slightly sink in the middle as they chill. It gives you room for toppings!
  6. Once chilled, add toppings and serve. Cover and store leftover cheesecakes in the refrigerator for up to 5 days.

Makes 9-12 mini cheesecakes.

(Adapted from Sally’s Baking Addiction)

Oreo Layer Cake

May 22, 2020

oreo cake

On May 1st Clara turned 8! This year was definitely different having a birthday alone at home but we made the most of it. I might have driven an hour to pickup her favorite Mediterranean take-out near our old house… we’re crazy about food like that! She received lots of gifts and love from family afar and a surprise drive-by visit from friends. And she requested an Oreo Cake so that’s what we made!

oreo layer cake

I’ve never been much of an Oreo fan so I was skeptical that I would like any Oreo cake I baked her. But WOW was I wrong. This cake was amazing and slightly converted me to Oreos (at least in cake/buttercream form)! The original recipe comes from Preppy Kitchen and I didn’t deviate much from it. His site has lots of pictures of the cake baking and even a video on the decorating process. Definitely check it out if you have questions or need more tips.

My cake didn’t turn out as picture perfect but I learned a few things along the way: Don’t crushed your Oreos too fine for the frosting (or cake batter) or they’ll turn it basically black. Not the prettiest color but it tasted amazing nonetheless. Also, pouring perfect chocolate ganache is harder than it looks. This was my first attempt EVER and in hindsight I should have let it cool a bit longer first. I didn’t use any ganache between the layers as I was worried about sliding and the ganache just on top was plenty rich. (I especially enjoyed licking it right out of the pot. So good.) And I skipped the white buttercream dollops on top. You could use this reserved buttercream to decorate in any way you wish. I went with white sprinkles because I was trying to please kids and didn’t feel like bothering with frosting tips.

Oreo Layer Cake

INGREDIENTS

Oreo Cake:
2 cups all-purpose flour
1 cup granulated sugar
1/4 tsp. baking soda
1 tsp. baking powder
1/4 tsp. kosher salt
3/4 cup unsalted butter, room temperature
3 egg whites
1 tsp. vanilla extract
1/2 cup sour cream, room temperature
1/2 cup whole milk, room temperature
1 cup chopped Oreos

Oreo Buttercream:
1 1/2 cups butter, room temperature
5 cups confectioners’ sugar
1 1/3 cups crushed Oreos (don’t crush them too finely or your frosting will turn out super dark like mine)
1/4 cup heavy cream
pinch salt kosher

Chocolate Ganache:
1 cup semisweet chocolate chips
1/2 cup heavy cream, heated

DIRECTIONS

For the Cake:

  1. Butter and flour three six inch pans. I use cake strips on my pans for more even baking as well. (I did it without cake strips and it turned out fine.) Preheat oven to 340F.
  2. In a standing mixture fitted with a paddle attachment, beat butter until light and fluffy.
  3. Sift the dry ingredients together in a large bowl.
  4. Beat the dry ingredients into the butter until well incorporated, scrape the bowl at least once.
  5. Beat the wet ingredients together in a medium bowl.
  6. Add the wet to the butter mixture and mix until just combined. Fold in the crushed Oreos at the very end and mix until just combined.
  7. Divide the mixture evenly into the cake pans
  8. Bake at 340 for about 25-30 minutes or until the centers are springy to the touch.

For the buttercream:

  1. Beat the butter until light and fluffy. Add the confectioners’ sugar and cream and mix.
  2. Reserve about a cup of the buttercream for the white dollops. Which will be piped with an 869 tip. (I didn’t end up doing white dollops, and just used white sprinkles on top.)
  3. Mix in the crushed Oreos into the large batch of buttercream.

For the ganache:

  1. Melt chocolate and cream together on low heat. Whisk together and set aside. You might need to add more or less cream to achieve the desired consistency. (Then set aside to cool to the ride consistency for pouring.)

To assemble the cake:

  1. Oreo buttercream goes between each layer as well as a swirl of chocolate. Don’t go overboard with the ganache as it will overpower the other flavors. (I didn’t add the chocolate ganache between the layers)
  2. Coat outside with buttercream and smooth.
  3. Add a skirt of crushed Oreos at the bottom of the cake. (We decorated with whole Oreos instead.)
  4. Pour the ganache on top and allow to drip. Smooth top with an offset spatula.
  5. Pipe white buttercream dollops on top with an 869 tip. (Once again, we didn’t do this and added white sprinkles instead.)

Adapted from Preppy Kitchen