Category Archives: Chocolate

Hello Robin Mackles’more Cookies

October 30, 2020

I promise I’ll share some healthier recipes next week… no one wants to think about grilled chicken and fish or salad when they’re about to stuff their face full of Halloween treats! So I’m posting these cookies we made for the first time last weekend… they were just amazing and have to be shared right away.

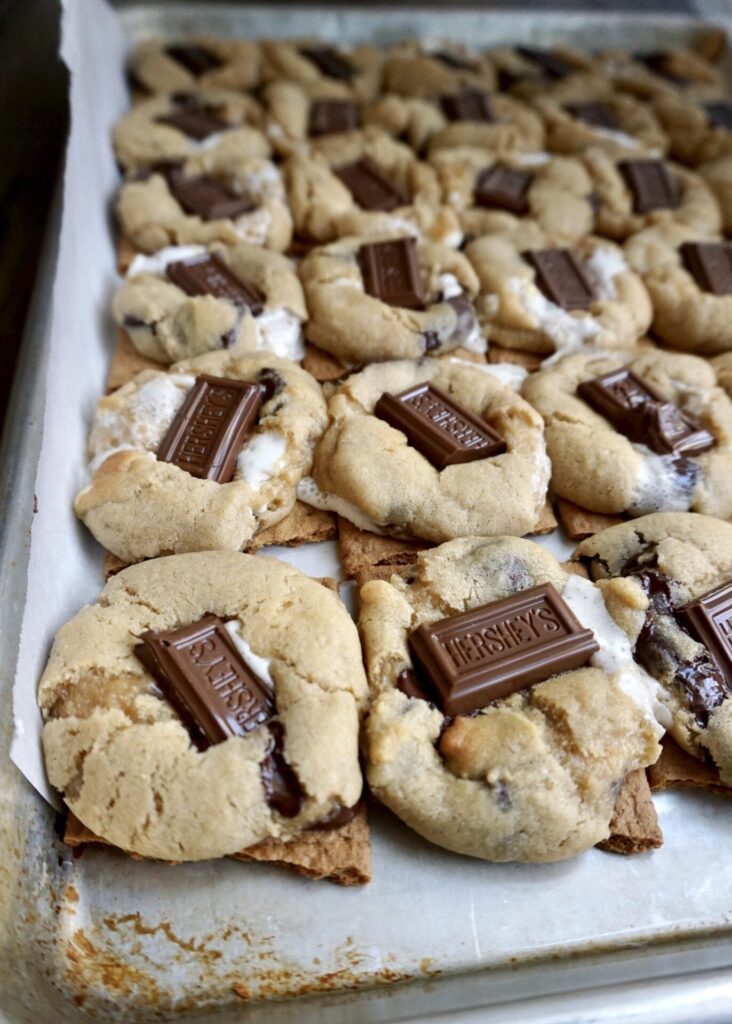
There’s a famous cookie shop in downtown Seattle called Hello Robin. We’ve been there and loved the cookies sandwiched with Molly Moon’s ice cream (my favorite local ice cream shop!) but we didn’t try their famous Mackles’more cookie (next time!). But now we have the recipe and will be making them at home forevermore. The Mackles’more is a dark chocolate chip cookie with marshmallows (and cinnamon- yum) baked on top of a graham cracker and topped with a milk chocolate square when it’s hot out of the oven. It sounds complicated but it’s not at all. You do need to freeze the dough for 1 hour before baking which requires some patience but it’s worth the wait!

I didn’t buy Theo chocolate because it’s expensive and I already had Ghirardelli and Hershey’s on hand. But Theo chocolate is amazing (and the factory tour is super fun if you’re ever visiting Seattle…) so I bet it would be even better with it!

Hello Robin’s Mackles’more Cookies

INGREDIENTS

2 3/4 cups all-purpose flour
1 tsp. ground cinnamon
1 tsp. kosher salt
1 tsp. baking soda
3/4 cup unsalted butter, softened
1 cup packed light brown sugar
1/2 cup granulated sugar
2 large eggs
1 tsp. pure vanilla extract
4 oz. dark chocolate (70%), cut into chunks, or 3/4 cup of dark chocolate chips (I used Ghirardelli 60% bittersweet chocolate chips)
1 cup packed mini marshmallows
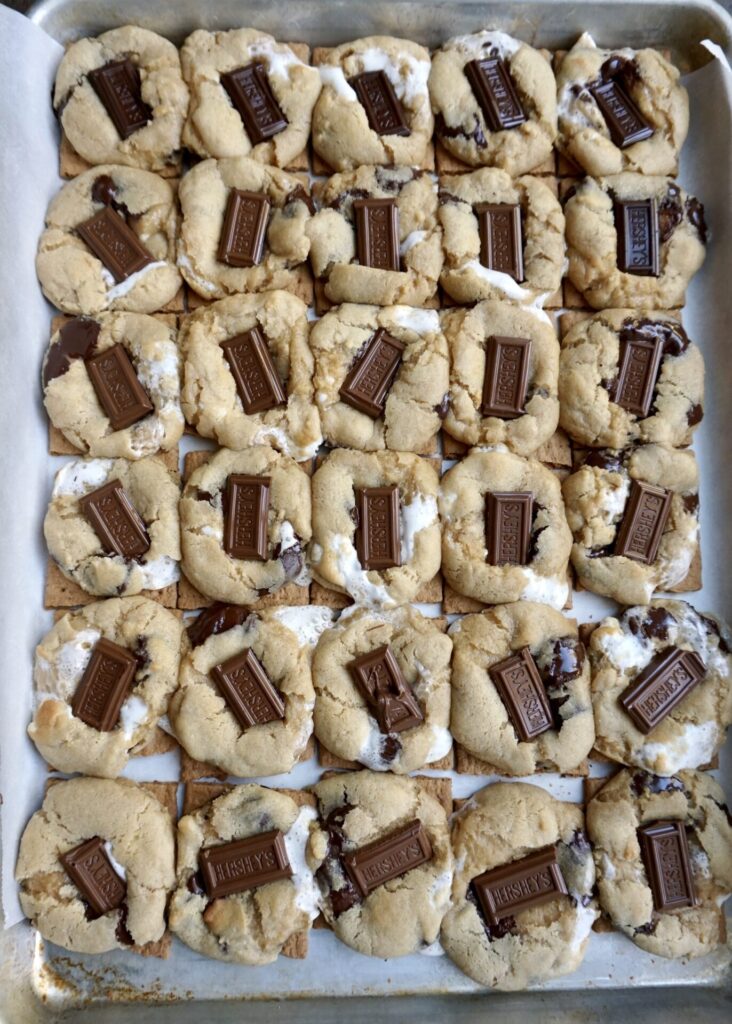
36 square-sized store-bought graham crackers (Honey Maid brand recommended, I could only fit 30 on the baking sheet so that’s how many I used)
7 1/2 oz. milk chocolate squares, halved (I used Hershey’s milk chocolate and special dark chocolate bars)

DIRECTIONS

  1. Line two baking sheets with parchment paper.
  2. Whisk together the flour, cinnamon, salt and baking soda in a medium bowl; set aside. Cream the (softened) butter, brown sugar and granulated sugar in a stand mixer on medium-high speed until pale and fluffy, about 3 minutes. Add the eggs, one at a time, mixing on medium speed for 15 seconds after each addition. Add the vanilla and mix until smooth. Add the dry ingredients and mix until combined. Fold in the dark chocolate and the marshmallows.
  3. Using a medium cookie scoop (about 1 1/2 tablespoons), scoop the dough into (30-36, depending on how many graham crackers you’re using) balls and place them close together on one of the prepared baking sheets. Freeze for at least 1 hour.
  4. Preheat the oven to 400 degrees F.
  5. Place the graham cracker halves side by side on the second prepared baking sheet. Place 1 ball of the frozen cookie dough on each graham cracker. Bake until the cookies are puffed and just turning golden, 10 to 12 minutes. Remove the baking sheet from the oven and immediately press 1 piece of milk chocolate onto each hot cookie–be sure to really press the chocolate into the soft cookie so that when it melts, it puddles on the cookie and doesn’t run off.

Makes 30-36 cookies.

(Adapted from Female Foodie)

Brown Butter Chocolate Chip Cookies

October 5, 2020

Brown butter does something amazing for chocolate chip cookies. It adds a nutty richness that can’t be replicated with any other ingredient. It’s rare that I think a store-bought or even bakery cookie is as good as homemade, but I tried one of Whole Food’s brown butter chocolate chip cookies last year and was instantly hooked! They use a combo of bitter and semi-sweet chocolate so they’re not overly sweet and they’re crisp on the edge, chewy in the middle and everything a cookie should be. And ever since I’ve been trying to recreate them at home.

I read a lot of similar recipes before landing on one to try. My first attempt tasted pretty good but was flat and stuck to the pan and I learned two things: 1) the butter and dough need time to chill in the fridge before creaming/baking to prevent spreading, and 2) parchment paper is a good idea. The second time around I tweaked a couple ingredients (not too much vanilla extract so the brown butter flavor can shine through, a decent amount of salt to balance the sweet- you can even sprinkle some flake salt on top after baking!, and a bit more flour to get the perfect texture) and this time they were just right!

Don’t be intimidated by browning the butter. It takes a few minutes but it smells amazing and and totally transforms the flavor. The rest of the recipe is very straightforward. I like to use both semi-sweet and chopped dark chocolate but you can use what you have/prefer. I hope you love these as much as we do!

INGREDIENTS

2 sticks (1 cup) butter
1 cup light or dark brown sugar
1/2 cup sugar
2 eggs
1 tsp. pure vanilla extract
2 1/2 cups all-purpose flour
1 tsp. baking soda
1 tsp. sea salt
2 cups chocolate chips (I like a combo of semi-sweet and dark chocolate in these cookies, so I used about 1/2 cup chopped 60% bittersweet Ghirardelli chocolate and 1 1/2 cups Ghirardelli semisweet chocolate chips)

DIRECTIONS

  1. Place butter in large pot or deep skillet. Melt butter over medium-low heat. The butter will go through different phases. It will begin to melt and bubble. Take a wooden spoon or spatula and stir often and around the sides of the pan. Let the butter melt and watch for it to begin changing colors from a creamy yellow to a deep amber yellow. The butter will begin to foam and this is why it is important to stir often so you can see what is going on below the foam. Small brown bits will begin to form and that will be a signal that the butter is officially browned. Butter can burn quickly so watch carefully. It is better to pull off of the heat a little early instead of browning too long and risk burning it.
  2. Since you want the butter to chill quickly, pour it into the mixing bowl you’ll be using and place in the refrigerator. Use a spatula to get every bit of butter out of the pan. Let it chill in the refrigerator for about 1 hour.
  3. Remove the mixing bowl with chilled butter butter from the refrigerator. Add brown sugar and sugar and cream for 2-3 minutes, scraping the sides of the bowl often.
  4. Add eggs, one at a time, beating for 30 seconds after each addition. Stir in vanilla.
  5. Add flour, baking soda, and salt. Stir just until combined, avoid over-mixing. Stir in chocolate chips.
  6. Cover and let dough chill in the refrigerator for 2+ hours (or up to 2 days).
  7. Preheat oven to 375 F. Place parchment paper liners or Silpat liners on baking sheets. Roll balls of cookie dough and place on cookie sheet. Bake for 8-10 minutes or until edges starts to become a light golden color. Remove from the oven and cool on a wire rack.

Makes 2-3 dozen cookies, depending on size.

(Adapted from Modern Honey)

Mini Cheesecakes

June 12, 2020

A couple years ago my friend Anna (who is an incredibly talented at cakes!) started a baking club for her girls and some friends. They would play and learn to bake something new and always come home with a yummy treat. It became the highlight of Clara’s month! When Anna moved away I promised my girls we could start a baking club of our own and so we did- twice now in our two different homes. It’s always a huge mess but so much fun and I love seeing how excited they get about creating something delicious!

We made these mini cheesecakes for baking club earlier this year (before we all went into isolation). They were simple enough to bake with 5 kids and because they’re so tiny, they’re quick to set up. And they were a huge hit! I didn’t photograph them then, so we made them again last weekend and we still think they’re the best. I stretched the recipe to make 12, but if you want them a little larger just fill 9 muffin cups. We sprinkled some with mini chocolate chips before they went into the oven and the rest we left plain and served with homemade whipped cream and fresh berries.

Mini Cheesecakes

INGREDIENTS

Graham Cracker Crust:
2/3 cup graham cracker crumbs (about 4-5 full sheet graham crackers)
2 Tbsp. unsalted butter, melted
1 Tbsp. sugar

Cheesecake:
one 8-ounce block full-fat cream cheese, softened to room temperature
1/4 cup sugar
1/4 cup full-fat sour cream, at room temperature
1/2 tsp. pure vanilla extract
1 tsp. fresh lemon juice (optional, but recommended)
1 large egg, at room temperature

topping suggestions: mini chocolate chips, salted caramel, lemon curd, strawberry topping, chocolate ganache, fresh fruit or maraschino cherries, homemade whipped cream, or raspberry sauce

DIRECTIONS

  1. Preheat oven to 350 F. Line a 12-count muffin pan with 9-12 liners. This recipe yields only 9-12 mini cheesecakes, (depending how full you fill them). You could skip the liners and spray the pan with non-stick spray or grease with butter, but the mini cheesecakes are pretty stubborn to release from the pan. I recommend using liners to make things easier.
  2. Make the crust: Combine all of the crust ingredients in a medium bowl. Mixture will be sandy. Firmly press a heaping Tablespoon of crust mixture into each liner. (I use closer to 1 and 1/2 Tablespoons of crust per mini cheesecake.) Pre-bake for 5 minutes.
  3. Make the filling: Using a handheld or stand mixer fitted with a paddle or whisk attachment, beat the cream cheese and granulated sugar together on medium-high speed in a large bowl until the mixture is smooth and creamy, about 1 minute. Add the sour cream, vanilla extract, and lemon juice then beat until fully combined. On medium speed, add the egg and beat just until combined. Batter will be thick. Divide the batter between all the liners. (If you want to add mini chocolate chips, sprinkle some on top before you bake the cheesecakes.)
  4. Bake until the edges are set and the centers only slightly jiggle, about 18-20 minutes.
  5. Set the pan on a wire rack and allow cheesecakes to cool at room temperature for 30 minutes, then transfer to the refrigerator and chill for at least 2 hours and up to 1 day. If chilling for longer than 2 hours, loosely cover the cheesecakes. The cheesecakes will slightly sink in the middle as they chill. It gives you room for toppings!
  6. Once chilled, add toppings and serve. Cover and store leftover cheesecakes in the refrigerator for up to 5 days.

Makes 9-12 mini cheesecakes.

(Adapted from Sally’s Baking Addiction)

Healthy Chocolate Zucchini Chocolate Chip Muffins

April 9, 2015

IMG_7441-001

A healthy double chocolate muffin today! I know it sounds unlikely, but these muffins are still light on sugar/fat/calories. They’re made with whole wheat flour (I added flax as usual), cocoa powder, and sweetened with honey and a few mini chocolate chips. The zucchini keeps them extra moist, as does a bit of coconut oil and applesauce. I’ve made half a dozen muffins now from Ambitious Kitchen and loved them all! Check out her site for lots more good-for-you treats.

p.s. High altitude adjustments included below.*

Healthy Chocolate Zucchini Chocolate Chip Muffins

INGREDIENTS

1 1/4 cups white whole wheat flour (I replaced 2 Tbsp. flour with ground flaxseed)
1/3 cup unsweetened cocoa powder
1 tsp. baking soda
1/4 tsp. salt
1 egg
1 cup shredded zucchini (about 1 medium zucchini)
1/4- 1/3 cup honey (I used 1/4 cup)
2 Tbsp. coconut oil, melted
1/2 cup unsweetened vanilla almond milk (or regular milk)
1/4 cup applesauce
1 tsp. pure vanilla extract
1/4- 1/2 cup chocolate chips (I used 1/4 cup mini chocolate chips)

DIRECTIONS

1. Preheat oven to 350 F. Lightly coat a muffin tin with cooking spray.

2. Squeeze shredded zucchini of excess water with a paper towel (or just use your hands).

3. In a medium bowl, whisk together flour (and flaxseed, if using), cocoa powder, baking soda, and salt; set aside.

4. In a separate bowl, whisk together coconut oil, honey, vanilla, egg and egg white until well combined. Add in zucchini, applesauce, and almond milk; mix again. Slowly add in dry ingredients and mix until just combined. Gently fold in chocolate chips.

5. Evenly divide batter into prepared muffin tin. Bake 18-22 minutes or until toothpick inserted into the middle of a muffin comes out clean. Remove muffins and transfer to wire rack to finish cooling.

*for high altitude: +1 Tbsp. flour, halve baking soda, +1 Tbsp. milk, increase baking temp to 375, and decrease baking time slightly

Makes 12 muffins.

(Adapted from Ambitious Kitchen)

Chewy Fudgy Brownies

February 16, 2015

IMG_6920

When I want to make Dustin happy, I make brownies. Or chocolate chip cookies. Cake is passable as long as it has buttercream frosting. Anything else and I risk complaints. He’ll eat pretty much everything, but he’s sure to let me know he’d rather be having a plain old brownie (with no nuts and no frosting, please). So for Valentine’s Day we had brownies and tried this new recipe. My friend Jenna actually ended up making the brownies while I was working on the rest of dinner. (Thank you, Jenna!) They were perfect: simple and quick to prep, and like the name implies, chewy and fudgy. Just right.

Chewy Fudgy Brownies

INGREDIENTS

1/2 cup butter
8 oz. coarsely chopped quality semi-sweet chocolate (I used Ghiradelli semi-sweet chocolate chips)
3/4 cup granulated sugar
1/4 cup light brown sugar
3 large eggs
1 tsp. pure vanilla extract
1/2 cup + 2 Tbsp. all-purpose flour
2 Tablespoons (11g) unsweetened cocoa powder
1/4 tsp. salt
1 cup semi-sweet chocolate chips (optional- I omitted)

DIRECTIONS

1. Melt the butter and chopped chocolate in a medium saucepan on medium heat, stirring constantly, about 5 minutes. Or melt in a medium microwave safe bowl in 20 second increments, stirring after each, in the microwave. Remove from the heat, pour into a large mixing bowl, and allow to slightly cool for 10 minutes.

2. Preheat oven to 350 F. Line the bottom and sides of a 9×9 inch square baking pan with aluminum foil (or parchment paper), leaving an overhang on all sides. Coat with cooking spray and set aside.

3. Whisk the granulated and brown sugars into the cooled chocolate/butter mixture. Add the eggs, one at a time, whisking until smooth after each addition. Whisk in the vanilla. Gently fold in the flour, cocoa powder, and salt. Once combined, fold in the chocolate chips.

4. Pour batter into the prepared baking pan and bake for 30-35 minutes or until the brownies begin to pull away from the edges of the pan. A toothpick inserted in the center should come out with only a few moist crumbs when the brownies are done. All ovens are different, so keep an eye on them after 25 minutes and use the toothpick test to see when yours are finished.

5. Allow the brownies to cool completely in the pan set on a wire rack. Once cooled, lift the foil out of the pan using the overhang on the sides and cut into squares. For neat squares, I use a very sharp knife and wipe it clean with a paper towel after each cut. Brownies can be stored in an airtight container at room temperature for several days or frozen for up to several months.

Makes a 9×9 pan brownies.

(Adapted from Sally’s Baking Addiction)