Tag Archives: Cookies/Bars

Coconut Brown Butter Cookies

February 5, 2021

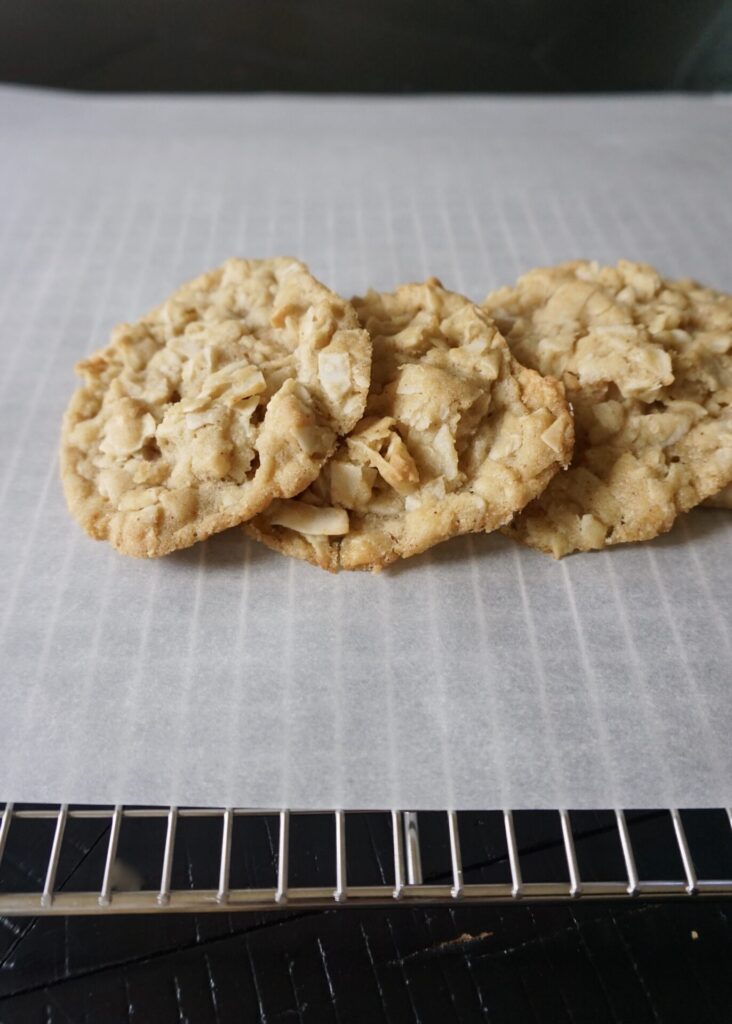
Are you sick of brown butter yet? Obviously, I’m not. After making brown butter chocolate chip cookies and brown butter apple blondies and pumpkin bars with brown butter icing this fall I took a little break. But then I came across this Coconut Brown Butter Cookie by Smitten Kitchen (whose recipe are always the best) and since coconut is one of my other favorite food things, I couldn’t stay away from brown butter any longer!

The weekend before I had tried a cookie recipe that sounded so promising and was just so disappointing (overly sweet, crumbly and dry, blech) so I was thrilled when I took my first bite of these crisp on the outside, soft and buttery in the center, packed with chewy coconut cookies. The dough was totally delicious as well. My husband claims to hate all things coconut but ate quite a few. My kids went nuts for them too.

A couple things to note: Don’t try and use shredded sweetened coconut here, you want the unsweetened coconut flakes. You can make these cookies bite-size and petite or huge (I went with something in the middle and yielded ~2 dozen)- approx. baking times for different sized cookies are listed below. And see the explanation in the note as to why we’re adding a little water to the dough, and how to adjust yours if needed.

INGREDIENTS

1 cup (2 sticks) unsalted butter
2 Tbsp. water
1/2 cup + 2 Tbsp. sugar
3/4 cup packed light-brown sugar
1 large egg
1/2 tsp. pure vanilla extract
1 1/4 cups + 3 Tbsp. all-purpose flour
1 tsp. baking soda
slightly heaped 1/2 tsp. flaky sea salt (such as Maldon) or 1/4 tsp. table salt
4 cups dried, unsweetened coconut chips (I used these)

DIRECTIONS

  1. In a medium saucepan, melt butter over medium heat. It will melt, then foam, then turn clear golden and finally start to turn brown and smell nutty. Stir frequently, scraping up any bits from the bottom as you do. Don’t take your eyes off the pot as it seems to take forever (more than 5 minutes) but then turns dark very quickly. Once it is a deeply fragrant, almost nut-brown color, remove from heat and pour butter and all browned bits at the bottom into a measuring cup. Adding 2 tablespoons water* should bring the butter amount back up to 1 cup. Chill browned butter in the fridge until it solidifies, about 1 to 2 hours. You can hurry this along in the freezer, but check back and stir often so it doesn’t freeze unevenly solid.
  2. Heat oven to 350 degrees. Line baking sheets with parchment paper or a nonstick baking mat.
  3. Scrape chilled browned butter and any bits into a large mixing bowl. Add both sugars and beat the mixture together until fluffy. Add egg and beat until combined, scraping down bowl as needed, then vanilla. Whisk flour, baking soda and salt together in a separate bowl. Pour half of flour mixture into butter mixture and mix until combined, then add remaining flour and mix again, scraping down bowl if needed. Add coconut chips in two parts as well.
  4. Scoop dough into 1 or 2+ tablespoon size balls and arrange a few with a lot of room for spreading on first baking sheet; use the back of a spoon or your fingers to flatten the dough slightly. Bake first tray of cookies; 1 tablespoon scoops will take 10 to 11 minutes; 2 tablespoon scoops, 12 to 14 minutes, the 2-inch scoop used at the bakery, 14 to 16 minutes; take the cookies out when they’re deeply golden all over. If cookies have not spread as much as you see above, stir 2 teaspoons more water into cookie dough, mixing thoroughly, before baking off another tray. (See note below for full explanation.) This should do the trick, but if it does not, repeat the same with your next batch. Once you’ve confirmed that you have the water level correct, bake remaining cookies.
  5. Cool cookies on baking sheet for 1 to 2 minutes before transferring to a cooling rack. Cookies keep for up to one week at room temperature. Extra dough can be stored in the fridge for several days or in the freezer for a month or more.

*About the water: Browned butter is one of my favorite things to eat in cookies like things and least favorite things to write cookie recipes for, because when you brown the butter, water volume is lost, but not all types of butter contain the same amount of water. I find that for most standard American grocery store butters (I was using Trader Joe’s store brand here, but the equivalent would be any non-European style butter), 1 tablespoon of water per stick (1/2 cup) of butter is a sufficient replacement. However, should you find that your first batch of cookies is too thick, a little extra water is all you’ll need to get the texture right. It sounds scary, but I promise is as simple as can be.

Makes 1-3 dozen cookies, depending on size.

(Recipe from Smitten Kitchen, originally from The City Bakery)

Hello Robin Mackles’more Cookies

October 30, 2020

I promise I’ll share some healthier recipes next week… no one wants to think about grilled chicken and fish or salad when they’re about to stuff their face full of Halloween treats! So I’m posting these cookies we made for the first time last weekend… they were just amazing and have to be shared right away.

There’s a famous cookie shop in downtown Seattle called Hello Robin. We’ve been there and loved the cookies sandwiched with Molly Moon’s ice cream (my favorite local ice cream shop!) but we didn’t try their famous Mackles’more cookie (next time!). But now we have the recipe and will be making them at home forevermore. The Mackles’more is a dark chocolate chip cookie with marshmallows (and cinnamon- yum) baked on top of a graham cracker and topped with a milk chocolate square when it’s hot out of the oven. It sounds complicated but it’s not at all. You do need to freeze the dough for 1 hour before baking which requires some patience but it’s worth the wait!

I didn’t buy Theo chocolate because it’s expensive and I already had Ghirardelli and Hershey’s on hand. But Theo chocolate is amazing (and the factory tour is super fun if you’re ever visiting Seattle…) so I bet it would be even better with it!

Hello Robin’s Mackles’more Cookies

INGREDIENTS

2 3/4 cups all-purpose flour
1 tsp. ground cinnamon
1 tsp. kosher salt
1 tsp. baking soda
3/4 cup unsalted butter, softened
1 cup packed light brown sugar
1/2 cup granulated sugar
2 large eggs
1 tsp. pure vanilla extract
4 oz. dark chocolate (70%), cut into chunks, or 3/4 cup of dark chocolate chips (I used Ghirardelli 60% bittersweet chocolate chips)
1 cup packed mini marshmallows
36 square-sized store-bought graham crackers (Honey Maid brand recommended, I could only fit 30 on the baking sheet so that’s how many I used)
7 1/2 oz. milk chocolate squares, halved (I used Hershey’s milk chocolate and special dark chocolate bars)

DIRECTIONS

  1. Line two baking sheets with parchment paper.
  2. Whisk together the flour, cinnamon, salt and baking soda in a medium bowl; set aside. Cream the (softened) butter, brown sugar and granulated sugar in a stand mixer on medium-high speed until pale and fluffy, about 3 minutes. Add the eggs, one at a time, mixing on medium speed for 15 seconds after each addition. Add the vanilla and mix until smooth. Add the dry ingredients and mix until combined. Fold in the dark chocolate and the marshmallows.
  3. Using a medium cookie scoop (about 1 1/2 tablespoons), scoop the dough into (30-36, depending on how many graham crackers you’re using) balls and place them close together on one of the prepared baking sheets. Freeze for at least 1 hour.
  4. Preheat the oven to 400 degrees F.
  5. Place the graham cracker halves side by side on the second prepared baking sheet. Place 1 ball of the frozen cookie dough on each graham cracker. Bake until the cookies are puffed and just turning golden, 10 to 12 minutes. Remove the baking sheet from the oven and immediately press 1 piece of milk chocolate onto each hot cookie–be sure to really press the chocolate into the soft cookie so that when it melts, it puddles on the cookie and doesn’t run off.

Makes 30-36 cookies.

(Adapted from Female Foodie)

Brown Butter Chocolate Chip Cookies

October 5, 2020

Brown butter does something amazing for chocolate chip cookies. It adds a nutty richness that can’t be replicated with any other ingredient. It’s rare that I think a store-bought or even bakery cookie is as good as homemade, but I tried one of Whole Food’s brown butter chocolate chip cookies last year and was instantly hooked! They use a combo of bitter and semi-sweet chocolate so they’re not overly sweet and they’re crisp on the edge, chewy in the middle and everything a cookie should be. And ever since I’ve been trying to recreate them at home.

I read a lot of similar recipes before landing on one to try. My first attempt tasted pretty good but was flat and stuck to the pan and I learned two things: 1) the butter and dough need time to chill in the fridge before creaming/baking to prevent spreading, and 2) parchment paper is a good idea. The second time around I tweaked a couple ingredients (not too much vanilla extract so the brown butter flavor can shine through, a decent amount of salt to balance the sweet- you can even sprinkle some flake salt on top after baking!, and a bit more flour to get the perfect texture) and this time they were just right!

Don’t be intimidated by browning the butter. It takes a few minutes but it smells amazing and and totally transforms the flavor. The rest of the recipe is very straightforward. I like to use both semi-sweet and chopped dark chocolate but you can use what you have/prefer. I hope you love these as much as we do!

INGREDIENTS

2 sticks (1 cup) butter
1 cup light or dark brown sugar
1/2 cup sugar
2 eggs
1 tsp. pure vanilla extract
2 1/2 cups all-purpose flour
1 tsp. baking soda
1 tsp. sea salt
2 cups chocolate chips (I like a combo of semi-sweet and dark chocolate in these cookies, so I used about 1/2 cup chopped 60% bittersweet Ghirardelli chocolate and 1 1/2 cups Ghirardelli semisweet chocolate chips)

DIRECTIONS

  1. Place butter in large pot or deep skillet. Melt butter over medium-low heat. The butter will go through different phases. It will begin to melt and bubble. Take a wooden spoon or spatula and stir often and around the sides of the pan. Let the butter melt and watch for it to begin changing colors from a creamy yellow to a deep amber yellow. The butter will begin to foam and this is why it is important to stir often so you can see what is going on below the foam. Small brown bits will begin to form and that will be a signal that the butter is officially browned. Butter can burn quickly so watch carefully. It is better to pull off of the heat a little early instead of browning too long and risk burning it.
  2. Since you want the butter to chill quickly, pour it into the mixing bowl you’ll be using and place in the refrigerator. Use a spatula to get every bit of butter out of the pan. Let it chill in the refrigerator for about 1 hour.
  3. Remove the mixing bowl with chilled butter butter from the refrigerator. Add brown sugar and sugar and cream for 2-3 minutes, scraping the sides of the bowl often.
  4. Add eggs, one at a time, beating for 30 seconds after each addition. Stir in vanilla.
  5. Add flour, baking soda, and salt. Stir just until combined, avoid over-mixing. Stir in chocolate chips.
  6. Cover and let dough chill in the refrigerator for 2+ hours (or up to 2 days).
  7. Preheat oven to 375 F. Place parchment paper liners or Silpat liners on baking sheets. Roll balls of cookie dough and place on cookie sheet. Bake for 8-10 minutes or until edges starts to become a light golden color. Remove from the oven and cool on a wire rack.

Makes 2-3 dozen cookies, depending on size.

(Adapted from Modern Honey)

Blueberry Pie Crumb Bars

July 17, 2020

Bring on the summer berries! We had plans to pick raspberries with friends yesterday but we had our first cat crisis (she swallowed a nice long string of yarn) resulting in a trip to the emergency vet (she’s doing fine now!) so we didn’t make it to the berry farm. Our sweet friends brought us some fresh-picked raspberries to console us though and they were so so good. Blueberry picking is coming soon and we can’t wait!

This year I made these blueberry pies bars for the 4th of July. We were in Utah with Dustin’s family and everyone LOVED them. The sour-cream based custard filling is what makes them creamy/tangy/unique. And it takes a lot of self-restraint to not eat all that cookie crumble right off the top! I’ve made them a few times now… even once with frozen berries- don’t bother thawing them, but do add some extra flour and cornstarch so they thicken up. You can double the recipe to fit a 9×13 pan but you’ll have to increase the baking time quite a bit (I would start checking them around an hour in case your oven is extra hot). Let the bars cool before cutting so they can set. I find them most irresistible with a scoop of vanilla ice cream!

Blueberry Pie Crumb Bars

INGREDIENTS

1/2 cup unsalted butter, chilled
3/4 cup sugar
1 1/2 cups all-purpose flour
1/2 tsp. ground cinnamon
Pinch kosher salt

Filling:
1 egg
1/2 heaping cup sour cream
1/3 cup sugar
2 Tbsp. lemon juice
1 Tbsp. all-purpose flour
4 tsp. cornstarch
1/2 tsp. cinnamon. (optional- I only use the cinnamon in the crust)
2 tsp. vanilla extract (or 1 tsp. vanilla extract and 1/4 tsp. almond extract)
2 cups blueberries

DIRECTIONS

  1. Preheat the oven to 350 F. Spray an 8×8-inch baking pan with cooking spray. Line the pan with parchment paper so that it hangs over on two sides. Spray the parchment.
  2. For the crust: In the bowl of a food processor, combine the butter, sugar, flour, cinnamon and salt. Process until the mixture starts to come together and clump, 1 minute. Remove 3/4 cup and reserve; press the remaining crust mixture evenly into the prepared baking pan. Set aside.
  3. For the filling: In a medium bowl, whisk together the egg, sour cream, sugar, lemon juice, flour, cornstarch, vanilla (and almond, if using) extract and cinnamon (if using) until smooth. Mix in 1 cup of the blueberries. Pour the filling mixture over the crust, shaking the pan gently to settle the custard and berries. Pour the remaining 1 cup blueberries over the top, spreading them evenly.
  4. Take the reserved crust and sprinkle it over the top of the berries, squeezing the mixture in your hands to encourage large lumps.
  5. Bake for ~1 hour. Let cool. Remove the bars from the pan and cut into 9 pieces. Refrigerate until ready to serve.

Makes an 8×8 pan of bars. 

Adapted from Food Network

Cherry Pie Cookie Bars

July 3, 2020

Early every summer the roadside cherry stands show up in Washington and we stop and buy local cherries by the bagful. I don’t like pitting them (but this little tool helps a lot) or cleaning up the mess after my kids cover themselves in cherry juice, but we LOVE fresh cherries. I’ve been making this dessert the last couple summers and it’s time I shared it here. These cherry pie bars have a base/crumble similar to a sugar cookie, a juicy cherry-almond filling, and a sticky sweet lemon glaze. It just crossed my mind how sprinkling sliced almonds on top would make them extra beautiful/delicious!

The hardest part of this recipe is making sure the bars get cooked through. Because the cherries release a lot of moisture, I pre-bake the crust a bit before adding the filling. I also added more cornstarch to help it thicken. Even if it takes longer than the suggested baking time, don’t take the bars out of the oven if the center is still doughy. I’ve made that mistake before and had to toss the center of the dish. The bars will set up more as they cool. They’re the best served with a scoop of vanilla bean ice cream.

Cherry Pie Cookie Bars

INGREDIENTS

Cherry Pie Filling:
5 cups fresh Bing/sweet cherries, pitted and halved (about 1 1/2 to 2 lbs., you can use frozen cherries, but make sure they are thawed and the juices drained off)
1/3 cup sugar
2 Tbsp. cornstarch
1/4 tsp. almond extract

Cookie Dough:
1 cup (2 sticks) butter, softened
1 cup sugar
2 Tbsp. milk
1 tsp. baking powder
1/2 tsp. baking soda
1/4 tsp. salt
1 large egg
1 large egg yolk
2 1/4 cups all-purpose flour

Lemon Glaze:
1 cup powdered sugar
1 tsp. lemon zest
~1 Tbsp. milk + extra to thin glaze

DIRECTIONS

  1. Preheat the oven to 350 degrees F. For easier cleanup, line a 9X13-inch baking pan with parchment paper or aluminum foil. Lightly grease the parchment/foil with nonstick cooking spray and set aside.
  2. In a medium bowl, stir together the cherries, sugar, cornstarch, and almond extract. Let sit while making the crust.
  3. For the cookie dough, with an electric mixer (handheld or stand mixer), cream together the butter, sugar, milk, baking powder, baking soda, and salt until light and fluffy, 2-3 minutes. Add the egg and egg yolk. Mix until well-combined. Add the flour and mix until just combined and no dry streaks remain.
  4. Take 2/3 of the dough (more or less) and press into the bottom of the pan. It helps to drop pieces relatively evenly across the bottom before spreading into an even layer. You can use your hands or a knife to spread the dough as it’s a bit sticky.
  5. Par-bake the bottom crust in the preheated oven for 15 minutes, it should puff and start to set but not be cooked through or brown. Remove from the oven,
  6. Give the cherry filling a good stir and pour over the top of the bottom crust. Pinch off quarter-size pieces of the remaining dough and drop on top. It won’t cover the cherry filling all the way but will puff and spread while baking.
  7. Bake for 30-40 minutes until the cherry filling is bubbling and the edges of the dough are golden. (Test to center with a knife to make sure that it’s not still doughy. If the bars are browning too fast before the center sets you can lightly tent them with foil while they finish baking.) When the bars are done, remove them from the oven and set them aside to cool.
  8. For the glaze, whisk together the powdered sugar, lemon zest and milk until thick and pourable (add milk a little at a time if needed to thin the consistency).
  9. Drizzle the glaze over the top of the bars. Serve the bars at room temperature or slightly warm with vanilla ice cream.

Makes a 9×13 pan of bars.

Adapted from Mel’s Kitchen Cafe