Category Archives: Asian

Thai Cucumber Salad

March 4, 2015

IMG_7022

We eat a lot of cucumbers around here. Clara is happy to munch on them with hummus or one of our other favorite dips (Trader Joe’s Cilantro Chive Yogurt Dip or this spicy Chipotle Ranch mixed with some nonfat Greek Yogurt to lighten it up). And cucumbers find their way into just about every green salad or veggie sandwich I make. This crunchy cucumber + red onion + cilantro (or mint) + peanut (or cashew!) salad with a tangy rice wine vinaigrette would complement most Asian, Indian, or Middle-eastern dishes. I served it with this cheater’s coconut curry sauce simmered with rotisserie chicken over rice.

Thai Cucumber Salad

INGREDIENTS

2 medium English cucumbers, sliced
3/4 cup thinly sliced red onion
1/4 cup chopped cilantro (or mint)
1/4 cup rice vinegar
1 1/2 Tbsp. fish sauce
1 1/2 Tbsp. sugar
2 small or 1 large clove garlic, minced
pinch crushed red pepper flakes, to taste (or minced jalapeno)
salt and freshly ground black pepper, to taste
2-3 tbsp. crushed peanuts (or cashews)

DIRECTIONS

1. Whisk vinegar, fish sauce, sugar, and garlic together in a medium bowl. Place cucumbers, onion, and cilantro (or mint) in large bowl. Add dressing and toss to coat. Season salad to taste with salt and pepper. Sprinkle with peanuts and serve.

Serves 4.

(Adapted from Bon Appetit)

Hawaiian Fried Rice

February 18, 2015

IMG_6942

Fried rice is one of my favorite dinners. Once you complete all of the prep it cooks so quickly and you can include lots of protein and veggies, making for a relatively healthy meal (especially compared to take-out, though I love that too!). I have recipes for Shrimp Fried Rice (can sub chicken) and Pineapple Mango Fried Rice. This fried rice has a Hawaiian twist. It probably isn’t authentic Hawaiian because I didn’t use spam. If you’re brave, be my guest. I’ll stick with deli sliced ham or Canadian bacon. Fresh pineapple is a must though to achieve that perfect balance of sweet and salty (and spicy with some added sriracha)!

Hawaiian Fried Rice

INGREDIENTS

~2 Tbsp. canola, coconut or peanut oil
1 medium shallot, minced
1/2 large red bell pepper, stemmed, seeded and chopped
3 cloves garlic, minced
1 tsp. grated fresh ginger
1 carrot, peeled and grated
3 large eggs, whisked
4 cups cooked white or brown rice, cold (prepared ahead/leftover refrigerated rice)
1 1/4 cups ham or Canadian bacon, diced
~ 2 Tbsp. low-sodium soy sauce
1 1/2 tsp. toasted sesame oil
2/3 cup frozen peas
1 1/2 cups fresh pineapple, chopped
3 green onions, chopped
fresh cilantro, chopped, to taste
sriracha or crushed red pepper, to taste

DIRECTIONS

1. Prep all ingredients ahead of time. This is key because once you start cooking, it moves fast!

2. Heat 1/2 Tbsp. oil in a large wok or nonstick skillet over medium-high heat. Add the shallot, pepper, garlic, ginger, and carrot and saute for several minutes, until golden and slightly softened. Remove from the pan to a plate and set aside. Return the pan to the heat and lightly coat with cooking spray. Pour the whisked eggs into the pan and cook, stirring occasionally, until almost cooked through. (They’ll cook FAST.) Remove the eggs from the pan and set aside on the same plate. Once cooled, break them up into tiny pieces with a knife or fork.

3. Return the pan to the heat and add the remaining 1 1/2 Tbsp. oil. Add the rice and spread into a single layer. Cook, only stirring every other minute or so, for 5-8 minutes until the rice is golden and warmed throughout. Add the ham and cook for several more minutes.

4. Stir in the vegetables/eggs that you set aside, 1 Tbsp. soy sauce, the sesame oil, peas, and pineapple. Cook, stirring frequently, for several minutes until warmed throughout. Add the green onions, cilantro, sirracha or red pepper, and adjust seasonings to taste (adding another Tbsp. of soy sauce if necessary). Serve immediately.

Serves 4.

(Adapated from Mel’s Kitchen Cafe)

Grilled Coconut Lime Chicken with Coconut Rice

June 3, 2014

IMG_5700

Next month we say goodbye to Chicago and will be moving to Colorado Springs! I’m thrilled to be finished with residency/school (forever- hopefully). But I’m sad to leave this city (especially now that it’s warm and beautiful and the summers here really are so fun). I am excited to have more quiet, more convenience, more space. A yard possibly?! To hike, to explore, to discover another city, another state.

My biggest worry about living in Colorado Springs? The altitude. Baking. I’m a little freaked out that I’ll arrive and whip out my cake pans and pizza stone and suddenly everything I make will implode or turn out flat and gross. Any altitude bakers out there? Any advice to offer me? I’ve done a little research on the matter and it seems like there are so many factors that can affect your success while baking at altitude. It’s overwhelming.

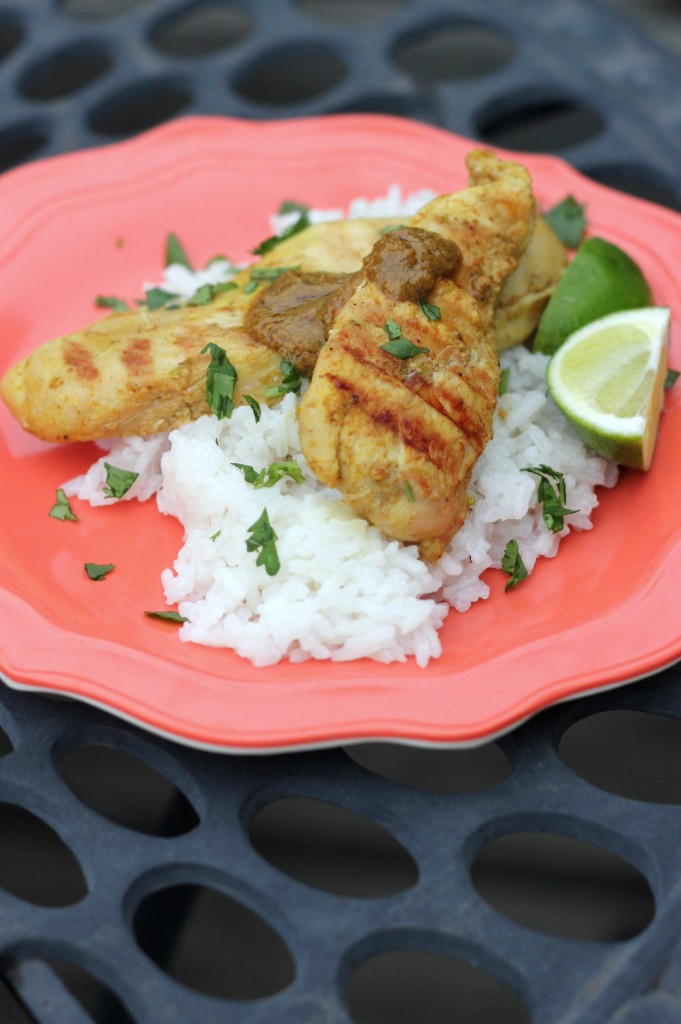
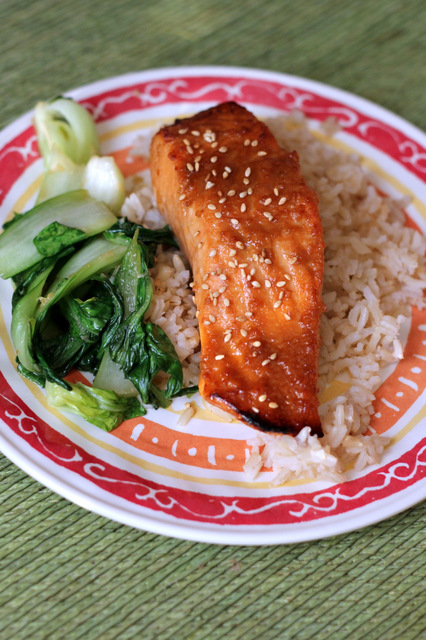
Totally unrelated to my future baking dilemmas is this recipe. It is, however, perfect for summer on the grill. (Or my indoor griddler which I LOVE and use nonstop/ year round. I should be paid to advertise for this thing. Full disclosure: I’m not and there’s no affiliate link.) The chicken and sauce are succulent and the rice is just the right amount of coconutty. I even used light coconut milk and it wasn’t at all lacking in flavor. Grill some asparagus on the side and dinner it is.

Grilled Coconut Lime Chicken with Coconut Rice

INGREDIENTS

Chicken:
3 Tbsp. canola or grapeseed, etc. oil
zest and juice of 1 lime
1 tsp. ground cumin
1 1/2 tsp. ground coriander
2 Tbsp. low-sodium soy sauce
1 1/2 tsp. kosher salt
2 Tbsp. sugar (I used brown sugar)
2 tsp. curry powder
1/2 cup canned coconut milk (I used light)
pinch cayenne pepper
2 lbs. boneless, skinless chicken breasts, cut into strips
1/4 cup fresh cilantro, chopped for garnish
lime wedges, for serving

Coconut Rice:
1 cup jasmine rice
1 cup canned coconut milk (I used light)
1 cup water
1/2 tsp. salt

DIRECTIONS

1. In a large bowl, whisk together the oil, lime zest, lime juice, cumin, coriander, soy sauce, salt, sugar, curry powder, coconut milk, and cayenne pepper. Place the chicken in a large ziploc bag and pour the marinade over the chicken. Seal the bag and refrigerate for at least 2 hours and up to 8 hours.

2. For the coconut rice, bring the rice, coconut milk, water and salt to a simmer in a medium saucepan. Cover, reduce the heat to low and simmer for 15 minutes until the liquid is mostly evaporated. remove from the heat and let stand for 5-10 minutes before fluffing with a fork and serving. (For brown rice, adjust the cooking time according to package directions.)

3. Preheat outdoor grill or indoor grill pan to medium-high heat. Grill the chicken until the juices run clear (will be firm to the touch). While the chicken is cooking, pour the marinade into a small or medium saucepan. Bring the mixture to a rolling boil and boil for 10 minutes, stirring occasionally.

4. Place the grilled chicken on a serving platter or plate. Drizzle with sauce (reserve the remaining sauce to serve separately) and sprinkle fresh cilantro over the top. Serve with rice, lime wedges, and additional sauce.

Serves 4-6.

(Adapted from Mel’s Kitchen Cafe)

Sweet and Sour Stir-fried Pork with Pineapple

May 12, 2014

IMG_5519

This might be the first Chinese food recipe I’ve shared. I like Asian food. I love Thai and Japanese. But I have a hard time with Chinese. The Chinese restaurants and take-out I’ve tried have yet to impress me. (Except for one place we found just before we left Richmond. I’d have gone back there if I’d had the chance.) American-Chinese food just seems so heavy, so greasy. Too much sugar and salt. I know great Chinese food exists and I hope to someday experience it. My mom on the other hand adores Chinese food and could probably eat it for every meal. Which is how I feel about Mexican (which, of course, she dislikes). Choosing a restaurant gets tricky when left to the two of us.

IMG_5491

This recipe convinced me to give Chinese another chance- at home. It would surely be fresher/lighter/healthier than take-out. And it included a few of my favorite things- pork tenderloin and pineapple. Well, I loved it! Chunks of tender pork, crisp peppers, and juicy pineapple, simmered in a sweet (but not overly) and sour sauce all served over rice and garnished with peanuts for crunch. So good.

A note about the rice: I’ll be honest, I’ve yet to master cooking any rice, but brown has been the biggest challenge. Then I found this method and it really works! No more soggy, clumpy rice. Hooray! (I also tried Alton Brown’s baking method but wasn’t as impressed.)

Sweet and Sour Stir-fried Pork with Pineapple

INGREDIENTS

1 cup brown rice (I used jasmine)
1/4 cup low-sodium soy sauce
1/4 cup rice vinegar
3 Tbsp. sugar
1 1/4 pounds pork tenderloin
1 Tbsp. cornstarch
kosher salt and freshly ground black pepper, to taste
1 Tbsp. peanut oil
2 cloves garlic, minced
2 bell peppers (any color- I used red and yellow), sliced
1/2 cup diced fresh pineapple
4 green onions, thinly sliced on the diagonal
2 Tbsp. roasted peanuts, chopped for serving (optional)

DIRECTIONS

1. Cook the rice according to package directions (about 45 minutes cook time). **Or follow this method for perfect brown rice- works great!!**

2. Meanwhile, in a small bowl or measuring cup, whisk together the soy sauce, vinegar and sugar.

3. Slice the pork into 1/2-inch-thick rounds, then slice again to make 1/2-inch-wide strips. Place the pork in a medium bowl and sprinkle with the cornstarch and salt and pepper, and toss to coat.

4. In a large skillet or wok, heat the oil over high heat until very hot. Add the pork and stir-fry until the pork is almost cooked through and begins to brown, about 2 minutes. Remove the pork from the pan and set aside on a plate. Add the garlic and bell peppers and stir-fry until the vegetables begin to soften, about 5 minutes. Add the pineapple and scallions and the pork back in and continue to stir-fry until the pork is cooked through and the vegetables are tender, 1 to 2 minutes longer.

5. Whisk the soy sauce mixture and add it to skillet. Cook until the sauce thickens, 2 to 3 minutes. Serve over the rice and garnish with roasted peanuts if desired.

Serves 4.

(Adapted from Kelsey Nixon)

Miso Glazed Salmon

March 28, 2014

miso salmon

This was my first time purchasing and cooking with miso, but it won’t be my last. When I fall in love with a new ingredient I become a little obsessed (so don’t be surprised if I share a bunch more miso recipes in the near future). Miso paste isn’t cheap (I found it at Whole Foods- I’m guessing Asian groceries would be a better deal), but the amazing flavor it lends is worth the splurge. Plus, a small tub of it will last a good six months in the refrigerator so I’m determined to use mine all up.

miso salmon

This recipe combines sweet white miso with soy sauce, brown sugar, and bit of rice wine vinegar for a sweet and salty and umami (whatever that is) experience. All I care is that it’s delicious. And so quick and easy! The fish can be marinated ahead of time for extra flavor- or not. I’ve made it both ways and it was just as good with the sauce brushed on right before and during broiling.

Unrelated to this salmon, does anyone have a favorite carrot-ginger-miso dressing recipe? I’ve tried several but yet to be impressed. If so, please send it my way…

Miso Glazed Salmon

INGREDIENTS

1- 1 1/2 lbs. salmon fillets
2 Tbsp. sweet/mild white miso
2 Tbsp. low-sodium soy sauce (reduce if using regular soy sauce)
2 Tbsp. rice wine vinegar
2 tsp. brown sugar (or honey)
toasted sesame seeds, for garnish
fresh chives, chopped for garnish

DIRECTIONS

1. In a small bowl, whisk to combine the miso, soy sauce, vinegar, and brown sugar (or honey).* Place the salmon fillets in a shallow dish or resealable plastic bag and pour the marinade over top. Place in the refrigerator and marinate 30 minutes or up to several hours. If you’re short on time, the marinade can be brushed over top the fish and cooked immediately, it just won’t be quite as flavorful.

*Note: Marinade ingredients can be adjusted to taste- a little more/less soy sauce to adjust saltiness, more/less sugar to adjust sweetness, more/less vinegar to adjust the sour note, etc.

2. Preheat broiler. Remove the fish from the marinade and place on a baking sheet lined with aluminum foiled and lightly coated in cooking spray. Broil 8-10 minutes, until the salmon is just cooked through and flakes easily with a fork. If you haven’t marinaded the fish, baste with the extra sauce partway through cooking.

Serves 3-4.

(Adapted from Cooking Light)