Category Archives: Bread

Homemade Pita Bread

October 27, 2020

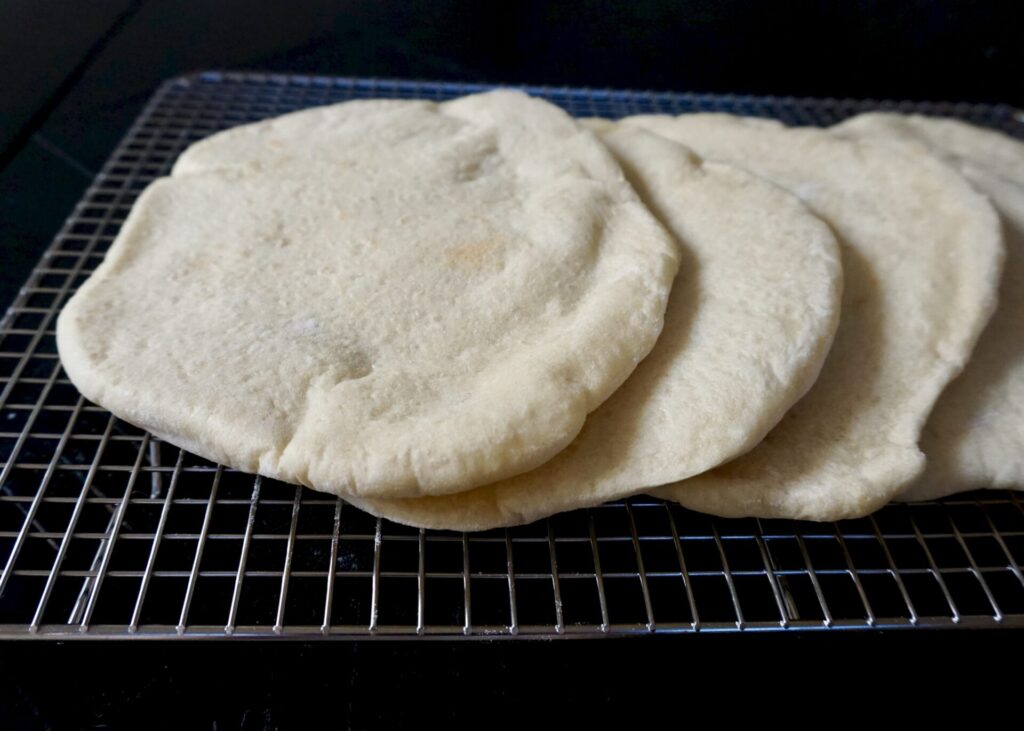
Here is that promised pita bread recipe! We eat a lot of pita with hummus/tzatziki or as a quick pizza crust and I have trouble keeping enough pita on hand. While this recipe isn’t exactly quick if you factor in the rise, rolling out, and baking time, it’s definitely not hard and so delicious! Nothing beats fresh, homemade bread.

I haven’t tried this pita recipe with whole wheat flour, but do have one from years ago that is whole wheat in the archives. I did have a few pita leftover the night I made them and popped them in the freezer (in a freezer bag) for later. They can be rewarmed in the microwave as needed.

Homemade Pita Bread

INGREDIENTS

1 package (2 1/4 tsp.) active dry yeast
1 tsp. sugar
1 1/2 cups warm water
1 tsp. salt
31/2 cups bread flour + more for dusting
1 tsp. olive oil

DIRECTIONS

  1. In the bowl of a heavy-duty electric mixer fitted with a dough hook, combine the yeast, sugar, and warm water; stir to blend. Let the yeast stand until foamy, about 5 to 10 minutes. (I did this in a large bowl.)
  2. Stir in the salt. Add the flour, a little at a time, mixing at the lowest speed until all the flour has been incorporated and the dough gathers into a ball; this should take about 4 minutes. (I mixed by hand with a spatula.)
  3. Turn the dough onto a lightly floured surface and knead until it’s smooth and elastic. Transfer the dough to a lightly oiled bowl, turn it over to coat, and cover with plastic wrap. Allow to rise until double in size, about 1 1/2 hours.
  4. Place a large pizza stone on the lower oven rack, preheat the oven (and stone) to 500 degrees F.
  5. Punch the dough down, divide it into 8 pieces, and gather each piece into a ball; keeping all of them lightly floured and covered while you work. Allow the balls of dough to rest, covered, for 15 minutes so they will be easier to roll out.
  6. Using a rolling pin, roll each dough ball into a circle that is about 8-inches in diameter and 1/4-inch thick. Make sure the circle is totally smooth, with no creases or seams in the dough, which can prevent the pitas from puffing up properly. Cover the disks as you roll them out, but do not stack them up. Put 2 pita rounds at a time on the hot pizza stone and bake for 3 to 4 minutes, or until the bread puffs up like a balloon and is pale golden. Watch closely; they bake fast. Remove the bread from the oven and place on a rack to cool for 5 minutes; they will naturally deflate, leaving a pocket in the center. Wrap the pitas in a large kitchen towel to keep them soft.

Makes 8 pita.

(Adapted from Food Network)

Whole-Grain Cornbread

October 16, 2020

Since the weather has turned cooler and wet and we’ve been stuck indoors more, I’ve been baking a lot! So most of the recipes I share for the next while will probably fall into the category of baked goods. I’ve been making dinner as well, but haven’t had as much success with those recipes. Nothing has wowed us, and a few things have even ended up in the trash bin. Nobody around here is complaining about cornbread, muffins, and homemade pita though (that one coming soon)!

I’ve been making this cornbread for several years now. It’s exactly what I want cornbread to be- fluffy, moist, slightly sweet, and flecked with corn. Even better spread with butter and drizzled with honey. I love that this recipe can be make 100% whole grain, though I usually use half white and whole wheat flour. For a savory version, reduce the sweetener to 1 tablespoon and add 1/2 cup shredded cheddar cheese.

Whole-Grain Cornbread

INGREDIENTS

2/3 cup whole wheat flour (I use half white whole wheat flour and half all-purpose flour)
1/2 cup cornmeal
1 Tbsp. baking powder
1/8 tsp. salt (I used unsalted butter so I increased the salt to 1/4 tsp.)
4 Tbsp. butter, melted
1/2 cup milk 
2 Tbsp. pure maple syrup (or honey)
2 eggs
1/2 cup sour cream (or plain Greek yogurt)
3/4 cup corn (fresh, canned, or frozen)

DIRECTIONS

  1. Preheat oven to 350 degrees F.
  2. In a small bowl, whisk together the flour, cornmeal, baking powder and salt.
  3. In a large bowl, whisk to combine the butter, corn, milk, maple syrup (or honey), eggs, and sour cream. Add the dry ingredients and mix until just combined. Stir in the corn.
  4. Pour batter into a lightly greased 8 or 9-inch square or round baking dish.  
  5. Bake in preheated oven for 25-30 minutes (it could take slightly longer if you use frozen corn) until lightly golden and a toothpick inserted into the center comes out clean. 

Makes an 8 or 9-inch square or round pan of cornbread. 

(Adapted from 100 Days of Real Food)


French Bread Rolls

September 18, 2020

I’m still making my way through the pile (or rather, digital files) of recipes I came to love during my blogging absence. This is one of them I’ve made time and time again now and its debut is overdue. These fluffy soft rolls are similar to french bread in taste and texture. They’re naturally dairy-free (just don’t brush with butter at the end!) and adaptable to whole grains (I’d start by replacing half of the flour with whole wheat).

My tips for roll success:

I almost always knead by hand because I trust myself more than a mixer. There are instructions provided for either method though.

Don’t over-flour the dough! After kneading the dough should still be slightly sticky or “tacky”. If you use some whole wheat flour you’ll need less flour as you knead because whole wheat absorbs more water. No matter the type of flour you use, if you’re baking somewhere humid you might need more flour because the dough will be more wet.

I like these rolls best baked in a 9×13 pan- when they’re crammed together they’re less likely to dry out. And remove the rolls from the oven just when they turn golden brown. There’s nothing more disappointing than over-baked bread. (If you’re bread obsessed like I am, anyway.)

French Bread Rolls

INGREDIENTS

1 1/2 cups warm water
3/4 Tbsp. instant yeast (or 1 Tbsp. active dry yeast)
2 Tbsp. sugar or honey
2 Tbsp. neutral-flavored oil (such as canola, grapeseed, or olive oil)
1 tsp. salt
3 1/2 – 4 cups all-purpose flour

DIRECTIONS

  1. In the bowl of a stand mixer fitted with the dough hook or in a large bowl by hand, combine the warm water, instant yeast, sugar, oil, salt and 2 cups of the flour. If you are using active dry yeast instead of instant yeast, let the yeast proof in the warm water and sugar for about 3-5 minutes until it is foamy and bubbly before adding the oil, salt and flour.
  2. Begin mixing, and continue to add the rest of the flour gradually until the dough has pulled away from the sides of the bowl. Begin kneading the dough for 4-5 minutes in a stand mixer (7-9 minutes by hand).
  3. The dough should be soft and smooth but still slightly tacky to the touch. After a few minutes of kneading, stop the mixer and grab a small piece of dough to test if it needs more flour or not. It might leave a little bit of sticky residue on your fingers, but if you can roll it into a small ball without it sticking all over to your hands, it is good to go. If not, gradually add a bit more flour as needed.
  4. Lightly grease a container or large bowl with nonstick cooking spray, and place the kneaded dough in the container.
  5. Cover the bowl with lightly greased plastic wrap or a large tea towel. Let the dough rise until it has doubled (this usually takes about an hour, depending on the warmth of the kitchen).
  6. Lightly punch down the dough and turn it out onto a lightly greased countertop.
    Divide the dough into 12-15 equal pieces, and form the dough into round balls.
  7. Place the rolls in a lightly greased 9X13-inch pan or on a large, rimmed baking sheet lined with parchment or lightly greased. Space the rolls about 1/2- to 1-inch apart.
    Cover the rolls with lightly greased plastic wrap taking care not to pin the plastic wrap under the baking sheet or else the rolls will flatten while rising. Let the plastic wrap gently hang over the sides of the pan to fully cover the rolls but not press them down.
  8. Let the rolls rise until very puffy and doubled, about 45 minutes to 1 hour.
  9. Preheat the oven to 400 degrees. Bake for about 15 minutes until lightly browned and cooked through.
  10. Immediately out of the oven, brush with butter (optional).

Makes 12-15 rolls.

(Adapted from Mel’s Kitchen Cafe)

Classic French Toast

July 29, 2020

I’ve tried my share of french toast recipes and this one makes THE BEST classic french toast! (I also love buttermilk french toast… you have to give it a try sometime as well.) What makes this recipe different from others I’ve found is the addition of flour and a generous amount of sugar to the egg batter, which helps form a sweet crust when it cooks on a buttered skillet. And the vanilla and cinnamon add even more flavor.

Use the best thick-sliced bread you can find. If you live in the Seattle area my favorite bread for french toast is the Swiss Peasant loaf made by Wild Wheat Bakery in Kent. It’s sold at Whole Foods, Central Market, and some other local grocery stores here. It also makes an awesome grilled cheese.

I usually top my french toast with Vanilla Greek yogurt and a pile of fruit/berries. Or try butter and maple syrup, powdered sugar, jam, lemon curd, or go savory with bacon and a fried egg.

Classic French Toast

INGREDIENTS

4 large eggs
2/3 cup milk
1/4 cup all-purpose flour
1/4 cup sugar
1/4 tsp. salt
1/2 tsp. ground cinnamon (optional)
1 tsp. pure vanilla extract
8 thick slices french bread

DIRECTIONS

  1. Preheat griddle to 350 degrees F or or heat a skillet over medium heat. Grease well with butter.
  2. Add all ingredients, except the bread, to a blender (I used an immersion blender) or to a shallow dish and whisk well to combine. If whisking by hand, it’s okay if the flour doesn’t mix in completely smooth. (I recommend using a blender or food processor because it’ll be pretty clumpy if you whisk by hand.)
  3. Dip bread slices into the egg mixture, dredging them well on both sides, and place on hot, greased griddle or skillet.
  4. Cook for a few minutes, until the bottom of the breads starts to get golden brown. Flip and cook on the other side the same.
  5. Remove to a plate. Serve warm, with syrup and a sprinkle of powdered sugar. (Or berries and vanilla yogurt, butter and jam, etc!

Makes about 8 large slices.

Adapted from Tastes Better from Scratch

Angel Biscuits

June 1, 2020

I’m realizing I should have taken a picture of one of these biscuits cracked open, slathered in butter and dripping honey. That’s the best way to enjoy them! They’re plenty buttery and rich on their own, of course, but you’ve got to have one with honey or some really good jam. Then they’re unforgettable! I’d choose that over most desserts any day.

Angel biscuits are a hybrid of biscuits and dinner rolls because they use yeast (but still a lot of butter). You have a longer rise but get a lighter, fluffier, taller biscuit with the texture somewhere in-between. It’s a good thing. I promise. I like baking them in a cast iron skillet for an extra crisp bottom.

Angel Biscuits

INGREDIENTS

2 1/2 cups all-purpose flour
2 tsp. baking powder
1/2 tsp. baking soda
1/2 tsp. kosher salt
2 1/2 Tbsp. sugar
2 Tbsp. warm (90-110 F) water
1 package (2 1/4 tsp.) active dry yeast
1/2 cup (1 stick) butter, cold, cut into small squares + 2 Tbsp. extra melted butter for the pan and brushing on top
1 cup buttermilk

DIRECTIONS

  1. Preheat the oven to 425 degrees F.
  2. In a large bowl, whisk together the flour, baking powder, baking soda, salt and 1 1/2 Tbsp. of the sugar.
  3. In a small bowl, combine the warm water with the yeast and the remaining 1 tablespoons sugar; stir until the yeast is dissolved. Let stand until bubbles appear, 2 to 3 minutes.
  4. Using your hands, mix the 1/2 cup cold butter into the flour, breaking the butter into small pebbles, until the mixture resembles coarse meal. Make a well in the center and add the buttermilk and the yeast mixture. Gently fold the flour into the wet ingredients. Keep mixing until a ball starts to form, then gently knead, 12 to 15 times, to create a smooth dough. Cover with a cloth or plastic wrap and let rise in a warm place for approximately 1 hour.
  5. Transfer the dough to a lightly floured work surface and press out to 1- to 1 1/2-inches thick. Fold the dough in half, press again to 1- to 1 1/2-inches thick, and then fold again. Cut the dough using a 2- to 3-inch round biscuit cutter, depending personal preference. Brush the bottom of a cast-iron skillet with some of the melted butter. Place the biscuits in the skillet; brush the tops with melted butter.
  6. Bake until golden brown, 15-20 minutes, depending on size. Brush again with melted butter and serve immediately. 

Makes about 12 small or 6 large biscuits.

Adapted from Food Network