Category Archives: Vegetarian

Roasted Beet, Pistachio, and Goat Cheese Salad

May 16, 2020

roasted beet goat cheese salad

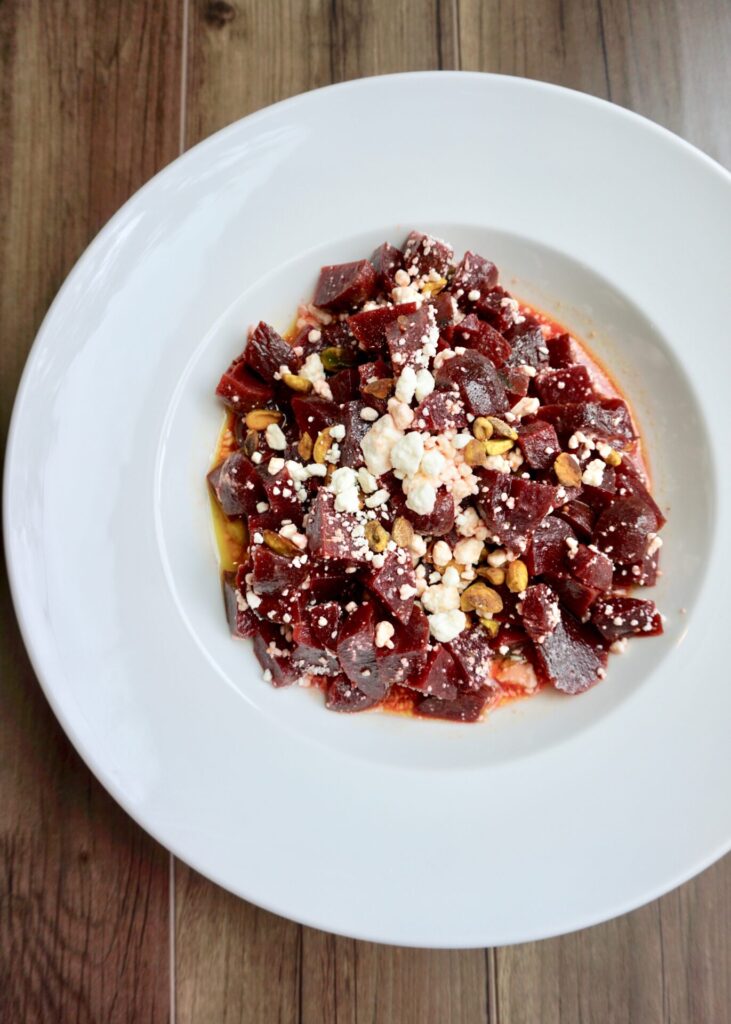
My kids might hate zucchini (in healthy forms, anyway) but they have a thing for beets. Our love for beet salad started when we ordered it at an Italian restaurant and realized how amazing roasted beets are paired with goat cheese! Now I make my own version at home- beets tossed with a sweet honey-orange vinaigrette, goat cheese crumbles, and toasted pistachios- and we can’t get enough!

I usually buy the pre-roasted beets (Love Beets or Trader Joe’s brand) because they’re so convenient, but by all means, you can roast your own beets: Place them in some foil, drizzle with olive oil and season with salt and pepper. Wrap the foil up and bake in a 400 F oven for 40-60 minutes until they are easily pierced with a knife. Let them cool before peeling off the skin. Whichever way you go just BE CAREFUL when you handle the beets- they are a mess and can stain clothing!

Roasted Beet, Pistachio, and Goat Cheese Salad

INGREDIENTS

4-6 roasted beets OR 16 oz. packaged roasted beets, diced
1/4 cup freshly squeezed orange juice
2 Tbsp. olive oil
1-2 tsp. honey, to taste
1/2 tsp. stone ground mustard (this is my favorite, you can sub Dijon but it’s stronger so I’d use 1/4 tsp.)
salt and dash of freshly ground black pepper, to taste
~1/3 cup crumbled goat cheese
~1/4 cup toasted pistachios

DIRECTIONS

  1. In a small bowl, whisk to combine the orange juice, olive oil, honey, and mustard. Season to taste with salt and pepper. 
  2. Place the beets in a large bowl and pour the dressing over top. Toss to coat. Add the goat cheese and pistachios and gently stir to combine. 

Serves 4.

Spinach Mushroom Grilled Cheese

May 7, 2020

I was planning to post my easy salsa verde enchiladas today but for some reason can’t get the photo to upload. So you’ll have to wait for enchiladas. Instead, I’m bringing you grilled cheese! You’ll probably think my kids are crazy because when they request grilled cheese they don’t want just cheese melted on bread, they mean spinach mushroom grilled cheese- it has become a popular meal around here! For some reason this combination of veggies is just really delicious with gooey cheese and crunchy bread. I saute mushrooms and spinach with a bit of garlic and pinch of pepper flakes. And then I layer it on some crusty bakery bread with a generous mound of cheese, grill, and repeat.

There are no rules for making this sandwich. You can get extra creative with the cheese(s). Use whatever you love and/or have on hand. I’ve made it so many times with so many different varieties of cheese. I’ve mentioned a few of my favorites in the ingredients section below. My daughter would like me to insert here that you’ve got to try Beecher’s flagship. It comes from Pike Place market here in Seattle (but can be found nationwide) and makes a killer grilled cheese. You can also add a bit of Parmesan, Pecorino, feta, or goat cheese. It’s really versatile. Sometimes we serve this with soup (oh yum) and other times we’ve added ham (or try bacon!) for an even heartier meal.

Spinach Mushroom Grilled Cheese

INGREDIENTS

spinach, chopped (fresh or frozen, if frozen defrost first)
mushrooms, chopped (I like to use cremini but any variety will work)
butter or olive oil
salt and freshly ground black pepper
garlic, minced or a pinch of garlic powder (optional)
pinch crushed red pepper flakes (optional)
crusty white or wheat bread, sliced
cheese, grated (cheddar, colby jack, pepper jack, gouda, smoked provolone, Muenster, manchego, Beecher’s flagship, etc.)

DIRECTIONS

  1. Heat a bit of butter or oil in a large pan over medium heat. Add the spinach and mushrooms and garlic, if using, and saute until the mushrooms are tender and most of the moisture has evaporated. Season to taste with salt and pepper and a pinch of crushed red pepper flakes.
  2. Remove the spinach and mushroom mixture from the pan and squeeze out any excess moisture.
  3. Wipe the pan clean, if necessary, and return the pan to medium heat. Pile cheese on a slice of bread, top with some of the spinach mushroom mixture, more cheese, and a second slice of bread. Put a little butter or oil on the pan and grill the sandwich, flipping halfway through until the cheese is melted, and the outside is golden and crisp. Slice and serve.

Pesto Cavatappi

May 5, 2020

I have another restaurant-inspired recipe to share with you today. It’s been a while since we lived somewhere with a Noodles and Company. When we left Chicago six years ago we moved to Colorado Springs for two years. Clara was a toddler and that’s where Gwen was born just before we left. When I was pregnant with Gwen and not able to cook, let alone eat much of anything, Dustin and Clara would go out for dinner together while I stayed home on the couch watching endless episodes of British television (Poldark, Downtown Abbey, and The Paradise which I LOVED!). Dustin is a pasta lover and so they often ended up at Noodles and Co. and this dish, pesto cavatappi, became their go-to order. I figured it couldn’t be too hard to make at home and this recipe is spot on!

Cavatappi is a fancy curly noodle that can be hard to find. No fear though, this recipe will work great with a pound of pretty much any other pasta- rigatoni, farfalle, or penne would be good substitutions. We usually buy our pesto at Costco (they have large jars, I freeze what’s leftover and thaw as needed). If you have lots of fresh basil on hand you can even make your own. The noodles get tossed with sautéed mushrooms and tomatoes (we don’t love mushy tomatoes so we wait and add them at the end), garlic, pesto, a bit of broth and cream, and lots of Parmesan cheese. It’s pretty and so delicious!

Pesto Cavatappi

INGREDIENTS

1 lb. Cavatappi (or another similar pasta)
1 cup basil pesto (We love Costco’s pesto)
1 Tbsp. olive oil
1-2 cups cherry or grape tomatoes, halved
8 oz. cremini mushrooms, sliced
2 large cloves garlic, minced
1/2 cup chicken or vegetable broth
1/4 cup heavy cream
salt and freshly ground black pepper
1/2 cup freshly grated parmesan + extra for serving
fresh basil, for serving (optional)

DIRECTIONS

  1. Bring a large pot of water to a boil. Add a generous pinch of salt, followed by the pasta. Cook just until al dente, according to package directions, then drain the pasta and set aside.
  2. While the pasta cooks, make the sauce. Warm olive oil in a large skillet over medium-high heat. When the oil is hot and shimmering, add the sliced tomatoes (we wait and add our tomatoes at the end) and mushrooms. Cook for 2-3 minutes, until the tomatoes are softened and the mushrooms begin to release liquid. Add garlic and cook for 1 minute more, just until fragrant.
  3. Pour in the broth and simmer for another 2-3 minutes, until slightly reduced. Stir in the cream and simmer for 1 minute more. Reduce heat to low and stir in the pesto and Parmesan. Taste and add more salt and pepper, to taste.
  4. Stir in the pasta and toss to mix well. Serve with additional cheese and fresh basil, if desired.

Adapted from Nourish and Fete

Mexican Street Corn Salad

May 2, 2020

Have you ever had elote (Mexican street corn)? We discovered it in on a trip to San Diego several years ago and now get it from a taco truck at our city famers market. Elote is fresh corn, usually served on a stick piping hot and coated in sour cream/mayo, cotija cheese and seasoned with lime, garlic and/or chili powder and salt. It’s delicious. And messy. (See picture below. If you can’t tell, Gwen is a fan.)

This salad is elote in a bowl. Just as tasty and a bit less mess. It’s great with freshly picked summer corn but adaptable to frozen. I use pre-roasted frozen corn (found at Trader Joe’s and Whole Foods) which makes it even easier and something we can enjoy year-round. It’s great for a picnic or bbq or pairs with just about any Mexican dish. We had it with beef taco salad– amazing on the side or thrown right on top!

Mexican Street Corn Salad

INGREDIENTS

4 cups corn (about 5 ears), cut from the cob (or frozen corn- Trader Joe’s and Whole Foods have roasted frozen corn and it’s delicious)
1 Tbsp. olive oil
1/2 red bell pepper, chopped
1/2 small red onion, finely chopped
1/2 cup fresh cilantro, chopped
6 green onions, chopped
1 jalapeno pepper, diced (or pickled jalapeno, to taste)
4 Tbsp. lime juice (from about 2 limes)
1/2 tsp. ground cumin
1/2 tsp. smoked paprika
1/4 tsp. freshly ground black pepper
1/4 tsp. salt
2 Tbsp. sour cream (or Greek yogurt)
2 Tbsp. mayonnaise
1/2 cup Cotija cheese, crumbled

DIRECTIONS

  1. Cut the corn off the cob. I used 5 ears to get about 4 cups. You can also use canned corn or frozen corn. If using frozen, no need to thaw it out.
  2. Heat the olive oil in a large skillet over high heat. Add the corn and stir it around. Cook for about 3 to 5 minutes or until the corn starts to char, which is why we’re using high heat. If using frozen corn, you will need a couple minutes extra to get the right charred bits. (If you’re using pre-roasted corn like I did, just warm it in the skillet, no need to char it further.)
  3. Transfer the corn to a large bowl and let it cool for a couple minutes.
    To the same bowl, add the remaining ingredients. Stir everything together until well combined. Adjust lime juice and salt and pepper as necessary. Garnish with additional cheese and cilantro, if preferred, and serve.

Adapted from Jo Cooks

Scalloped Potatoes

April 27, 2020

My kids are so used to sweet potatoes around here that I have a hard time getting them to eat white ones. They’ll eat french fries, of course, and tater tots. But even mashed potatoes aren’t their favorite. So I’ve been experimenting with different ways to prepare potatoes and found a winner. (Well, Dustin and I think these are amazing, and so does the one year old at least!) This is a classic cheesy scalloped potato dish, with a creamy white cheddar sauce. It went wonderfully with our herb marinated pork tenderloin and roasted carrots for Easter dinner. Next up are the no-knead buttermilk rolls I also served alongside.

Scalloped Potatoes

INGREDIENTS

3 Tbsp. butter
1 cup yellow onion, chopped
3 Tbsp. all-purpose flour
1 Tbsp. garlic, minced
salt and freshly ground black pepper, to taste
2 3/4 cups milk (whole or reduced fat)
1 1/4 cups sharp white cheddar cheese, shredded
2 3/4 lbs. red potatoes (I’ve also used russet potatoes)
1 Tbsp. fresh parsley or chives, chopped (optional)

DIRECTIONS

  1. Preheat oven to 350 degrees. Spray a 9×13 baking dish with non-stick cooking spray.
  2. Melt butter in a medium saucepan over medium heat. Add onion and saute 3 minutes. Add flour and garlic and saute 1 minute. While whisking pour in milk. Bring to a light boil over medium-high heat, stirring frequently, until thickened. Remove from the heat and stir in cheese. Season with salt and pepper to taste (you’ll need about 1 tsp. kosher salt). Set pan aside until ready to assemble.
  3. Peel potatoes and slice into 1/6-inch slices using a mandolin (I do it by hand with a sharp knife). Spread half of the potatoes into an even layer in prepared baking dish (be sure each slice is separated). Pour half the sauce evenly over potatoes. Spread over remaining half of potatoes and finish by covering with remaining half of sauce.
  4. Bake in preheated oven until potatoes are tender when pierced with a toothpick or fork, about 55 – 70 minutes. Garnish with parsley or chives if desired and serve warm.

Makes a 9×13 pan.

Adapted from Cooking Classy