Monthly Archives: October 2013

Coconut Tres Leches Cake

October 29, 2013

tres leches cake

This one I never considered making before I made it. And then immediately regretted the 20+ years I’ve lived without it. I know that sounds dramatic. After all, it is just a dessert. But it’s a shame to be missing out on something this wonderful. I suspect there are less-than-spectacular tres leches cakes out there. But this was the first I’ve tasted and I (we) loved it. I think you’ll be wowed as well.

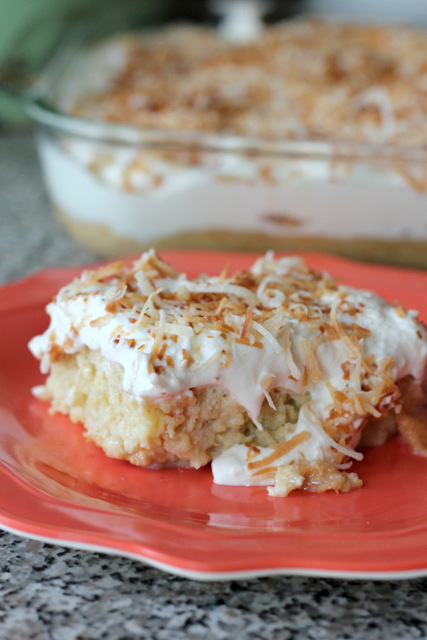
I came across this coconut tres leches cake searching for a dessert to pair with tacos. I went all out a couple Sundays ago and slow-cooked a pork shoulder and fixed an array of toppings, and felt the need to serve a Mexican-themed final course. This recipe was highly touted on CHOW and I barely messed with it except for the addition of some cinnamon (don’t skip it!) and using vanilla extract instead of Bourbon. The coconut was the highlight for me. Coconut milk is one of the “tres leches” (three milks) and the whipped cream smothered cake is topped with toasted coconut flakes. Despite the detailed instructions, it is quite simple to make. And perfect for a party since it must be prepared ahead of time and allowed to refrigerate.

Coconut Tres Leches Cake

INGREDIENTS

butter, for coating the baking dish
1 cup all-purpose flour
1/4 tsp. cinnamon + extra for dusting
6 large eggs
1 cup sugar
1 14-oz. can sweetened condensed milk
2/3 cup evaporated milk (not nonfat)
1/2 cup unsweetened canned coconut milk (not light)
1 1/2 tsp. pure vanilla extract, divided
1 cup sweetened flaked coconut
1 1/2 cups heavy whipping cream
1 Tbsp. powdered sugar

DIRECTIONS

1. Preheat oven to 325 F and arrange a rack in the middle. Coat a 9×13-inch glass baking dish with butter; set aside.

2. Combine the flour and cinnamon in a small bowl and whisk to aerate and break up any lumps; set aside.

3. Separate the eggs, placing the yolks in the bowl of a stand mixer. Reserve the whites in a separate, very clean, medium bowl. Add the sugar to the yolks and, using the paddle attachment, beat on high speed until pale yellow, about 5 minutes. Transfer the mixture to a large bowl; set aside. Thoroughly clean and dry the stand mixer bowl. Place the egg whites in the clean bowl and, using the whisk attachment, whip on high speed until medium peaks form, about 1 1/2 minutes.

4. Using a rubber spatula, stir about a third of the egg whites into the yolk mixture to lighten it. Then gently fold in the remaining whites. Sprinkle the flour over the egg mixture and gently fold it in, just until there are no more white flour streaks. (Do not overmix.)

5. Pour the batter into the prepared baking dish and bake until the cake is puffed and golden and the edges pull away from the sides of the pan, about 20 minutes.

6. Meanwhile, place the three milks and 1 tsp. of the vanilla extract in a large bowl and whisk until combined; set aside.

7. Remove the cake from the oven and place on a wire cooling rack. Using a toothpick or wooden skewer, poke holes all over the cake and allow to cool for 15 minutes. Pour the milk mixture evenly over the cake and continue cooling, about 45 minutes more. Tightly cover with plastic wrap and refrigerate at least 4 hours or overnight.

8. When the cake is ready to serve, spread the coconut in an even layer in a large frying pan. Toast over medium heat, stirring often, until lightly browned and fragrant, about 5 minutes. (If the coconut begins to burn, reduce the heat.) Immediately remove from the pan to a small bowl.

9. Place the heavy cream and powdered sugar in large bowl and whisk until medium peaks form, adding the remaining 1/2 tsp. vanilla extract halfway through whipping. Slice the cake and serve topped with a mound of whipped cream, a sprinkle of toasted coconut, and a dusting of cinnamon. (Cake will keep for several days tightly covered in the refrigerator.)

Makes a 9×13 inch cake.

(Adapted from CHOW)

Turkey Meatballs with Spaghetti Sauce

October 23, 2013

turkey meatballsTwo things I’d like to complain about this morning (because it’s hard to always be cheerful): My toddler isn’t sleeping- again. Which means neither are the rest of us. (This isn’t unusual, but more and more frustrating with age.) And it already feels like winter. What happened to fall, Chicago? I already know it’s going to be cold ’till June. Couldn’t you hold off on the misery a little bit longer? This is a great city. But let’s be honest, the weather sucks.

Now that I’m done whining, let’s talk about meatballs. With turkey instead of beef. You don’t need beef to make a great meatball. These are juicy and flavorful and I’d actually choose them over the classic. And they don’t have to accompany pasta. You could serve them on a crusty baguette as a meatball sub or just with toast for soaking up the sauce. Spaghetti squash instead of noodles is a low-carb option. If, like me, you’re in a bit of a pre-winter slump, make a batch of meatballs. They’ll warm you right up.

Turkey Meatballs with Spaghetti Sauce

INGREDIENTS

for the sauce:
2 Tbsp. extra virgin olive oil
1/2 yellow onion, diced
2 cloves garlic, minced
1 carrot, peeled and grated
1 tsp. dried oregano
handful fresh basil (about 1/4 cup) or 1-2 tsp. dried
1/2 tsp. finely ground fennel seeds (optional- I didn’t have any and omitted it this time)
28 oz. crushed tomatoes
1 bay leaf
pinch red pepper flakes (to taste)
salt and freshly ground black pepper, to taste

for the meatballs:
1/2 yellow onion, finely diced
2 cloves garlic. minced
1/2 cup plain dried breadcrumbs
2 Tbsp. fresh parsley, chopped
2 Tbsp. fresh basil, chopped
1/4 cup freshly grated Parmesan
1 Tbsp. tomato paste
1 Tbsp. ketchup (optional- adds a touch of sweetness)
1 large egg
1 lb. ground turkey (I use ground turkey thigh, dark meat is preferred as turkey breast is too dry)
3/4 tsp. kosher salt
1/4 tsp. freshly ground black pepper
2 Tbsp. olive oil, for browning

8-12 oz. spaghetti noodles, cooked according to package directions
freshly grated Parmesan, for serving

DIRECTIONS

1. To make the sauce, heat the olive oil in a large deep skillet over medium heat. Add the onion and carrot and cook until softened, about ten minutes. Stir in the garlic and cook another minute. Stir in the oregano, basil, fennel (if using), and crushed tomatoes. Add the bay leaf, a pinch of red pepper flakes, and season with salt and freshly ground black pepper. Bring to a boil; reduce heat, and simmer 15-20 minutes, stirring occasionally, until the sauce thickens slightly. Season to taste with salt and freshly ground black pepper and a pinch of sugar (if needed). If you want a smoother sauce you can puree part or all of it with a blender or food processor.

2. While the sauce is simmering, make the meatballs: In a large bowl stir together the onion, garlic, breadcrumbs, parsley, basil, Parmesan, tomato paste, ketchup (if using), egg, salt, and pepper. Add the ground turkey and, using your hands, gently mix to thoroughly combine. Form into 1 1/2 inch balls and place on a large plate or baking sheet.

3. To brown the meatballs, heat 2 Tbsp. olive oil in a large skillet over medium-high heat. Add the meatballs (I had to do them in two batches) to the pan, making sure not to overcrowd them. Cook several minutes on each side, until browned.

4. Once the sauce is ready and all the meatballs are browned, add the meatballs to the sauce, cover, and simmer over medium-low heat until the meatballs are cooked through, 15-20 minutes. (While the meatballs are cooking you can boil your pasta.) Season to taste with salt and freshly ground black pepper. Serve over spaghetti with freshly grated Parmesan.

Serves 4.

(Adapted from Food Network and Food Network)

Whole Wheat Apple Spice Pancakes

October 18, 2013

apple pancakes

I’m tired of talking about pancakes. Not of making or eating them, apparently. But there is only so much to be said about this favorite breakfast-dessert. So I’ll just skip the part where I convince you that you need another pancake recipe (because honestly, you probably don’t). You might want one though, and in that case here it is: Apple Spice Pancakes. With grated apples and cinnamon and allspice and even whole wheat. (p.s. If you skip the syrup, these really aren’t so unhealthy.)

Whole Wheat Apple Spice Pancakes

INGREDIENTS

1 1/4 cups white whole wheat flour
1 Tbsp. brown sugar
1 tsp. baking powder
1/4 tsp. baking soda
1/2 tsp. salt
1 tsp. ground cinnamon
1/4 tsp. ground allspice
1 cup + 2 Tbsp. buttermilk
1 Tbsp. butter or canola oil (or unsweetened applesauce)
1 large egg
1 tsp. pure vanilla extract
1 cup peeled, grated apple (squeeze out any extra moisture before measuring)

DIRECTIONS

1. In a large bowl, whisk together the flour, sugar, baking powder, baking soda, salt, cinnamon, and nutmeg.

2. In a separate bowl, whisk to combine the buttermilk, oil or applesauce, egg, and vanilla extract.

3. Pour the wet ingredients over the dry and whisk until just combined (don’t overmix- the batter will still by lumpy). Gently fold in the grated apple.

4. Heat a griddle or nonstick skillet over medium heat. Brush with butter or spray with cooking spray. Pour batter by 1/4-cup fulls onto the griddle and cook several minutes until bubbles form in the middle of each pancake and the edges start to set. Flip and cook several minutes on the second side, until golden brown and cooked through.

NOTE: Cooked pancakes can be kept warm on a sheet pan in a 250 F oven until ready to serve. They also freeze well: Cool completely and freeze in a single layer on a sheet pan before combining into a freezer bag (this prevents them from sticking together). To reheat, defrost in the microwave or let come to room temperature on the counter, then toast.

Serves 2.

(Adapted from Two Peas and Their Pod)

Four Cheese Pesto Margherita Pizza

October 11, 2013

pesto margherita pizza

Here is that promised pizza recipe. Another way to top the honey whole wheat pizza dough. This time I took three different pizzas- pesto, margherita, and four cheese- and combined them into one. (I even snuck sausage on half, because I had some. And I was feeding a few men who get a lot more excited about eating something if it includes meat.) Make this recipe your own and pick your favorite four (or three or six) Italian cheeses. I’m thinking Gorgonzola or Romano would be great options. (By the way I just did a Google search of “Italian Cheeses” out of curiosity and found this list– I had no idea there were so many!) You can even expand origins and throw some feta or Gouda on there. It’ll be delicious.

Four Cheese Pesto Margherita Pizza

INGREDIENTS

1 recipe honey whole wheat pizza dough
~ 1/3 cup purchased or homemade basil pesto
combination of 4 Italian cheeses: I used thinly sliced fresh mozzarella and freshly grated Asiago, fontina, and Parmesan
Roma tomatoes, thinly sliced
salt and freshly ground black pepper
fresh basil, chopped for garnish

*I added crumbled cooked Italian sausage to half of the pizza. It was excellent with or without.

DIRECTIONS

1. Prepare pizza dough according to recipe directions.

2. Preheat oven and pizza stone to 450 F.

3. Spread a thin layer of basil pesto over the prepared crust. Top with sliced mozzarella and sprinkle with freshly grated cheeses. Top with sliced tomatoes and sprinkle with a bit of salt and freshly ground black pepper.

4. Bake in the preheated oven for about 10 minutes, until the crust is puffed and golden brown and the cheese is bubbling. Sprinkle with fresh basil; slice and serve.

Makes 1 large pizza.

(Adapted from All Recipes and Gourmet)

Honey Whole Wheat Pizza Dough

October 8, 2013

pizza dough

I created this pizza dough recipe almost five years ago and have been using it regularly ever since. Haven’t you noticed? I post pizzas constantly. (There are, um, more than 30 pizzas in the index!!) Obviously, we love it! I decided it was time for a few updates (I just streamlined some of the instructions) and to be re-shared.

If you’ve never made your own pizza dough, you must! A puffed and chewy homemade crust is worth the little effort. I promise it’s easier than you think. And after a few times it’ll be second nature- you’ll probably even have the recipe memorized. If you’ve never worked with yeast, don’t be intimidated- this recipe is a great place to start.

A few notes before you begin: (As always, if you have any questions, leave them in the comments section and I will try to respond to you as soon as possible.)

on yeast– Here I use active dry (I’ve never tried this dough with instant yeast, if I do someday I’ll update with the results), which needs to be proofed in warm water before adding the other ingredients. Adding the sweetener (honey or sugar) to the water just speeds up the process as yeast thrives on sugar. Water temperature is important: too hot and you’ll kill your yeast, too cold and it won’t activate properly. You can use a thermometer to be exact, but I usually test the water with my finger and aim for what feels hot but not scorching (if I have to pull it out quickly, it’s too hot).

sugar vs. honey– Either will work. I just prefer the flavor and health benefits of honey. Before my daughter turned 1 made it with sugar and hardly noticed a difference.

pizza dough


about the flours
– Why bread flour? Because it has a higher gluten content and creates a chewier puffier crust. All-purpose can be used instead but the final result won’t be quite the same. Why white whole wheat flour? Well, because I like to use at least some whole wheat flour for nutrition and white whole wheat is ground finer resulting in a less dense texture and lighter taste. You can use regular whole wheat flour and the dough will be a bit tougher. You can use all white flour (bread or all-purpose) and you’ll just need to add more of it during the kneading process (white flour doesn’t absorb as much water as whole wheat).

pizza stones– To achieve a perfectly puffed, crispy-bottomed crust you need to use a pizza stone. Round or square- I don’t care as long as it’s HOT. Preheat to 450 F (or even 500 F if your oven runs cool) for a good 30+ minutes before baking. (I’ve detailed your options for transferring your crust to and from the oven in the directions below.) And remember to carefully follow any directions for cleaning your stone. Soap should not be used- only hot water.

letting the dough rest– This step might sound unnecessary and inconvenient, but I promise it makes a huge difference. After your dough rises and you punch it down, let it rest for at least 5, preferably 10 minutes before forming your crust. I’ve been in a hurry many times and immediately tried to shape my crust and always end up tearing holes in the dough. I don’t know the science behind it but letting the dough rest makes it stretchy and pliable and so much easier to work with.

making the dough ahead of time: If you need to make your dough ahead of time (earlier in the day) it can be refrigerated after step 4 (placing it in a bowl and covering it) and then taken out of the fridge to warm up about an hour before you’ll be using it. It will rise slightly in the fridge, but needs to warm to room temperature and finishing the rising process before it is ready to handle. I’ve never refrigerated it overnight and don’t think it would hold up very well. I have heard that you can freeze pizza dough for later use, but haven’t tried it yet myself.

Alright, that’s it.

Oh, if you’re wondering about the pizza pictured above, I’ll be sharing that recipe next!

Honey Whole Wheat Pizza Dough

INGREDIENTS

1 cup warm water (100-120 degrees F, over 120 degrees will kill your yeast)
2 tsp. honey (or sugar)
2 tsp. active dry yeast
1 cup bread flour (+ approx. 1/4 cup more for kneading)
1 cup white whole wheat flour (or all-purpose flour*)
1 tsp. sea salt
2 Tbsp. extra virgin olive oil

DIRECTIONS

1. In a glass or plastic bowl (metal can negatively affect yeast), dissolve honey in warm water. Add yeast and let sit (at least 10 minutes) until yeast is active and bubbly.

2. In a large mixing bowl, whisk together all purpose flour, white whole wheat flour, and salt. Create a well in the center.

3. Once the yeast mixture is ready, pour it into the well in your flour mixture bowl. Add the extra virgin olive oil. Using a spatula and then your fingers, mix the dough until it pulls away from the side of the bowl.

4. Knead the dough on the counter top, adding up to 1/4 cup more flour just until it is no longer sticking to the counter and has a smooth texture. (You can brush a little olive oil onto your fingers for the kneading process.)

5. Place the dough in a greased bowl and cover. Let rise until doubled in size, about an hour. You can test if your dough has risen enough by poking it with a finger. If the imprint stays, then the dough is ready.

6. Deflate the dough into a ball, and let it rest on your counter for at least 10 minutes before you create the crust.

7. Preheat the oven and pizza to 450 degrees F. This will take 20+ minutes. A scorching hot pizza stone is the key to getting that puffed evenly cooked crust.

8. To shape your crust you will simply use your hands and gravity. DO NOT use a rolling pin- it will press out all of the air that has formed in your dough. Take the ball of dough in your hands and simply begin pulling it around the edges. It should start to stretch easily. Rotate it around your first making sure you are stretching each side evenly, so that you have a round crust. The middle will be fairly thin, and you want to leave the edges thicker so they will puff up.

9. Now you have several options. First is to open the preheated oven, sprinkle with stone with semolina flour or cornmeal, and place your crust directly on the stone. Then add your sauce and toppings and close the oven. This allows a fair bit of heat to escape the oven though so it is not ideal. The second option is to place your crust on a sheet of parchment paper (dusted with cornmeal). You can then add the sauce and toppings. Carry the pizza to the oven and place it on the stone (parchment paper stays beneath it). This makes removing the pizza from the oven easy as well-you simply pick up the parchment paper! (Be very careful though, as it sometimes rips.) Last of all, if you own a pizza peel, you can place your crust directly on the peel (dust it with cornmeal first) or your parchment paper directly on the peel, add your sauce and toppings, then use the peel to slide the crust or parchment onto the pizza stone. Once it is cooked you will slide it off the stone back onto the peel. If you are cooking multiple pizzas the second and third options are best, as they do not require you to remove the stone from the oven and it will stay hot.

10. Bake your pizza for approximately 10-12 minutes, until the crust is puffed and starting to turn golden brown, and the cheese is melted and bubbling.

11. Once you have removed your pizza from the oven, let it rest for a few minutes before slicing. Enjoy!

*You’ll need to add some extra flour during the kneading process if you use all white flours (because white flour absorbs less water than whole wheat flour does)

Makes 1 large pizza.

(an A Hint of Honey original)