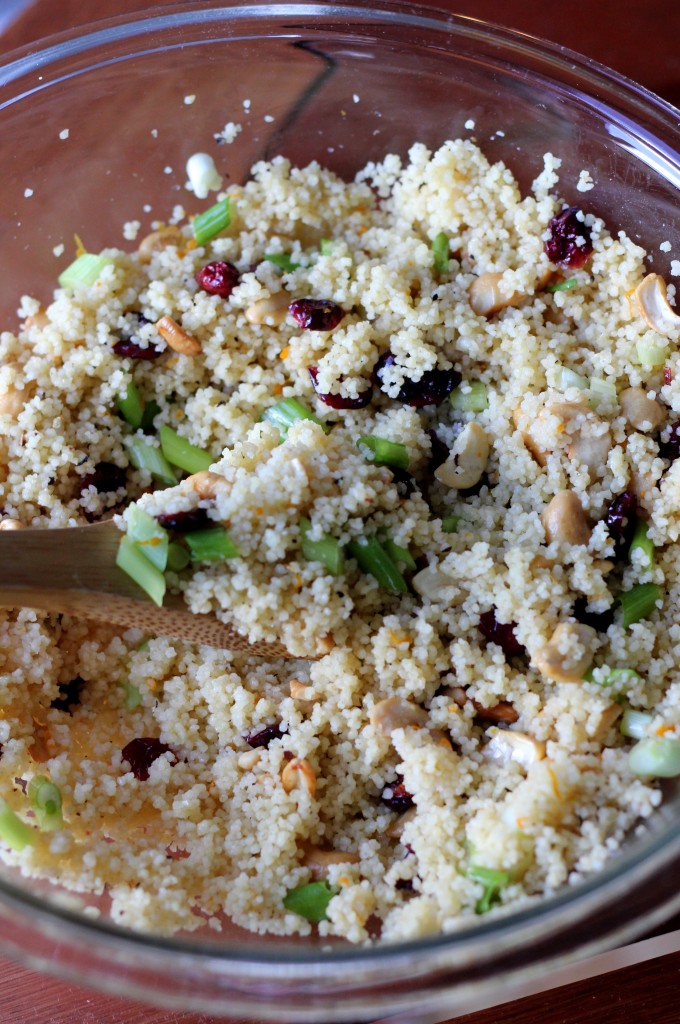
I realized while typing out this recipe that it would make a very festive Christmas side dish. And here we are on the first 80+ degree day of summer! You don’t have to wait for Christmas to make this couscous. Dotted with green onions, sweet dried cranberries, and roasted cashews, and tossed in a maple-orange vinaigrette, it’s light and fresh and perfect year-round! I served it with Parmesan and panko crusted thin-cut pork chops and steamed green beans. It would be excellent with chicken kebabs or grilled shrimp or fish or just about anything.
Orange Couscous with Cranberries and Cashews
INGREDIENTS
3/4 cup couscous (I used whole wheat)
1 cup water or low-sodium chicken/vegetable broth
zest of 1/2 orange
2 Tbsp. fresh orange juice
1 tsp. pure maple syrup
1 Tbsp. olive oil
1/3 cup dried cranberries
1/3 cup roasted cashews, roughly chopped
2-3 green onions, thinly sliced
salt and freshly ground black pepper, to taste
DIRECTIONS
1. Put the couscous in a medium bowl. In a very small saucepan, bring the broth and a pinch of salt to a boil over high heat, then pour it over the couscous. Tightly cover the bowl with plastic wrap and let stand until the couscous is tender and the broth is absorbed, about 5 minutes. Gently scrape and fluff the couscous with a fork and serve as is (stir in a little butter or olive oil, if you like).
2. Meanwhile, in a small bowl, whisk together the orange zest, orange juice, maple syrup, and oil, then season with salt and pepper.
3. Pour the dressing over the warm couscous and gently toss to combine. Add the cranberries, cashews, and scallions and gently toss again. Adjust the seasonings to taste and serve.
What I love about this salsa: It uses chipotle peppers, as in smoked jalapenos that come from a can (you can freeze what you don’t use for later). Also from a can- the tomatoes (fire-roasted for the best flavor), which means you can make it any time of year. And then it requires hardly any chopping at all as you throw everything in the blender/food-processor and let it do the work for you. It’s also completely customizable as far as texture (smooth or chunky), acidity (lots of vinegar or a little), and heat (just increase the peppers). Amazing on tacos or for dipping quesadillas and chips in (our new favorite tortillas chips). It’ll keep for about a week in the fridge and would be awesome canned in little jars to give as gifts, though I’ve yet to ever do this.
Chipotle Salsa
INGREDIENTS
1 (14.5 oz.) can fire-roasted diced tomatoes
1/2 medium onion, diced
2 -3 canned chipotle chiles in adobo (two for medium heat, three for hot)
1/4 cup fresh cilantro
2 cloves garlic
1 1/2 tsp. kosher salt
pinch freshly ground black pepper
2 -3 Tbsp. cider vinegar (I used 2 Tbsp.)
DIRECTIONS
1. Combine tomatoes and remaining ingredients in food processor or blender and pulse until well combined (pulse less for a chunky salsa, longer for a smooth salsa). Adjust seasonings (salt, pepper, and vinegar) to taste. Refrigerate until ready to serve.
One last post coming to you from Chicago. Tomorrow we pack a truck and depart the city. Bittersweet, for sure. Sad to leave so many friends and favorite places behind, but ready to discover somewhere new. Before all the packing began and mountains of cardboard took over my kitchen, I made breakfast. I made two versions of puffed pancakes- one with vanilla, fresh blueberries, and cinnamon, and this one with cherries and toasted almonds. Dutch baby’s (same thing, different name) are even easier than traditional pancakes. You just whisk everything together and pour it into a skillet- no flipping required. Plus, one recipe makes just the right amount for us 2 + toddler (with some browned chicken sausage, hash browns, and fruit on the side).
You can use fresh or frozen cherries here. Since I had a bowl of ripe cherries on my counter, I went with fresh. But a little secret: frozen cherries are often cheaper and usually come pre-pitted!! As usual, I made the batter with half whole wheat flour. When it comes to the almonds, it doesn’t matter how you do it (I opted for the dry skillet on the stove method), just make sure you toast them. They taste and smell so much more amazing toasted than raw. Last of all, serve hot with lemon wedges, powdered sugar, and a drizzle of warm maple syrup or honey.
Cherry Almond Dutch Baby
INGREDIENTS
3 large eggs
2 Tbsp. sugar
3/4 cup all-purpose flour (or half white flour and half whole wheat)
3/4 cup milk
1/2 tsp. almond extract
pinch salt
4 Tbsp. butter
1- 2 cups pitted sweet cherries, halved
1/3- 1/2 cup sliced almonds, toasted (toast in a dry skillet over medium-low heat, stirring occasionally, until golden and fragrant)
powdered sugar, lemon wedges, honey and/or maple syrup, all for serving
DIRECTIONS
1. Preheat oven to 425 F. Whisk eggs, sugar, flour, milk, almond extract and salt together until the batter is blended but lumpy; you can also do this in a blender. In a 12-inch ovenproof frying pan or cast iron skillet, melt butter. Add cherries and cook until warmed, about 2 minutes. Pour in batter and transfer to heated oven. Bake for 15-20 minutes, until puffed and golden brown.
2. Remove pancake from oven and quickly scatter with toasted almonds, dust with powdered sugar and squeeze lemon juice over. Serve in wedges, piping hot.
My “survive another (and probably last- this gives me hope*) Chicago winter” plan is this: Stay indoors and cook lots of wonderful warm things. When you must venture out to a) the grocery store, because you must secure ingredients for all that cooking you’re going to do, and b) the gym, because if you eat and never move all winter long you’ll regret it, wear as many layers as possible. Big puffy coats and boots are a must. Hats and gloves and scarves are not optional. And earmuffs- I always thought they were just ridiculous looking and frivolous. But now I get it. If you don’t want hat hair and you’re going to step outdoors here, earmuffs are a must. I know I won’t be the only one freezing their tush off for the next six months (Chicago winters last ’till June- it’s unfortunate) so hopefully some of you will appreciate a few soul-warming recipes to get you through.
*I love so many things about this city. Winter is not one of them though. My husband finishes his residency in June so we are likely to be moving somewhere new as he starts his career. Chicago has been an amazing experience so far. It offers so many opportunities and adventures (especially for food-lovers), but I won’t complain if our move takes us to a warmer climate.
Next chance you get to make breakfast, I suggest you start here- with Baked Eggs. Canadian bacon (or the regular stuff) is topped with sauteed shallot and spinach, a cracked egg, a drizzle of milk or cream, and dusted with Parmesan before being baked until the whites are set and the yolk is as runny or hard as you wish. Serve with toast for an irresistible hot breakfast.
I actually made these for lunch for Clara and I and saved the last two for breakfast the next day. A few seconds in the microwave to re-warm and they still tasted great. Dustin only tried them as leftovers and thought they were awesome. As usual, this recipe is easily adaptable. Don’t have a shallot? Use several tablespoons of minced onion in its place. Replace the spinach with another leafy green. Use traditional bacon, cooked until crisp and crumbled. And top with whatever salty cheese you’re into.
Baked Eggs with Canadian Bacon, Spinach, and Parmesan
INGREDIENTS
1 Tbsp. olive oil or butter + extra for greasing the ramekins
1 medium shallot, minced
6 oz. baby spinach, chopped
salt and freshly ground black pepper, to taste
4 slices Canadian bacon, whole or diced (or regular bacon, cooked until crisp and crumbled)
4 large eggs
1 oz. freshly grated Parmesan (or white cheddar or asiago, etc.)
4 tsp. milk or heavy cream
DIRECTIONS
1. Preheat oven to 350 F. Grease 4 (6-oz.) ramekins** with butter or cooking spray and set on a baking sheet.
2. Heat olive oil or butter in a large skillet over medium heat. Add the shallot and cook for several minutes, until softened. Stir in the spinach and cook for several more minutes, until wilted. Season with salt and freshly ground black pepper to taste.
3. Place 1 slice (or 1/4 of the diced) Canadian bacon in the bottom of each prepared ramekin. Divide the spinach mixture between the ramekins and place on top of the bacon. Crack one egg on top of the spinach mixture in each ramekin. Drizzle each egg with 1 tsp. milk/cream, sprinkle with cheese, and season with salt and freshly ground black pepper.
4. Bake in preheated oven for about 15 minutes for a just-set yolk. (Shorter for a runny yolk and longer for a hard yolk.) Serve immediately.
**Don’t own ramekins? Any similar-sized oven-safe bowl or dish should work. Or you can combine all of the ingredients and bake the eggs in one larger dish.
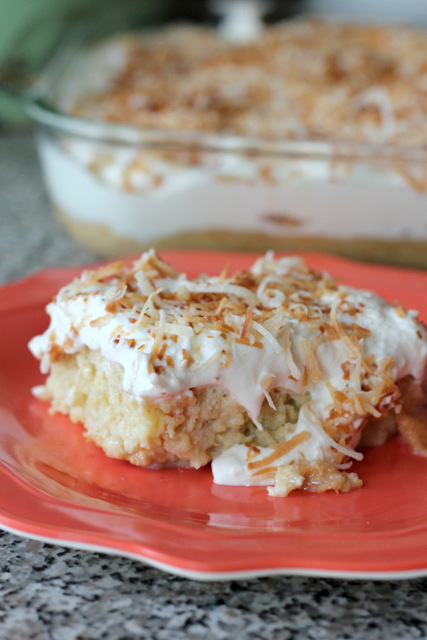
This one I never considered making before I made it. And then immediately regretted the 20+ years I’ve lived without it. I know that sounds dramatic. After all, it is just a dessert. But it’s a shame to be missing out on something this wonderful. I suspect there are less-than-spectacular tres leches cakes out there. But this was the first I’ve tasted and I (we) loved it. I think you’ll be wowed as well.
I came across this coconut tres leches cake searching for a dessert to pair with tacos. I went all out a couple Sundays ago and slow-cooked a pork shoulder and fixed an array of toppings, and felt the need to serve a Mexican-themed final course. This recipe was highly touted on CHOW and I barely messed with it except for the addition of some cinnamon (don’t skip it!) and using vanilla extract instead of Bourbon. The coconut was the highlight for me. Coconut milk is one of the “tres leches” (three milks) and the whipped cream smothered cake is topped with toasted coconut flakes. Despite the detailed instructions, it is quite simple to make. And perfect for a party since it must be prepared ahead of time and allowed to refrigerate.
Coconut Tres Leches Cake
INGREDIENTS
butter, for coating the baking dish
1 cup all-purpose flour
1/4 tsp. cinnamon + extra for dusting
6 large eggs
1 cup sugar
1 14-oz. can sweetened condensed milk
2/3 cup evaporated milk (not nonfat)
1/2 cup unsweetened canned coconut milk (not light)
1 1/2 tsp. pure vanilla extract, divided
1 cup sweetened flaked coconut
1 1/2 cups heavy whipping cream
1 Tbsp. powdered sugar
DIRECTIONS
1. Preheat oven to 325 F and arrange a rack in the middle. Coat a 9×13-inch glass baking dish with butter; set aside.
2. Combine the flour and cinnamon in a small bowl and whisk to aerate and break up any lumps; set aside.
3. Separate the eggs, placing the yolks in the bowl of a stand mixer. Reserve the whites in a separate, very clean, medium bowl. Add the sugar to the yolks and, using the paddle attachment, beat on high speed until pale yellow, about 5 minutes. Transfer the mixture to a large bowl; set aside. Thoroughly clean and dry the stand mixer bowl. Place the egg whites in the clean bowl and, using the whisk attachment, whip on high speed until medium peaks form, about 1 1/2 minutes.
4. Using a rubber spatula, stir about a third of the egg whites into the yolk mixture to lighten it. Then gently fold in the remaining whites. Sprinkle the flour over the egg mixture and gently fold it in, just until there are no more white flour streaks. (Do not overmix.)
5. Pour the batter into the prepared baking dish and bake until the cake is puffed and golden and the edges pull away from the sides of the pan, about 20 minutes.
6. Meanwhile, place the three milks and 1 tsp. of the vanilla extract in a large bowl and whisk until combined; set aside.
7. Remove the cake from the oven and place on a wire cooling rack. Using a toothpick or wooden skewer, poke holes all over the cake and allow to cool for 15 minutes. Pour the milk mixture evenly over the cake and continue cooling, about 45 minutes more. Tightly cover with plastic wrap and refrigerate at least 4 hours or overnight.
8. When the cake is ready to serve, spread the coconut in an even layer in a large frying pan. Toast over medium heat, stirring often, until lightly browned and fragrant, about 5 minutes. (If the coconut begins to burn, reduce the heat.) Immediately remove from the pan to a small bowl.
9. Place the heavy cream and powdered sugar in large bowl and whisk until medium peaks form, adding the remaining 1/2 tsp. vanilla extract halfway through whipping. Slice the cake and serve topped with a mound of whipped cream, a sprinkle of toasted coconut, and a dusting of cinnamon. (Cake will keep for several days tightly covered in the refrigerator.)


/ COMMENT / Share