Two things I’d like to complain about this morning (because it’s hard to always be cheerful): My toddler isn’t sleeping- again. Which means neither are the rest of us. (This isn’t unusual, but more and more frustrating with age.) And it already feels like winter. What happened to fall, Chicago? I already know it’s going to be cold ’till June. Couldn’t you hold off on the misery a little bit longer? This is a great city. But let’s be honest, the weather sucks.
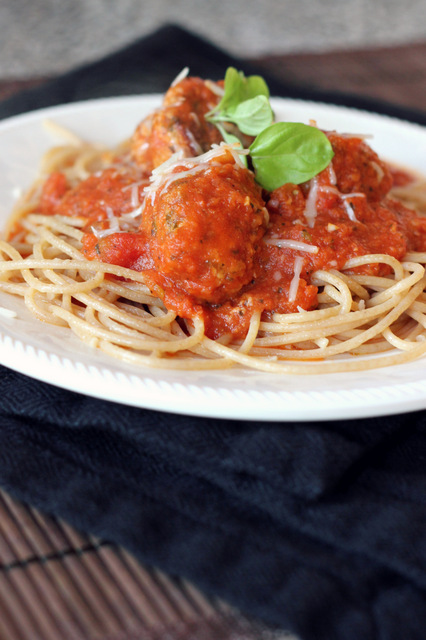
Now that I’m done whining, let’s talk about meatballs. With turkey instead of beef. You don’t need beef to make a great meatball. These are juicy and flavorful and I’d actually choose them over the classic. And they don’t have to accompany pasta. You could serve them on a crusty baguette as a meatball sub or just with toast for soaking up the sauce. Spaghetti squash instead of noodles is a low-carb option. If, like me, you’re in a bit of a pre-winter slump, make a batch of meatballs. They’ll warm you right up.
Turkey Meatballs with Spaghetti Sauce
INGREDIENTS
for the sauce:
2 Tbsp. extra virgin olive oil
1/2 yellow onion, diced
2 cloves garlic, minced
1 carrot, peeled and grated
1 tsp. dried oregano
handful fresh basil (about 1/4 cup) or 1-2 tsp. dried
1/2 tsp. finely ground fennel seeds (optional- I didn’t have any and omitted it this time)
28 oz. crushed tomatoes
1 bay leaf
pinch red pepper flakes (to taste)
salt and freshly ground black pepper, to taste
for the meatballs:
1/2 yellow onion, finely diced
2 cloves garlic. minced
1/2 cup plain dried breadcrumbs
2 Tbsp. fresh parsley, chopped
2 Tbsp. fresh basil, chopped
1/4 cup freshly grated Parmesan
1 Tbsp. tomato paste
1 Tbsp. ketchup (optional- adds a touch of sweetness)
1 large egg
1 lb. ground turkey (I use ground turkey thigh, dark meat is preferred as turkey breast is too dry)
3/4 tsp. kosher salt
1/4 tsp. freshly ground black pepper
2 Tbsp. olive oil, for browning
8-12 oz. spaghetti noodles, cooked according to package directions
freshly grated Parmesan, for serving
DIRECTIONS
1. To make the sauce, heat the olive oil in a large deep skillet over medium heat. Add the onion and carrot and cook until softened, about ten minutes. Stir in the garlic and cook another minute. Stir in the oregano, basil, fennel (if using), and crushed tomatoes. Add the bay leaf, a pinch of red pepper flakes, and season with salt and freshly ground black pepper. Bring to a boil; reduce heat, and simmer 15-20 minutes, stirring occasionally, until the sauce thickens slightly. Season to taste with salt and freshly ground black pepper and a pinch of sugar (if needed). If you want a smoother sauce you can puree part or all of it with a blender or food processor.
2. While the sauce is simmering, make the meatballs: In a large bowl stir together the onion, garlic, breadcrumbs, parsley, basil, Parmesan, tomato paste, ketchup (if using), egg, salt, and pepper. Add the ground turkey and, using your hands, gently mix to thoroughly combine. Form into 1 1/2 inch balls and place on a large plate or baking sheet.
3. To brown the meatballs, heat 2 Tbsp. olive oil in a large skillet over medium-high heat. Add the meatballs (I had to do them in two batches) to the pan, making sure not to overcrowd them. Cook several minutes on each side, until browned.
4. Once the sauce is ready and all the meatballs are browned, add the meatballs to the sauce, cover, and simmer over medium-low heat until the meatballs are cooked through, 15-20 minutes. (While the meatballs are cooking you can boil your pasta.) Season to taste with salt and freshly ground black pepper. Serve over spaghetti with freshly grated Parmesan.
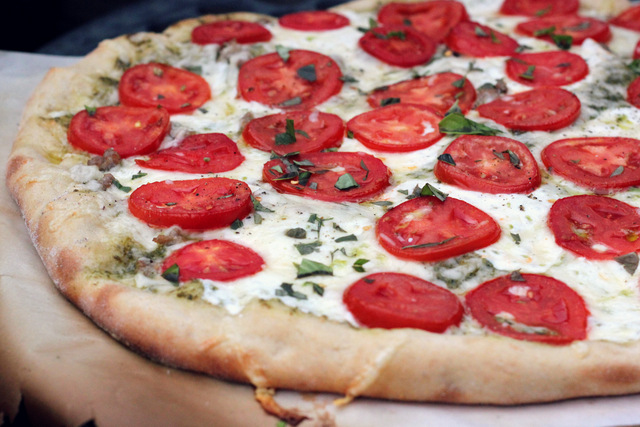
Here is that promised pizza recipe. Another way to top the honey whole wheat pizza dough. This time I took three different pizzas- pesto, margherita, and four cheese- and combined them into one. (I even snuck sausage on half, because I had some. And I was feeding a few men who get a lot more excited about eating something if it includes meat.) Make this recipe your own and pick your favorite four (or three or six) Italian cheeses. I’m thinking Gorgonzola or Romano would be great options. (By the way I just did a Google search of “Italian Cheeses” out of curiosity and found this list– I had no idea there were so many!) You can even expand origins and throw some feta or Gouda on there. It’ll be delicious.
Four Cheese Pesto Margherita Pizza
INGREDIENTS
1 recipe honey whole wheat pizza dough
~ 1/3 cup purchased or homemade basil pesto
combination of 4 Italian cheeses: I used thinly sliced fresh mozzarella and freshly grated Asiago, fontina, and Parmesan
Roma tomatoes, thinly sliced
salt and freshly ground black pepper
fresh basil, chopped for garnish
*I added crumbled cooked Italian sausage to half of the pizza. It was excellent with or without.
3. Spread a thin layer of basil pesto over the prepared crust. Top with sliced mozzarella and sprinkle with freshly grated cheeses. Top with sliced tomatoes and sprinkle with a bit of salt and freshly ground black pepper.
4. Bake in the preheated oven for about 10 minutes, until the crust is puffed and golden brown and the cheese is bubbling. Sprinkle with fresh basil; slice and serve.
I created this pizza dough recipe almost five years ago and have been using it regularly ever since. Haven’t you noticed? I post pizzas constantly. (There are, um, more than 30 pizzas in the index!!) Obviously, we love it! I decided it was time for a few updates (I just streamlined some of the instructions) and to be re-shared.
If you’ve never made your own pizza dough, you must! A puffed and chewy homemade crust is worth the little effort. I promise it’s easier than you think. And after a few times it’ll be second nature- you’ll probably even have the recipe memorized. If you’ve never worked with yeast, don’t be intimidated- this recipe is a great place to start.
A few notes before you begin: (As always, if you have any questions, leave them in the comments section and I will try to respond to you as soon as possible.)
on yeast– Here I use active dry (I’ve never tried this dough with instant yeast, if I do someday I’ll update with the results), which needs to be proofed in warm water before adding the other ingredients. Adding the sweetener (honey or sugar) to the water just speeds up the process as yeast thrives on sugar. Water temperature is important: too hot and you’ll kill your yeast, too cold and it won’t activate properly. You can use a thermometer to be exact, but I usually test the water with my finger and aim for what feels hot but not scorching (if I have to pull it out quickly, it’s too hot).
sugar vs. honey– Either will work. I just prefer the flavor and health benefits of honey. Before my daughter turned 1 made it with sugar and hardly noticed a difference.
about the flours– Why bread flour? Because it has a higher gluten content and creates a chewier puffier crust. All-purpose can be used instead but the final result won’t be quite the same. Why white whole wheat flour? Well, because I like to use at least some whole wheat flour for nutrition and white whole wheat is ground finer resulting in a less dense texture and lighter taste. You can use regular whole wheat flour and the dough will be a bit tougher. You can use all white flour (bread or all-purpose) and you’ll just need to add more of it during the kneading process (white flour doesn’t absorb as much water as whole wheat).
pizza stones– To achieve a perfectly puffed, crispy-bottomed crust you need to use a pizza stone. Round or square- I don’t care as long as it’s HOT. Preheat to 450 F (or even 500 F if your oven runs cool) for a good 30+ minutes before baking. (I’ve detailed your options for transferring your crust to and from the oven in the directions below.) And remember to carefully follow any directions for cleaning your stone. Soap should not be used- only hot water.
letting the dough rest– This step might sound unnecessary and inconvenient, but I promise it makes a huge difference. After your dough rises and you punch it down, let it rest for at least 5, preferably 10 minutes before forming your crust. I’ve been in a hurry many times and immediately tried to shape my crust and always end up tearing holes in the dough. I don’t know the science behind it but letting the dough rest makes it stretchy and pliable and so much easier to work with.
making the dough ahead of time: If you need to make your dough ahead of time (earlier in the day) it can be refrigerated after step 4 (placing it in a bowl and covering it) and then taken out of the fridge to warm up about an hour before you’ll be using it. It will rise slightly in the fridge, but needs to warm to room temperature and finishing the rising process before it is ready to handle. I’ve never refrigerated it overnight and don’t think it would hold up very well. I have heard that you can freeze pizza dough for later use, but haven’t tried it yet myself.
Alright, that’s it.
Oh, if you’re wondering about the pizza pictured above, I’ll be sharing that recipe next!
Honey Whole Wheat Pizza Dough
INGREDIENTS
1 cup warm water (100-120 degrees F, over 120 degrees will kill your yeast)
2 tsp. honey (or sugar)
2 tsp. active dry yeast
1 cup bread flour (+ approx. 1/4 cup more for kneading)
1 cup white whole wheat flour (or all-purpose flour*)
1 tsp. sea salt
2 Tbsp. extra virgin olive oil
DIRECTIONS
1. In a glass or plastic bowl (metal can negatively affect yeast), dissolve honey in warm water. Add yeast and let sit (at least 10 minutes) until yeast is active and bubbly.
2. In a large mixing bowl, whisk together all purpose flour, white whole wheat flour, and salt. Create a well in the center.
3. Once the yeast mixture is ready, pour it into the well in your flour mixture bowl. Add the extra virgin olive oil. Using a spatula and then your fingers, mix the dough until it pulls away from the side of the bowl.
4. Knead the dough on the counter top, adding up to 1/4 cup more flour just until it is no longer sticking to the counter and has a smooth texture. (You can brush a little olive oil onto your fingers for the kneading process.)
5. Place the dough in a greased bowl and cover. Let rise until doubled in size, about an hour. You can test if your dough has risen enough by poking it with a finger. If the imprint stays, then the dough is ready.
6. Deflate the dough into a ball, and let it rest on your counter for at least 10 minutes before you create the crust.
7. Preheat the oven and pizza to 450 degrees F. This will take 20+ minutes. A scorching hot pizza stone is the key to getting that puffed evenly cooked crust.
8. To shape your crust you will simply use your hands and gravity. DO NOT use a rolling pin- it will press out all of the air that has formed in your dough. Take the ball of dough in your hands and simply begin pulling it around the edges. It should start to stretch easily. Rotate it around your first making sure you are stretching each side evenly, so that you have a round crust. The middle will be fairly thin, and you want to leave the edges thicker so they will puff up.
9. Now you have several options. First is to open the preheated oven, sprinkle with stone with semolina flour or cornmeal, and place your crust directly on the stone. Then add your sauce and toppings and close the oven. This allows a fair bit of heat to escape the oven though so it is not ideal. The second option is to place your crust on a sheet of parchment paper (dusted with cornmeal). You can then add the sauce and toppings. Carry the pizza to the oven and place it on the stone (parchment paper stays beneath it). This makes removing the pizza from the oven easy as well-you simply pick up the parchment paper! (Be very careful though, as it sometimes rips.) Last of all, if you own a pizza peel, you can place your crust directly on the peel (dust it with cornmeal first) or your parchment paper directly on the peel, add your sauce and toppings, then use the peel to slide the crust or parchment onto the pizza stone. Once it is cooked you will slide it off the stone back onto the peel. If you are cooking multiple pizzas the second and third options are best, as they do not require you to remove the stone from the oven and it will stay hot.
10. Bake your pizza for approximately 10-12 minutes, until the crust is puffed and starting to turn golden brown, and the cheese is melted and bubbling.
11. Once you have removed your pizza from the oven, let it rest for a few minutes before slicing. Enjoy!
*You’ll need to add some extra flour during the kneading process if you use all white flours (because white flour absorbs less water than whole wheat flour does)
I’ve been dedicating a lot of time here recently (mostly behind the scenes: moving to wordpress, partnering with advertisers, now working on a redesign… so exciting!!) and it has prompted me to think about my purpose in this space. What am I doing here? Not on earth in general- we’ll save that for another day. But why I bother with this blog. Why I put so much of myself into something that maybe just a few (wonderful) people read. Well, this is what I came up with:
I love it. I love food (obviously). I tolerate taking pictures of food (one of my goals is to improve this aspect of things). I love cooking. And I want to inspire you to love it too. That’s it. My big purpose. I hope I can reach at least a few of you out there and inspire you to create in the kitchen. To feed yourselves and your families healthy, whole foods and to enjoy it!
The second purpose is to journal my successes and failures. I post the recipes that are worth repeating, along with what I learned in the process of getting there. This is my love affair with food, chronicled as a reference for us to share.
And last, the most selfish reason of all- I want to write. To write about food and whatever else I please. To write about my little unimportant life, in a way that’s meaningful to me. To write about eating too much and not sleeping nearly enough. About being a wife, a daughter, a mama. Just to say something.
So thank you for listening.
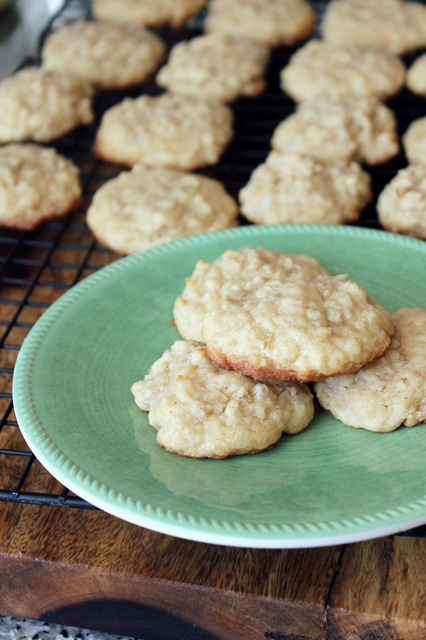
Now cookies. Because we all deserve a treat. I loved my friend’s description of these, “the perfect balance of chewy, and coconut, and sweet”. They’re simple- nothing exotic or unusual. Just a vanilla cookie batter with coconut and oats. Soft and sweet and chewy.
Chewy Coconut Oatmeal Cookies
INGREDIENTS
1 cup (2 sticks) butter, softened to room temperature
1 cup granulated sugar
1 cup brown sugar
2 eggs
2 tsp. pure vanilla extract
1 tsp. baking soda
1 tsp. baking powder
1/2 tsp. salt
2 1/2 cups all-purpose flour
1 cup shredded sweetened coconut
1 cup quick oats
DIRECTIONS
1. Preheat oven to 350 F. Lightly grease (or line with parchment paper) a large baking sheet.
2. Cream butter and sugars with an electric mixer on medium until light and fluffy. Add the eggs and vanilla extract and mix well. Add the baking soda, baking powder, salt, flour, coconut, and oats and mix until well combined.
3. Drop by tablespoonfuls onto the prepared sheet. Bake in preheated oven for 8-10 minutes until just golden brown on the edges. Remove cookies to cool on a wire rack.
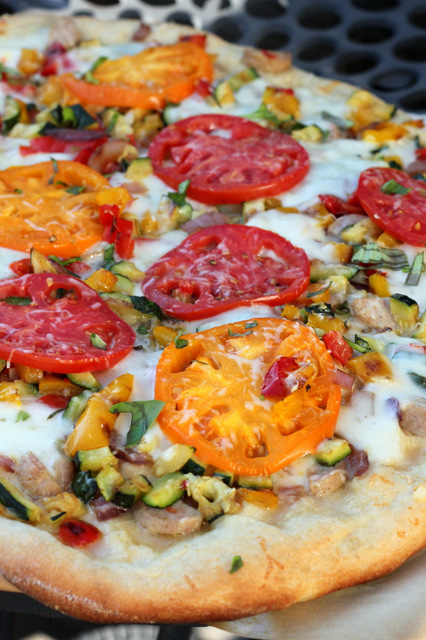
Just because September is upon us doesn’t mean summer is over. We have a few official weeks left. And the peaches and tomatoes and berries aren’t going to disappear overnight. Thank goodness. I’m not ready to say goodbye yet. I picked up some end-of-summer veggies at the farmers market this week and decided they were destined for a pizza.
I didn’t actually grill the pizza (although you could- I did so here) but I grilled the zucchini and peppers and onion before I put them on the pizza. (Just with a little olive oil and s&p.) Those grilled veggies combined with sliced tomatoes, fresh mozzarella and Parm, bits of shaved garlic, and chopped fresh basil made for one stunning pizza. (Oh, and I threw on some chicken sausage which is good, but not necessary.)
You really don’t need a recipe (other than a good pizza dough). Gather the most beautiful vegetables you can find (or fruit- fruit is awesome on pizza) and grill them. Add your favorite cheese(s) and fresh herbs. Bake it ’till it’s golden and crisp and the cheese oozes. And you’re there. Summer on a crust.
Grilled Summer Vegetable Pizza
INGREDIENTS
1 recipe pizza dough
extra virgin olive oil, for grilling vegetables and brushing crust 1-2 cloves garlic, thinly sliced as possible
summer vegetables (zucchini, yellow squash, eggplant, bell peppers, onion, tomatoes, etc.),
kosher salt and freshly ground black pepper
chicken sausage (optional)
fresh mozzarella, thinly sliced
freshly grated Parmesan cheese
fresh basil, julienned
2. While the crust is rising, grill the vegetables. (I grilled everything except the tomatoes.) Preheat indoor grill pan or outdoor grill to medium-high heat. Prepare vegetables (wash and stem, pit and slice, etc.), brush with olive oil, and sprinkle with salt and pepper. (NOTE: You don’t want to chop your veggies up too small before grilling. Leave them in large pieces to go on the grill and then afterwards cut them up for topping the pizza.) Grill until tender and slightly charred. Set aside to cool before chopping into the size you want for topping the pizza.
3. Preheat oven and pizza stone to 450 F.
4. Brush prepared crust with a thin layer of olive oil. Sprinkle with the sliced garlic and roasted vegetables and chicken sausage (if using). Top with slices of mozzarella and freshly grated Parmesan cheese. Sprinkle with freshly ground black pepper.
5. Bake in preheated oven on pizza stone for about 10 minutes, until the crust is puffed and golden brown and the cheese is bubbling. Remove from the oven and sprinkle with fresh basil. Slice and serve.
 Two things I’d like to complain about this morning (because it’s hard to always be cheerful): My toddler isn’t sleeping- again. Which means neither are the rest of us. (This isn’t unusual, but more and more frustrating with age.) And it already feels like winter. What happened to fall, Chicago? I already know it’s going to be cold ’till June. Couldn’t you hold off on the misery a little bit longer? This is a great city. But let’s be honest, the weather sucks.
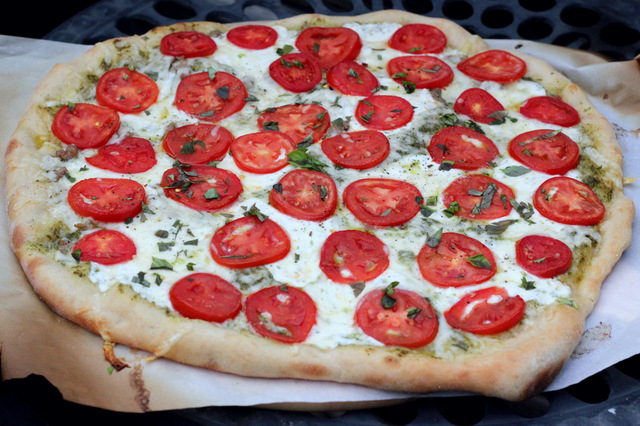

/ COMMENT / Share