Category Archives: dairy-free

Pork Meatball Bahn Mi

October 19, 2012

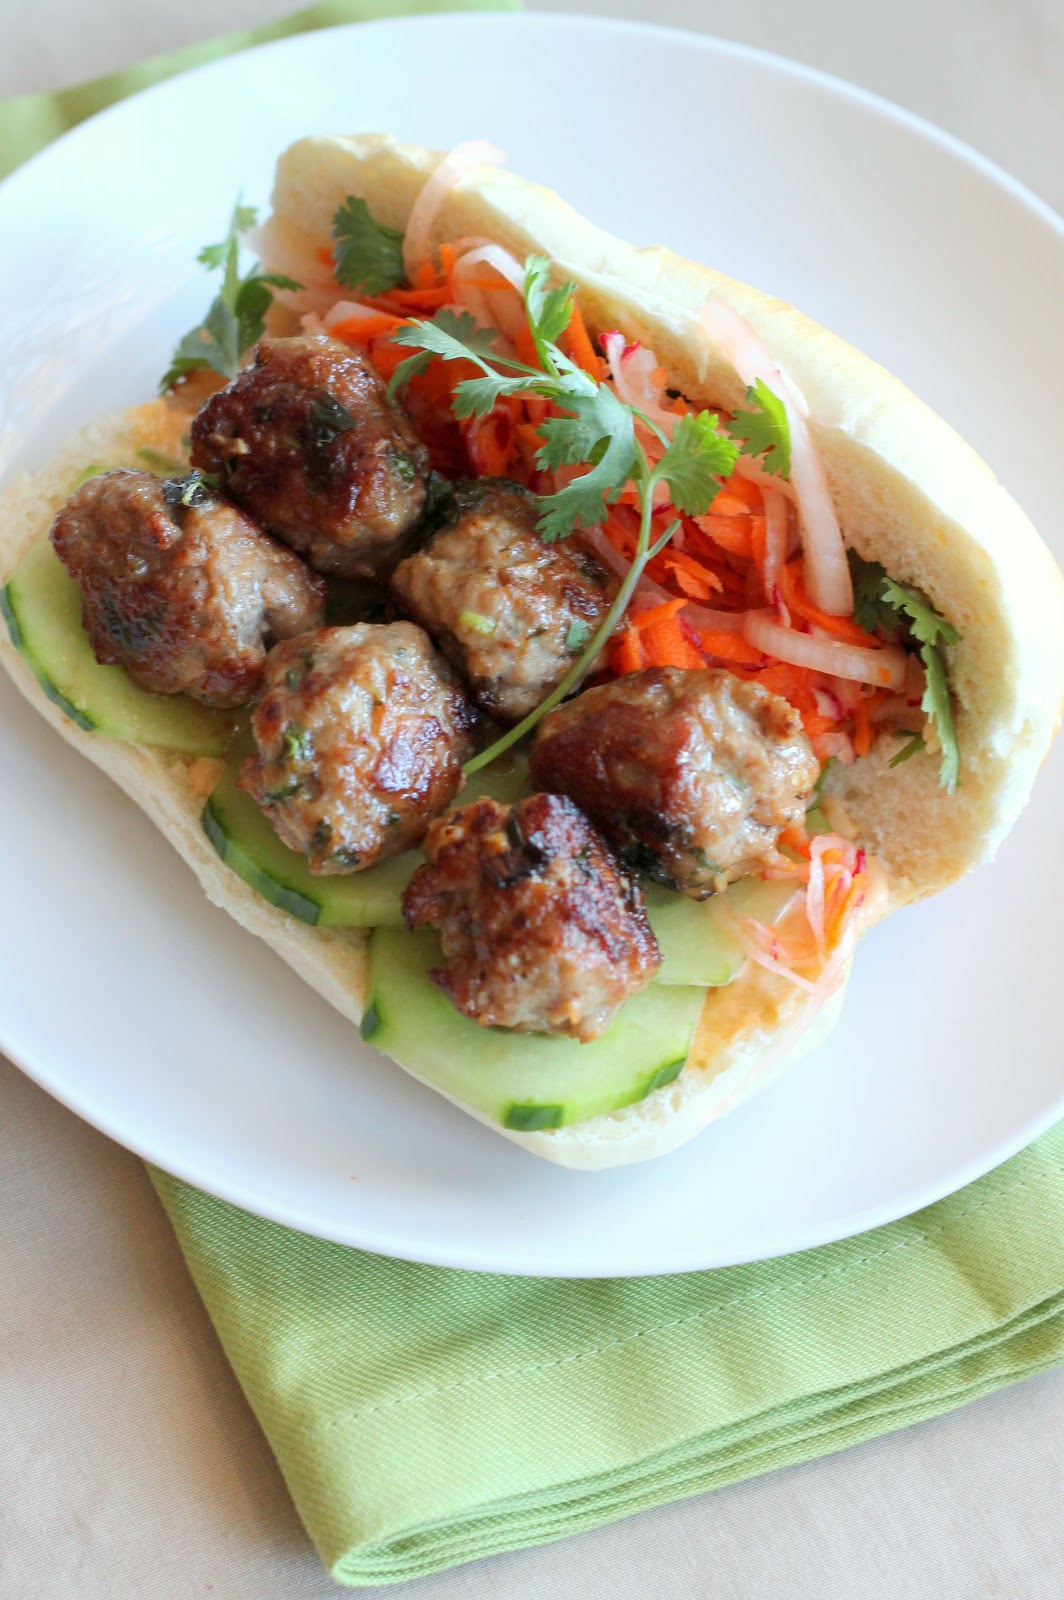
I found this delectable sandwich during my hunt for dairy-free recipes. I didn’t get around to trying it until just recently. But I wish I hadn’t waited. It was insanely delicious. If you’re not familiar with the bahn mi, essentially it’s just a Vietnamese sandwich. “Bahn mi” literally means bread or baguette, which, as I just learned, was introduced to the country by French colonists. The chewy-soft rolls are commonly filled with meat, picked vegetables, cilantro, and finished with a spicy mayo. This version is stuffed with plump pork meatballs, along with the traditional fixings. The meatballs were warm and juicy, bursting with basil, garlic, and chili flavors- the perfect contrast to the sweet pickled carrot and radish and creamy hot mayonnaise. If you want to lighten things up, try using ground chicken or turkey. And if you’re feeling extra lazy, you could simply use thinly sliced or shredded roasted chicken breast- you’ll still have an awesome sandwich.

Pork Meatball Bahn Mi

INGREDIENTS

Pork Meatballs:
1 lb. ground pork (or chicken or turkey)
1/4 cup fresh basil, finely chopped
4 cloves garlic, minced
3 green onions, finely chopped
1 Tbsp. fish sauce
1 Tbsp. hot chili sauce (such as sambal oelek or sriracha)
1 tsp. sugar
2 tsp. cornstarch
1/2 tsp. freshly ground black pepper
1/2 tsp. kosher salt

Pickled Vegetables:
2 cups carrot, coarsely grated or julienned
2 cups daikon (japanese radish) or regular radish and/or cucumber, coarsely grated or julienned
1/4 cup rice vinegar
2 Tbsp. sugar
1/2 tsp. kosher salt
1 tsp. sesame oil

Hot Chili Mayonnaise:
1/3 cup mayonnaise
2 green onions, finely chopped
1 Tbsp. hot chili sauce (such as sriracha)

1 Tbsp. sesame oil
4+ french rolls or pieces sliced baguette
cucumber, peeled and thinly sliced (if you didn’t pickle it)
jalapeno, thinly sliced into rings (optional, I’ve used pickled jalapeno as well)
fresh cilantro

DIRECTIONS

1. To prepare the meatballs: Gently mix all ingredients in a large bowl and form into 1-inch meatballs (should yield about 24). Place on a rimmed baking sheet and refrigerate until ready to use. (Can be made up to a day ahead of time.)

2. To prepare the pickled vegetables: In a medium bowl dissolve sugar in rice vinegar and season with kosher salt. Toss with carrot, daikon, and onion. Let stand at room temperature 1 hour (or refrigerate if made farther in advance).

3. To prepare the hot chili mayonnaise: Stir to combine mayonnaise, green onion, and chili sauce in a small bowl. Refrigerate until ready to serve. (Can be made up to a day ahead of time.)

4. Heat sesame oil in a large skillet over medium-high heat. (You may want to divide the meatballs up and cook them in two batches.) Add meatballs and saute until browned and cooked through, about 10-15 minutes. Lower the heat if the meatballs are browning too quickly. (Already cooked meatballs can be kept warm on a baking sheet in a 300 F oven.)

5. To assemble the sandwiches: Slice rolls in half and remove enough bread out of the center so you have a 1/2-inch thick shell. Spread with hot chili mayo. Arrange cucumber, jalapeno (optional), and cilantro on the bottom halves. Top with meatballs and pickled vegetables and serve.

Makes 4 sandwiches.

(Adapted from Bon Appetit)

Slow-Cooker Moroccan Chicken, Chickpea, and Apricot Tagine

October 14, 2012

chicken tagine

One of my favorite restaurants back in Richmond served, among other incredible things, the most delicious Moroccan tagine. I’d always hoped to find a recipe that allowed me to replicate it at home. Or at least come close. And here it is. In the eloquent words of Wikepedia, tagines are “slow-cooked stews braised at low temperatures, resulting in tender meat with aromatic vegetables and sauce”. They are actually named after the pot in which they are traditionally cooked, which is this cute little triangular dish with a chimney. While you are welcome to go out and pick yourself up a tagine, it won’t be necessary. This recipe uses the slow-cooker to achieve the same result- with little time or fuss.

While I find this recipe to be near perfect as is, it would be easily amenable to changes. Throw in a few extra vegetables such as cauliflower, sweet potatoes, or squash. (I would wait and add softer ones partway through cooking so they don’t turn to mush.) Or try it with pork or lamb. And in case you’re wondering, ras el hanout is simply a Moroccan spice blend. It can be found at some upscale groceries (try Whole Foods), online, or you can make it yourself (links below).

Slow-cooker Moroccan Chicken, Chickpea, and Apricot Tagine

INGREDIENTS

2 Tbsp. extra virgin olive oil
2 large onions, chopped
4 cloves garlic, minced
1 inch fresh ginger root, peeled and grated
1 Tbsp. all-purpose flour
2 Tbsp. tomato paste
2 Tbsp. honey
4 tsp. ras el hanout (available here, or try this recipe)
1 tsp. turmeric (or a pinch of saffron)
1 tsp. ground cumin
1 tsp. ground cinnamon
1 tsp. ground coriander
up to 1 tsp. cayenne pepper (I only used ~1/4 tsp.)
1 cup low-sodium chicken stock
2 cans diced tomatoes (I used fire-roasted crushed tomatoes)
2 cans chickpeas, drained and rinsed
6 oz. dried apricots, diced (or you can leave them whole, but I prefer the texture of them diced)
3 lbs. boneless skinless chicken thighs
4 carrots, peeled and chopped
1 preserved lemon, cut into wedges (optional, I omitted)
salt and freshly ground black pepper, to taste

fresh cilantro, chopped for serving
cous cous or rice, for serving

DIRECTIONS

1. Heat olive oil in a large skillet over medium heat. Add the onions and saute until softened. Add the garlic and ginger and cook for 1 minute. Stir in the flour, tomato paste, honey, and spices and cook for another minute. Add the chicken stock and tomatoes and cook for several minutes, making sure to get out any lumps of flour. Season with salt and freshly ground black pepper.

2. Combine the tomato/spice mixture with the chickpeas, apricots, chicken thighs, carrots, and lemon (if using) in a large slower cooker, mixing well. Cover and cook on high for 3-4 hours, or until the meat shreds easily with a fork. Serve over cous cous or rice, topped with fresh cilantro.

Serves 8.

(Adapted from Food.com)

Shrimp Fajtas

October 10, 2012

I already had a shrimp fajita recipe in my archives. But it has been replaced. There was nothing wrong with it- it was an excellent recipe. But this one is even better. I’ve made it twice now in the last few weeks. I served it to my parents this weekend when they came to visit and they too thought it was fantastic. And it’s easily adaptable (and just as tasty) if you’re eating dairy-free: just forgo the sour cream.

Shrimp Fajitas

INGREDIENTS

1 1/2 lbs. shrimp, peeled and deveined
1 tsp. ground cumin
1 tsp. garlic powder
1 tsp. freshly ground black pepper
1 tsp. kosher salt
1 tsp. chili powder
1 tsp. light brown sugar
1/4 tsp. dried oregano
2 cloves garlic, minced
2 Tbsp. extra virgin olive oil + extra for sautéing
1 large white onion, sliced into thin wedges
2-3 bell peppers (I used yellow, red, and green), seeded and sliced into thin strips

for serving:
warmed flour tortillas
guacamole or avocado
salsa or pico de gallo
sour cream
cilantro, chopped
lime wedges

DIRECTIONS

1. In a small bowl combine the spices and brown sugar. Set aside 1 Tbsp. of the spice mixture for later. Add the shrimp, garlic, and olive oil and toss to coat.

2. Heat a drizzle of olive oil in a large saute pan over medium-high heat. Add the onion and cook until starting to soften and brown, about 4 minutes. Add the peppers and continue to saute for 3 minutes. Stir in the remaining spice mixture and continue to cook until the onions and peppers are tender, another couple minutes. Transfer to a bowl or plate. Return the skillet to medium-high heat and add the shrimp. Cook, stirring frequently, until the shrimp are cooked through, about 3-4 minutes. Add the vegetables; toss to combine and reheat. Serve with warm flour tortillas and the other optional toppings.

Serves 4.

(Adapted from Fine Cooking)

Turkey Pinto Bean Chili

September 28, 2012

As much as I hate saying goodbye to summer, I get excited about fall every year. Particularly the food. Apples and pears, pumpkin and squash. Hearty and comforting dishes like casseroles and stews and chili. I was made for warmer weather (probably the only thing I’ll miss about being pregnant is not having that internal heater all winter). But I fully embrace boots and scarves and warm bowls of soup. I’m not gonna lie- I’m terrified of what’s coming. I hear Chicago gets ugly this time of year. That there is snow and wind and COLD coming my way. So far my only strategy for surviving these impending months is hiding out in my kitchen with my hot oven, a pile of recipes, and baby girl in tow.

This chili has been sitting in my “recipe box” all year waiting for the right moment to be shared. I fused two similar Bon Appetit recipes to come up with this one. Simple to prepare and full of flavor (which gets even better as leftovers), this dish’ll keep you toasty and full. (And it can be made dairy-free by opting for the cocoa powder or using milk-free chocolate chips.)

Turkey Pinto Bean Chili

INGREDIENTS

1 Tbsp. extra virgin olive oil
1 large onion, diced
2 red bell peppers, seeded and diced
4 cloves garlic, minced
2 lbs. ground turkey thigh
1/4 cup chili powder
1 1/2 tsp. ground cumin
1 1/2 tsp. dried oregano
1/4 tsp. cinnamon
1 bay leaf
1 oz. semi-sweet chocolate OR 1 Tbsp. unsweetened cocoa powder
3 cans pinto beans (I used 2 cans pinto and 1 can white/Great Northern beans)
28 oz. can diced tomatoes in juice
3 cups low-sodium chicken broth
salt and freshly ground black pepper, to taste

for serving (optional):
chopped cilantro
diced red or green onion
sour cream or plain yogurt
sharp cheddar

DIRECTIONS

1. Heat oil in a large pot over medium heat. Add the onion, peppers, and garlic and saute until soft, about 10 minutes. Add the turkey thigh and cook, breaking up with the back of a spoon, until no longer pink. Stir in the chili powder, cumin, oregano, cinnamon, bay leaf, and chocolate. Add beans, tomatoes with their juice, and chicken broth. Bring to a boil. Reduce heat to medium and simmer uncovered until chili thickens, stirring occasionally, about 45 minutes- 1 hour. Season to taste with salt and freshly ground black pepper. Serve with optional toppings.

Serves 8.

(Adapted from Bon Appetit and Bon Appetit)

Chocolate Coconut Bars

September 20, 2012

There aren’t a lot of dessert options when you’re eating dairy-free. Desserts that don’t include any milk, butter, buttermilk, yogurt, cream, cream cheese, etc. are not only hard to come by, but usually not too enticing. I know dairy-free margarine and several other substitutes exist. (I’ve got some and I’ll try them out eventually.) They just don’t excite me. Thankfully, not all chocolate is made with milk (especially the dark varieties). And coconut oil makes an excellent replacement for butter in some recipes.

I just discovered coconut oil and I love it. And from what I hear/read- it happens to be good for you. I’ll eat it for breakfast spread on a toasted english muffin. Yum. Anyway, its health benefits are probably negated by the copious amounts of sugar used in this recipe. But this is after all, dessert. Feel free to use butter instead. I’m sure (in fact, I know) that would be good. But the oil adds even more coconut flavor without sacrificing richness or texture in this recipe.

Chocolate Coconut Bars

INGREDIENTS

1 cup all-purpose flour
1/8 tsp. salt
1/2 cup unsalted butter, melted and at room temperature (I used 1/2 cup coconut oil)
1 cup light brown sugar
1 large egg
1 1/2 tsp. pure vanilla extract
1 cup sweetened coconut flakes + extra for sprinkling on top
1 cup chocolate chips

DIRECTIONS

1. Preheat oven to 350 F. Spray an 8-inch square baking pan with cooking spray.

2. Combine the flour and salt; whisk and set aside.

3. Stir together the melted butter (or coconut oil) and brown sugar until smooth and creamy; beat in egg and vanilla extract until well blended.

4. Slowly beat in the flour and salt mixture until just blended. Next, stir in the coconut and chocolate chips. Scrape the batter into the pan. Make sure the batter is spread evenly, smooth with a spatula. Sprinkle extra coconut on top of the bars.

5. Bake for about 20-25 minutes, or until set in the center but still soft. (Mine were almost overly done after 18 minutes- this may be due to my hot oven or replacing the butter with coconut oil.) Do not overbake the bars. Let cool slightly before cutting the bars into squares and serving.

Makes an 8×8 pan.

(Adapted from Brown Eyed Baker via Lahatchita Eats)