Category Archives: Pie

Pear Crumble Pie

December 4, 2020

I’m so excited to be finally sharing this recipe with you! For the last 3+ years this Pear Crumble Pie has become our favorite pie ever/Thanksgiving dessert tradition. Since I only make it once a year and am often traveling for the holiday and baking it in someone else’s kitchen, it has taken me this long to take a picture and share it. But I have already passed the recipe on to a few friends who love it too. It’s a keeper! And since pears are in season much of the winter, it would also make an excellent Christmas/New Years treat!

Pear pie might sound weird, since apples are more commonly used. But I promise, once you try this combo of sweet Bartlett pears with tossed with cinnamon and vanilla in a flaky all-butter pie crust and topped with cookie crumble, you won’t go back to apple pie!

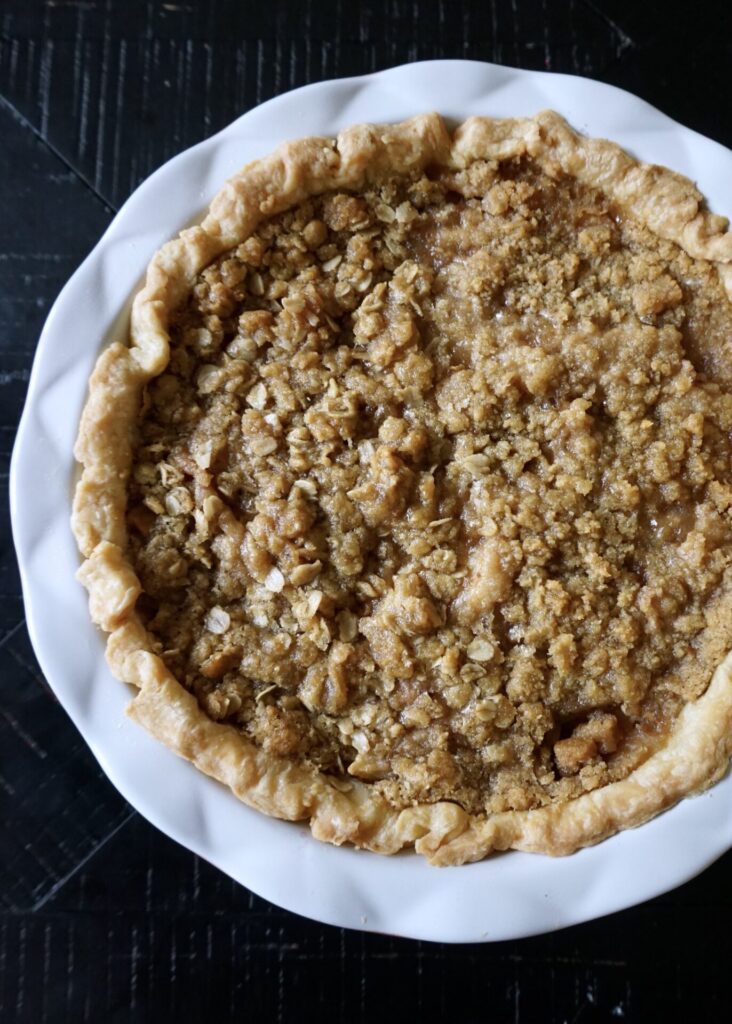
You might notice that the left half of the pie above has oats in the crumb topping and the right half does not. I figured out several years ago that I can’t digest oatmeal without side effects (which I’ll spare you the details on). So I’ve adapted this recipe to be made with and without the oats and it’s great either way. Though I do love the heartiness the oatmeal provides to the crumble, and recommend using it if you can!

Lastly, please make your own pie crust. It’s really not hard. And it tastes so SO much better than store bought. This is my favorite pie crust recipe. It’s buttery and flaky and perfect. (And can easily be doubled when you want to use it in a recipe that calls for a top and bottom pie crust!)

Pear Crumble Pie

INGREDIENTS

Pie Crust:
1 1/4 cups all-purpose flour
1/2 Tbsp. sugar
1/4 tsp. sea salt
1/2 cup (1 stick) cold unsalted butter, cubed
3-4 Tbsp. ice water
1 egg white, lightly beaten

Filling:
5 large Bartlett pears (about 2 lbs.), peeled, cored and thinly sliced (use pears that are ripe but still firm- not too squishy yet- so they don’t get mushy once baked)
1/4 cup all-purpose flour
1/2 tsp. sea salt
1/2 cup sugar
1 tsp. ground cinnamon
1/2 a vanilla bean, seeds scraped out (or 1 tsp. pure vanilla extract)

Crumble:
1/2 cup all-purpose flour
1/2 cup rolled oats (or replace with another 1/2 cup of all-purpose flour)
1 cup brown sugar
1/2 cup (1 stick) unsalted butter, room temperature

DIRECTIONS

  1. To make the pie crust, mix the flour, sugar, and salt in a food processor (or by hand with a whisk). Add the butter and pulse until coarse mill forms (or cut in the butter by hand with a pastry blender until only pea-size crumbs remain). Gradually blend in enough ice water until the dough clumps (or mix in a Tbsp. at a time by hand). Form the dough into a large ball and flatten into a disk. Wrap in plastic and chill 2 hours or overnight.
  2. Roll out the pastry dough on a floured surface until large enough to cover a 9-inch pie dish. Drape the rolled out pastry over the pie dish and press it down to fit. Trim and crimp the edges. Brush the bottom and sides of the crust with the beaten egg white. 
  3. To make the filling, in a large bowl add the vanilla seeds/extract, pears, flour, salt, sugar and cinnamon. Use your hands or a spoon to carefully combine the ingredients together, making sure the pears don’t break apart. Set aside.
  4. To make the crumble, in a small bowl, combine the flour, oats (if using), brown sugar and butter. Using a pastry cutter/fork (or your fingers), combine the mixture until it resembles large crumbs.
  5. Spoon the filling into the pie crust. Top with the crumble mixture.
  6. Preheat oven to 325 F. (If you are worried about your filling spilling over, you can place the pie pan on top of a large rimmed baking sheet to catch any dripping while it bakes. I used a deep dish pie pan and didn’t need to.)
  7. Cover the exposed pie crust with thin strips of aluminum foil or a pie shield and bake in preheated oven for 35 minutes. Remove foil/shield and bake for another 25 minutes until the filling is bubbling and the top is golden and crisp. Let cool for at least an hour before serving. Slice and serve with vanilla ice cream or whipped cream. 

Makes 1 pie.

(Adapted from Bitchin Camaro)

Mini Key Lime Pies

September 4, 2020

I’m loving mini desserts lately! Like these mini cheesecakes, these tiny key lime pies are quick to bake with my 3 small helpers and just the right size for one or two a piece. They’re tart yet sweet and perfect with a dollop of homemade whipped cream. (If you’d rather bake a full size pie, there are instructions included below the recipe.)

Mini Key Lime Pies

INGREDIENTS

1 1/2 cups graham cracker crumbs (about 10 full sheet graham crackers)
6 Tbsp. unsalted butter, melted
1/3 cup sugar

4 oz. full-fat cream cheese, softened to room temperature
4 large egg yolks
14 oz. can full-fat sweetened condensed milk
1/2 cup (120ml) key lime juice*
lime slices and whipped cream, for garnish (optional)

DIRECTIONS

  1. Preheat the oven to 350 F. Line a 12-count muffin pan with liners and a second 12-count muffin pan with only 4 (since this recipe makes only around 16). Set pans aside.
  2. Make the crust: Before you begin, here are all of my tips for a perfect graham cracker crust. If you’re starting out with full-sheet graham crackers, you can use a food processor or blender to grind them up. Or crush them in a zipped top bag with a rolling pin. Mix the graham cracker crumbs, melted butter, and granulated sugar together with a rubber spatula in a medium bowl until combined. The mixture will be thick, coarse, and sandy. Press a heaping tablespoon of mixture down into each liner, making sure the crust is tight and compact. You might have a little crust leftover. If so, press a little more into each liner—if desired! Pre-bake the crusts for 5 minutes. Remove from the oven.
  3. Make the filling: In a large bowl using a handheld or stand mixer fitted with a whisk attachment, beat the cream cheese on high speed until smooth, about 1 minute. On medium-high speed, beat in the egg yolks, scraping down the sides as needed. On high speed, beat in the sweetened condensed milk and lime juice until combined.
  4. Pour the filling evenly into each crust. Bake for 15-16 minutes or until the centers of the pies only slightly jiggle (I check this by wiggling the muffin pan—with an oven mitt on– while it’s still in the oven). Allow the pies to cool at room temperature in the pan set on a wire rack. Once completely cool, place the pan in the refrigerator for at least 2 hours and up to 1 day.
  5. Once chilled, serve the key lime pies cold with whipped cream and a lime slice if desired. Store leftover pies in the refrigerator (covered) for up to 1 week. If they last that long!

NOTES:

*Key Lime Juice: For the best flavor, make sure you use key lime juice. You can juice your own key limes or buy it from the store. It is usually with the regular lime and lemon juice in the juice aisle. I buy Nellie & Joe’s brand. In a pinch, you can use regular lime juice.

For a Full-Size Key Lime Pie: This is the same exact recipe I use for classic key lime pie (and sometimes I add the zest of 1 lime to the filling, which you can add to these mini pies as well). To make the pie, simply use this crust and filling recipe. Press crust into a 9-inch pie dish. Pre-bake for 12 minutes at 350 F. Pour in filling. Bake for 18 minutes, then allow to cool at room temperature before chilling in the refrigerator for 4 hours – overnight.

Makes ~16 mini key lime pies.

(Adapted from Sally’s Baking Addiction)

Fresh Pumpkin Pie

November 19, 2013

pumpkin pie

Before we talk about pumpkin pie, some news:

Over the next few days A Hint of Honey will experience some down time as we work behind the scenes to get the newly designed site up and running! If during that time you’re in desperate need of a recipe, don’t hesitate to contact me. You can reach me via email (ahintofhoney at gmail) or Facebook or Twitter and I’ll do my best to get that recipe to you! I hope you’re as excited as I am! It will be worth the wait…

Now pie. I’ve always wanted to make a pumpkin pie with pumpkin that didn’t come from a can. Because then it would truly be a from-scratch homemade pumpkin pie. And yes it’s more work, but it had to be done. At least once.

And now that I’ve done it, I’m already considering doing it again. Because it wasn’t so hard and it was really wonderful. Although if you’re not as determined as me, this recipe would still be delicious with canned pumpkin. And even if you skip the cardamom and lemon zest (which brighten and boost the flavor), it’ll taste great.

Fresh Pumpkin Pie

INGREDIENTS

1 recipe all-butter pie crust (I added 1 1/2 tsp. sugar for a sweeter crust)
2 cups pumpkin puree (from a medium sized fresh roasted sugar pumpkin or canned)
12 oz. can evaporated milk (not nonfat) or 1 /2 cups heavy cream
1/2 cup packed dark brown sugar
1/3 cup white sugar
1/2 tsp. salt
2 whole eggs + 1 egg yolk
2 tsp. ground cinnamon
1 tsp. ground ginger
1/4 tsp. ground nutmeg
1/4 tsp. ground cloves
1/4 tsp. ground cardamom
1/2 tsp. lemon zest

DIRECTIONS

1. Prepare pie crust according to recipe directions, omitting the step where you pre-bake the crust. (NOTE: The dough needs to be made ahead of time and allowed to chill for several hours in the refrigerator before rolling out.)

2. To make pumpkin puree, preheat oven to 350 F. Line a large baking sheet with aluminum foil. Cut the sugar pumpkin in half and scrape out the seeds. Place cut-side-down on the prepared baking sheet and roast in the preheated oven for 40-60 minutes (this will depend on the size of your pumpkin) until fork tender. Set aside to cool before scraping out the pulp. Place the pumpkin pulp in a large clean dish towel and wring the towel to squeeze the extra liquid out of the pumpkin. If you want the puree to be extra smooth, puree the pumpkin with a food processor or blender.

3. Preheat oven to 425 F.

4. In a large bowl, mix together sugar, salt, spices, and lemon zest. Beat the eggs and add to the bowl. Stir in the pumpkin puree and milk (or cream). Whisk until well incorporated.

5. Pour into pie shell and bake in preheated 425 F oven for 15 minutes. After 15 minutes reduce the oven temperature to 350 F and bake for another 40-50 minutes, until a knife inserted into the center comes out clean. (If the crust is browning too fast you can cover the edges with strips of aluminum foil partway through baking.)

6. Remove from the oven to cool on a wire rack for several hours before serving. The pumpkin will be puffed up when you take it out of the oven and deflate slightly as it cools. Serve with whipped cream.

Makes 1 9-inch round pie.

(Adapted from Simply Recipes)

Triple Berry Pie with Almond Crumble

July 30, 2010

Before this summer, I never considered myself much of a pie lover. Or perhaps it started in the fall when I made my first all-butter pie crust and filled it full of fresh picked apples. Then in the Winter it was pears. Now berries are bountiful and I can’t get enough of them piled high in pies. For the 4th of July it was blueberry, and this time I threw in three berries. Instead of a traditional top, this pie comes with a crumble. Almost two desserts in one!

Don’t let a fear of pastry prevent you from making your own. I actually consider pies one of the easiest desserts to master. With the help of a food processor, preparing the dough is no work at all. Then you just have to roll it out and fill it full. And bake it until it’s golden and bubbling. The hardest part is waiting for it to cool!

Triple Berry Pie with Almond Crumble

INGREDIENTS

1/2 recipe sweet butter pie crust (this recipe makes a double pie crust and you only need a bottom layer)

Almond Crumble:
6 Tbsp. brown sugar
6 Tbsp. whole almonds
6 Tbsp. cold unsalted butter, cut into 1/2-inch cubes
4 1/2 Tbsp. old-fashioned oats
4 1/2 Tbsp. all-purpose flour

Triple Berry Filling:
5-6 cups assorted berries (blueberries, raspberries, and blackberries, about 8 oz. of each)
3/4 cup sugar
1/4 cup quick-cooking tapioca (I would assume several Tbsp. of corn starch could be substituted)
2 Tbsp. freshly squeezed lemon juice

DIRECTIONS

1. Prepare the crust according to recipe directions.

2. To prepare the crumble topping, combine all the ingredients in a food processor. Process until moist clumps form. Refrigerate until ready to use.

3. To make the filling, mix the sugar, tapioca, and lemon juice in large bowl. Add berries and toss gently to combine. Let stand until tapioca softens slightly, stirring occasionally, about 45 minutes.

4. Preheat oven to 400 F. Roll out the dough on a lightly floured surface to form a large round. Transfer to a 9-inch-round pie dish. Trim dough overhang to 1 inch. Fold overhang under and crimp decoratively. Freeze crust 20 minutes.

5. Spoon filling into crust. Crumble topping evenly over filling. Bake pie until crust and topping are golden brown and filling is bubbling, covering loosely with sheet of foil if topping browns too quickly, about 45-55 minutes. Transfer pie to rack and cool at least 3 hours. (Can be made 8 hours ahead. Let stand at room temperature.) Cut pie into wedges and serve.

Makes 1 pie.

(Adapted from Bon Appetit)

Butter Tarts

November 28, 2009


My mother is Canadian-American. She comes from a tiny town in Alberta. She has lost her accent and her “eh”, but she’s still got her traditional Canadian recipes. Our northern neighbors know how to do dessert right. Some time ago I shared with you a recipe for Nanaimo Bars– a rich chocolaty Canadian delicacy. And now I finally got around to making butter tarts. I made them for my brother as a birthday gift. He’s a huge fan. It has been years since I’d had one and I’d forgotten how good they are!

These are amazingly simple to prepare. You make a buttery sweet pate brisee (pastry dough), form it into mini tarts, and fill it with a syrupy mixture of butter, sugar, and raisins. (I have detailed the pastry making process in another post, so be sure to visit that link for directions.) The filling is gooey and sweet, with a pleasant chewiness from the raisins. And I absolutely love the flaky, light crust. Don’t wait to try this Canadian delight!

Butter Tarts

INGREDIENTS

1 recipe all-butter pie crust (you will need to halve this recipe, because it is for a double pie crust)

Filling:
1 egg, beaten
1 cup brown sugar
1/3 cup butter, melted
2 Tbsp. milk
1/2 cup raisins
1 tsp. pure vanilla extract

DIRECTIONS

1. Prepare the pie crust and refrigerate 2 hours.

2. Preheat oven to 375 F.

3. Roll out the pie crust on a lightly floured surface. Using a large round cookie cutter (or cup/bowl) cut out 12 circles large enough to fill standard muffin tins. Gently press the crusts into the muffin tins (they should reach up the sides almost level with the top).

4. To prepare the filling, combine all of the ingredients in a medium sized bowl, stirring until the sugar has dissolved (no lumps remain). Evenly distribute the filling among the 12 pastry crusts, filling each about 2/3 full. (Any fuller and they will bubble over when baking.)

5. Bake in preheated oven for 18-20 minutes until the filling is bubbling and the crusts are lightly browned. Remove to cool on a wire rack. Store in an airtight container.

Makes 12 tarts.

(My mom’s recipe.)