Category Archives: Yeast

Rosemary Olive Oil Bread

April 17, 2011

Feeling sick is terrible. And especially inconvenient over the weekend you were planning to try a pile of new recipes because you start work on Monday morning and might not have so much free time ever again. But instead you’re spending your last valuable hours comfortlessly rotating between the couch, the futon, the floor, the bed- everywhere but the kitchen. Up half the night watching episodes of The Kennedy’s (thank goodness for the DVR in your time of need). Because you’ve got the aches and chills and just the thought of food makes you feel queasy. Not cool.

Maybe I should be more concerned about recovering in time to make it to work tomorrow instead of what I’m not eating. It crossed my mind, but with my luck I’ll be perfectly recovered by 6 am in the morning and left frustrated that my weekend plans (cooking, baking, and ice cream-making) were thwarted. Actually, ice cream is the only thing that sounds appealing at all right now. That one might still happen.

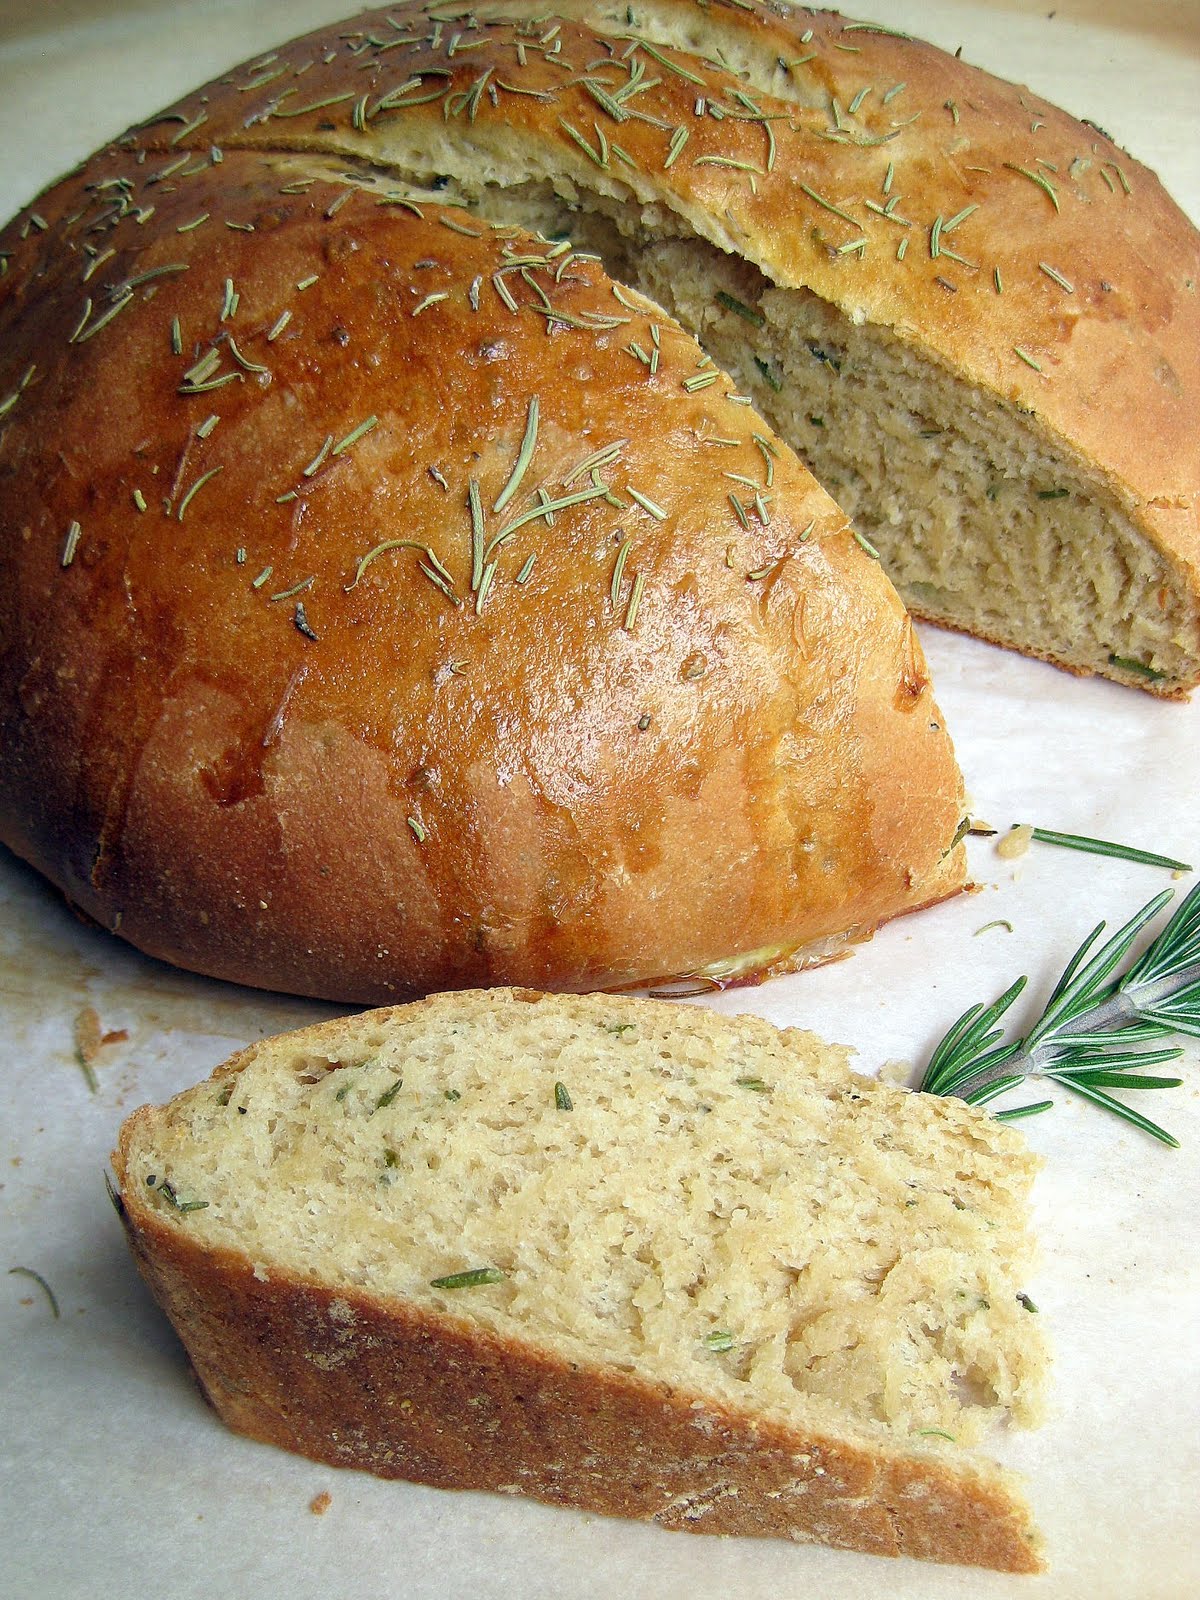
On a much cheerier note, back when I was feeling more like myself (hearty appetite in-tact), I baked this wondrous loaf of rosemary bread. I was inspired by my sisters’ (yes, plural- they’re twins) roommate, Laura, who made something similar while I was a guest inhabiting their couch. (I’ve clocked a lot of nights on the couch lately it seems.) While I managed to get a peek at her recipe, I was foolish enough not to write it down. So when I arrived home with the urgency to bake my own version of the bread, I sought advice from a second recipe source. The main tinkering I did was to incorporate whole wheat flour and to use fresh rosemary instead of dried (either works fine). I was very happy with the result- a loaf so flavorful that it needs no accompaniment. The rosemary is prominent but not overwhelming. And while this bread is best enjoyed warm out of the oven, it can be frozen and reheated later.

Rosemary Olive Oil Bread

INGREDIENTS

1 cup warm water (100-110 F)
1 Tbsp. organic cane sugar
2 tsp. active dry yeast
1 tsp. salt
2 Tbsp. fresh rosemary, chopped (or 2 tsp. dried)
1/4 tsp. Italian seasoning (or pinch of each ground garlic, dried oregano, and dried basil)
1/4 tsp. freshly ground black pepper
2 Tbsp. extra virgin olive oil
1 1/2 cups white whole wheat flour
1/2 cup bread flour + extra for kneading
1 egg, whisked + 1 Tbsp. water, for egg wash
dried rosemary, for sprinkling

DIRECTIONS

1. In a large bowl, combine the warm water, sugar, and yeast. Let sit 10 minutes to proof.

2. Stir in the salt, rosemary, seasonings, olive oil, and whole wheat flour. Add the bread flour and stir until the dough forms a ball. Knead on a lightly floured surface for about 5 minutes, adding more flour as necessary to prevent sticking, until smooth.

3. Place the dough in a lightly greased bowl; cover; and let rise until doubled in size, about1 hour.

4. Punch down the dough and form it into a round loaf. Place it on a cornmeal dusted pizza peel or parchment paper; cover; and let rise until doubled in size, about 45 minutes.

5. Meanwhile, preheat oven (and pizza stone) to 400 F. Once the dough has risen, gently brush the top with egg wash and sprinkle with dried rosemary.

6. Bake on preheated stone for 20-25 minutes until the top is golden brown and sounds hollow when tapped.

Makes 1 round loaf.

(Adapted from Laura A. and All Recipes)

Orange Rolls

September 22, 2010

I’ve drastically revised this recipe, so much of what I have written below no longer applies to these rolls. But I spent a lot of time back on April 7th 2009 writing that post so I didn’t want to delete it completely! This is the exact same dough (and directions) that I use to make cinnamon rolls. Just the filling and frosting are different. Instead of cinnamon, you get orange zest. Instead of milk and vanilla to thin and flavor the frosting, you get orange juice and almond extract. I’ve practically written a book about my love affair with these rolls (which you can read here). So I’ll leave it at this: they’re sensational.

4/7/09: I live for those rare occasions when we have cinnamon rolls (they are rare because if they weren’t I’d weight twice as much and have been hospitalized for sugar overdose by now). Diving into a pan of piping hot ooey gooey cinnamon buns drenched in creamy icing is what I call bliss. Unfortunately it is the type of pleasure that usually ends in regret… since I can’t seem to stop after just one, or two, or three…you get the point. I usually make myself sick from consuming copious amounts of soft cinnamon-y swirls. So why inflict such torture upon myself you ask? Because I’ll suffer (just about) anything for those first heavenly bites, and inevitably within a few days, maybe weeks, I’ll have forgotten the misery that accompanied my over-consumption and start dreaming of them again.

I had been off the buns for about 6 months when the urge returned. Eventually I’d have to include them on this blog, and so I got it in my head that it was time, I was ready to bake my next batch. But since I’m having a rather creative streak lately, I decided to try something new: Orange Rolls. I couldn’t find one recipe that I thought was satisfactory so I borrowed an idea from here and there and formulated my very own. The dough is very similar to (and could be used for) regular cinnamon rolls (minus my clever addition of orange zest). I spread a honey-butter (with more zest) filling over every inch of the rolled out dough. For the glaze, I used the juice from the same orange combined with powdered sugar. Be generous with the glaze. If you are in doubt, make more. My rolls were absolutely delicious, but I wish I’d used more glaze (I already adjusted the amount in the recipe). Also, be careful not to over bake them… the whole point of sticky buns is that they are soft and billowy. Honey was the perfect choice of filling… I’m elated that these turned out so well!

I made one pan with all-purpose flour and then a second with 100% white whole wheat flour. White flour guarantees a silky smooth texture, but the whole wheat weren’t bad at all. They were definitely more dense (and due to my neglecting the oven, a bit well done). And so I repeat: under cook! Even I figure it’s probably futile to try and make a healthy version of cinnamon or orange rolls. For the occasional treat, pure unadulterated white bread is a worthy indulgence. If you must have these more often though (say, as for breakfast instead of dessert) using whole wheat would be a good idea.

I’m happy to announce that these Honey Orange Rolls are so scrumptious that I had no trouble eating half the pan! I suggest having friends around to share them with (if you haven’t any friends, I’m sure random strangers will be willing to oblige, and no doubt will quickly become your friends).

Orange Rolls

INGREDIENTS

6-8 cups unbleached all-purpose flour
2 Tbsp. instant yeast
2 tsp. salt
1/2 cup sugar
1/2 cup butter, melted
2 eggs, whisked
2 1/4 cups warm milk

Filling:
1/2 cup butter, melted
1 1/2 cups brown sugar
zest of 2 oranges

Suggestion: Try adding sweetened dried cranberries to the filling. Haven’t tried it yet, but I think it would be chewy and delicious!

Orange Cream Cheese Frosting:
8 oz. cream cheese
1/2 cup butter
3 cups powdered sugar
6-8 Tbsp. freshly squeezed orange juice
1/2 tsp. almond extract
pinch salt

DIRECTIONS

1. In a large bowl combine 3 cups flour, yeast, salt, and sugar. Whisk to combine. Pour in wet ingredients (butter, eggs, and milk). Stir until it is a thick paste. Add the remaining flour, 1/2 cup at a time, until it comes together into a ball.

2. Lightly flour a flat surface, and knead the dough, adding more flour to prevent sticking, 8-10 minutes, until smooth. Spray the inside of a bowl with cooking spray, place the dough inside, cover, and let rise in a warm place until doubled, about 1 hour.

3. Punch down the dough and divide in half. Roll out each half into a large rectangle. Brush melted butter over the surface of the dough. Sprinkle with brown sugar and orange zest. Roll up lengthwise. Cut each log into 12 evenly sized pinwheels. Place into lightly greased 9×13 baking pans. Cover each pan and let rise until doubled in size, about 1 hour.

4. Preheat oven to 350 F. Bake rolls in preheated oven for 15-20 minutes, until golden on top. Remove from the oven and place on a cooling rack.

5. While the rolls are baking, prepare the frosting. Beat the butter and cream cheese in a large bowl with an electric mixer until fluffy. Slowly add the orange juice, powdered sugar, almond extract, and salt. Beat until smooth. If the frosting is too thick, add more juice.

6. Pour frosting over the hot rolls, dividing it among the two pans. Serve warm.

Fills two 9×13 pans, about 24 rolls.
(Dough from my mom, Frosting from Tasty Kitchen)

Cinnamon Rolls

September 21, 2010

Over the weekend I helped host a baby shower brunch for one of my best friends and the occasion called for cinnamon rolls. I’m not super clever at crafts or good at decorating, but I can bake. And I’m always happy to. It’s probably my favorite way to spend a weekend morning. Forget the gym or running errands, I’d rather hide in my kitchen and create irresistible aromas and tastes.

I’ve shared this recipe before, but this time I made a few changes. The dough is the same. Still easy and wonderful. But now I’m giving you topping options- icing or cream cheese frosting. Take your pick. I loved the thicker cream cheese frosting. Dustin made it clear that he preferred the old icing. No big deal. This recipe comes in pans of two, so next go ’round I’ll just make one each way!

1/2/10: Christmas morning called for cinnamon rolls. I knew the minute I rolled up my sleeves on Christmas Eve and set about making the dough that would become these buns, Christmas was destined to be a day of indulgences. Sugary-sweet fluffy white rolls drowning in vanilla icing…what a perfect breakfast. Problem is, one bun is never enough. As long as the pan of rolls remains on the counter I’ll be eating them. All day long! Lucky I had Dustin’s family to share them with (this isn’t the type of treat you should enjoy on your own-that would be dangerous)!

As I mentioned, I made the dough the night before. I’d never done this before. I hoped that if I used active dry yeast instead of instant, and stored the dough in the refrigerator overnight (during the first rise), it would be ready to roll out in the morning. The dough was already overflowing its bowl by bedtime so I gently punched it down, re-covered it, and wished for the best. I woke up bright and early Christmas morning (much before the rest of the house- I’m like a little kid when it comes to Christmas- I can’t sleep a wink!), tiptoed past the piles of presents, and into the kitchen to begin my work. I was slightly frightened to discover that the dough hadn’t risen at all since I’d slapped it the night before. Had I killed it? Wait. Don’t panic. I’ve got time- maybe it’ll warm up and rise. And I was right. Two or three hours later (after presents- it’s a long process in Dustin’s home) the rolls had risen to the top of the pan and were ready to be baked!

They turned out wonderful: browned on the tips, soft and chewy in the middle! As you might guess, they didn’t last long. Best enjoyed warm, with a large glass of milk, and a friend to share them with.

10/9/09: What is one of my absolute favorite foods ever? These are. They are the cinnamon buns my mom made us as kids. I love them. Because I am a breadaholic and because they are that good. Leave off the raisins, and Dustin loves them too. We all do! They’re light and fluffy on the inside and sweet and sticky in between the layers. I try to under cook them a little so they stay soft and gooey, and then smother them in a rich glaze. Please, eat them warm, right out of the pan. It’s an experience you can’t live without.

In the rare chance that you have leftovers (OK, this recipe does make 2 pan-fulls), freeze or refrigerate and then warm them up in the microwave. They’ll only keep for a day or two at room temperature. Someday I plan on making the frosting with cream cheese. Cinnabon uses cream cheese in their icing so I imagine it will be divine! When I do, I’ll let you know how it goes.

Cinnamon Rolls

INGREDIENTS

6-8 cups unbleached all-purpose flour
2 Tbsp. instant yeast
2 tsp. salt
1/2 cup sugar
1/2 cup butter, melted
2 eggs, whisked
2 1/4 cups warm milk

Filling:
1/2 cup butter, melted
1 1/2 cups brown sugar
ground cinnamon
raisins (optional)
pecans, chopped (optional)

Icing:*
4 cups powdered sugar
1/4 cup butter
1 tsp. vanilla extract
1/2 cup milk

*I don’t actually have a specific recipe I follow when I make this icing. The basics are always the same: butter, sugar, and milk. It is supposed to be much thinner than the cream cheese frosting. It should be able to be poured on (rather than spread). Feel free to make more or less and adjust to your desired consistency.

OR
Cream Cheese Frosting:
8 oz. cream cheese, softened
1/2 cup butter, softened
6-8 Tbsp. milk
3 cups powdered sugar
1 tsp. pure vanilla extract
pinch salt

DIRECTIONS

1. In a large bowl combine 3 cups flour, yeast, salt, and sugar. Whisk to combine. Pour in wet ingredients (butter, eggs, and milk). Stir until it is a thick paste. Add the remaining flour, 1/2 cup at a time, until it comes together into a ball.

2. Lightly flour a flat surface, and knead the dough, adding more flour to prevent sticking, 8-10 minutes, until smooth. Spray the inside of a bowl with cooking spray, place the dough inside, cover, and let rise in a warm place until doubled, about 1 hour.

3. Punch down the dough and divide in half. Roll out each half into a large rectangle. Brush melted butter over the surface of the dough. Sprinkle with brown sugar, cinnamon, raisins (optional), and pecans (optional). Roll up lengthwise. Cut each log into 12 evenly sized pinwheels. Place into lightly greased 9×13 baking pans. Cover each pan and let rise until doubled in size, about 1 hour.

4. Preheat oven to 350 F. Bake rolls in preheated oven for 15-20 minutes, until golden on top. Remove from the oven and place on a cooling rack.

5. While the rolls are baking, prepare the icing/frosting. For the icing, whisk to combine all the ingredients in a medium bowl. Adjust milk and sugar until you reach the desired consistency. For the frosting, beat butter and cream cheese in a large bowl with an electric mixer until fluffy. Slowly add the milk, powdered sugar, vanilla, and salt. Beat until smooth. If the frosting is too thick, add more milk.

6. Pour icing/frosting over the hot rolls, dividing it among the two pans. Serve warm.

Fills 2 9×13 pans, about 24 rolls.

(Rolls from my mom, Cream Cheese Frosting adapted from All Recipes)

Potato Crescent Rolls

May 14, 2009

This was one of the first recipes I discovered when I began cooking. It is probably my favorite find on All Recipes. I’ve made these rolls countless times- for my family, for guests, and sometimes all for myself. I’ll never tire of sinking my teeth into their smooth pillow-like curves, and I love unraveling their layers till I reach the soft, moist center.

They also travel well through open car windows at high speeds. Let’s just say I got hungry on the road and the other car (big family) had the stash of potato rolls. One cell phone call later Dad was maneuvering through freeway traffic in a Bond-like manner to toss a bun through my window. Thank goodness we didn’t lose any to the pavement, although our cars came dangerously close to colliding. But oh, it was worth it!

When I make these potato rolls I always use at least half whole wheat flour, which I like to pretend offsets some of the richness of the butter. They might not be super low-cal, but they are everything a tempting dinner roll should be.

INGREDIENTS
2 potatoes, peeled and cubed (about 2 cups mashed)
1 (.25 ounce) package active dry yeast (2 1/4 tsp.)
1 1/2 cups warm water (leftover cooking water from boiling the potatoes works best)
1/2 cup white sugar
2/3 cup butter

2 eggs
1 1/2 tsp. salt
3 cups white whole wheat flour
3 -3 1/2 cups all-purpose flour
1/4 cup butter, melted

DIRECTIONS
1. Place potatoes in a saucepan and cover with water. Bring to a boil, and cook until tender, about 15 minutes. Drain (reserving the cooking water), cool, and mash.


2. In a large bowl, dissolve yeast in 1 1/2 cups of the warm potato cooking water. Let stand until creamy, about 10 minutes.

3. When yeast is ready, mix in 2 cups mashed potatoes, sugar, butter, eggs, salt, and 3 cups flour. Stir in the remaining flour, 1/2 cup at a time, until dough has become stiff but still pliable.


4. Turn dough out onto a lightly floured surface, and knead until smooth and elastic, about 8 minutes. Lightly oil a large bowl, place the dough in the bowl, and turn to coat with oil. Cover with plastic wrap, and let rise in a warm place for several hours until doubled, or refrigerate for 8 hours and up to several days.

5. Deflate the dough, and turn it out onto a lightly floured surface. Divide the dough into two equal pieces, and form into rounds. Roll out each round to a large circle. Brush generously with melted butter, and cut each circle into 12-16 wedges. Roll wedges up tightly, starting with the large end. Place on lightly greased baking sheets with the points underneath, and the ends bent to form a crescent shape. Cover, and let rise for 1 hour.

6. Meanwhile, preheat oven to 350 degrees F (200 degrees C). Bake in preheated oven for 15 to 20 minutes, or until golden brown.

Makes 2-3 dozen rolls.

(Adapted from All Recipes)

New Mexican Sopapillas

March 2, 2009

My dad can cook two things (that I’ve ever witnessed): grilled cheese (who can’t?) and sopapillas! (Oh actually, I think he made me pancakes from a mix once for my birthday. In the shape of my age (18) of course.) But sopapillas are all we need! He is a native of New Mexico and this is his traditional dish. Funny thing is I called home for a last-minute recommendation on how hot to heat the oil (I’m a deep fry novice) and my family was at that exact moment finishing their own batch of sopapillas! My family loves them. It’s our go-to meal for company and for comfort! Family lore has it that this recipe came from (how they obtained it is questionable) a popular restaurant in Los Alamos. Fried dough stuffed to the brim with southwestern fillings-all I know is that they are awesome!

This was also my first experience with lard. While you can use shortening in its place, lard is a more natural source of fat. Our grandmothers grew up on the stuff- it can’t be that scary! It took me three tries to find a grocer that actually sells the stuff and you have to make sure it is not hydrogenated or you are probably better off with shortening. Ideally, you could render your own, but since I don’t have a pet hog I settled for store-bought. Unless you have a reliable source of pure lard, using non hydrogenated shortening is probably your best bet.

But back to the sopapillas! As a savory dish they are torn open and stuffed with Green Chili Ground Beef, refried beans, Spanish Rice, lettuce, tomatoes, cheddar cheese, sour cream, and salsa. For dessert try them sprinkled with cinnamon and sugar, dusted with powdered sugar, or drizzled in honey!

INGREDIENTS

3 cups warm water
1 Tbsp. yeast
2 Tbsp. lard or shortening
1 Tbsp. sugar
1 1/2 tsp. salt
5 1/2- 6 cups all-purpose flour
canola oil, for frying

DIRECTIONS
1. Add sugar to water. Sprinkle in yeast and let stand until creamy, about 10 minutes.

2. Add salt, lard, and 1 cup flour. Mix thoroughly.

3. Continue adding flour, 1 cup at a time and mixing well after each addition, until dough cleans the sides of the bowl. Knead 5 minutes. (You may need to add more flour to prevent dough from sticking.)

4. Rub dough with a small amount of lard or spray with cooking spray. Cover, set in a warm place, and let rise 1 hour.

5. Push down and divide in half. Roll out half of dough at a time to 1/8 inch thickness. Cut into 3″ or 4″ squares.

6. Preheat canola oil in a large pot on high heat. To test oil, drop a small piece of dough into the hot oil. It will quickly puff and turn brown at the right temperature.

7. Fry dough by gently placing the squares into the hot oil. Continuously spoon oil over top of the dough until they puff and are light golden on both sides.

8. Remove from the oil and drain on paper towel. Best served hot. (If you are frying a large batch you might want to keep them warm in a 200 F oven until ready to serve.)

Serve with green chili ground beef, refried beans, Spanish rice, shredded cheese, tomatoes, lettuce, sour cream, and salsa for stuffing. Also delicious sprinkled with cinnamon and sugar, powdered sugar, or drizzled with honey.

Serves 8.