Category Archives: Dessert

Cherry Pie Cookie Bars

July 3, 2020

Early every summer the roadside cherry stands show up in Washington and we stop and buy local cherries by the bagful. I don’t like pitting them (but this little tool helps a lot) or cleaning up the mess after my kids cover themselves in cherry juice, but we LOVE fresh cherries. I’ve been making this dessert the last couple summers and it’s time I shared it here. These cherry pie bars have a base/crumble similar to a sugar cookie, a juicy cherry-almond filling, and a sticky sweet lemon glaze. It just crossed my mind how sprinkling sliced almonds on top would make them extra beautiful/delicious!

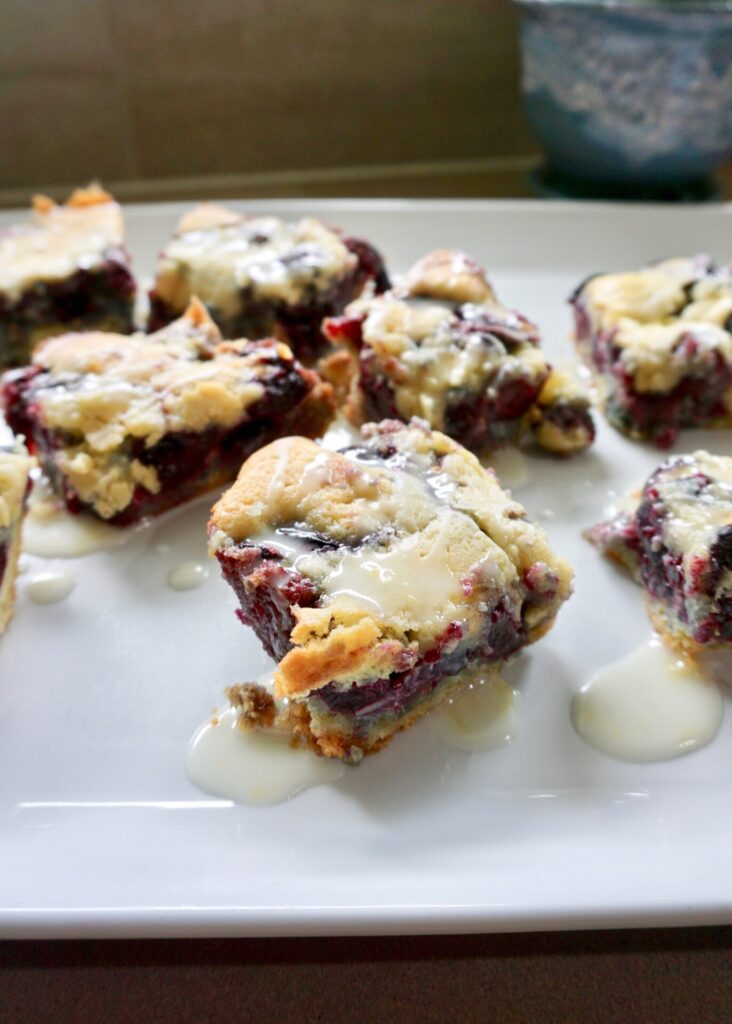
The hardest part of this recipe is making sure the bars get cooked through. Because the cherries release a lot of moisture, I pre-bake the crust a bit before adding the filling. I also added more cornstarch to help it thicken. Even if it takes longer than the suggested baking time, don’t take the bars out of the oven if the center is still doughy. I’ve made that mistake before and had to toss the center of the dish. The bars will set up more as they cool. They’re the best served with a scoop of vanilla bean ice cream.

Cherry Pie Cookie Bars

INGREDIENTS

Cherry Pie Filling:
5 cups fresh Bing/sweet cherries, pitted and halved (about 1 1/2 to 2 lbs., you can use frozen cherries, but make sure they are thawed and the juices drained off)
1/3 cup sugar
2 Tbsp. cornstarch
1/4 tsp. almond extract

Cookie Dough:
1 cup (2 sticks) butter, softened
1 cup sugar
2 Tbsp. milk
1 tsp. baking powder
1/2 tsp. baking soda
1/4 tsp. salt
1 large egg
1 large egg yolk
2 1/4 cups all-purpose flour

Lemon Glaze:
1 cup powdered sugar
1 tsp. lemon zest
~1 Tbsp. milk + extra to thin glaze

DIRECTIONS

  1. Preheat the oven to 350 degrees F. For easier cleanup, line a 9X13-inch baking pan with parchment paper or aluminum foil. Lightly grease the parchment/foil with nonstick cooking spray and set aside.
  2. In a medium bowl, stir together the cherries, sugar, cornstarch, and almond extract. Let sit while making the crust.
  3. For the cookie dough, with an electric mixer (handheld or stand mixer), cream together the butter, sugar, milk, baking powder, baking soda, and salt until light and fluffy, 2-3 minutes. Add the egg and egg yolk. Mix until well-combined. Add the flour and mix until just combined and no dry streaks remain.
  4. Take 2/3 of the dough (more or less) and press into the bottom of the pan. It helps to drop pieces relatively evenly across the bottom before spreading into an even layer. You can use your hands or a knife to spread the dough as it’s a bit sticky.
  5. Par-bake the bottom crust in the preheated oven for 15 minutes, it should puff and start to set but not be cooked through or brown. Remove from the oven,
  6. Give the cherry filling a good stir and pour over the top of the bottom crust. Pinch off quarter-size pieces of the remaining dough and drop on top. It won’t cover the cherry filling all the way but will puff and spread while baking.
  7. Bake for 30-40 minutes until the cherry filling is bubbling and the edges of the dough are golden. (Test to center with a knife to make sure that it’s not still doughy. If the bars are browning too fast before the center sets you can lightly tent them with foil while they finish baking.) When the bars are done, remove them from the oven and set them aside to cool.
  8. For the glaze, whisk together the powdered sugar, lemon zest and milk until thick and pourable (add milk a little at a time if needed to thin the consistency).
  9. Drizzle the glaze over the top of the bars. Serve the bars at room temperature or slightly warm with vanilla ice cream.

Makes a 9×13 pan of bars.

Adapted from Mel’s Kitchen Cafe

Fresh Strawberry Gelato

June 26, 2020

It’s strawberry season here now! The first thing we made with our piles of fresh berries was this strawberry gelato, which has become a summer tradition. I’m not sure what makes this recipe gelato (vs regular ice cream), but I know it’s absolutely delicious. It’s also one of the easier ice cream recipes I’ve made.

Don’t skip the step of straining the strawberries to get all the seeds out, it makes it much creamier/smoother. I’ve used both fresh picked strawberries and ones that we’ve frozen first. Just make sure whatever you use is really ripe for the best flavor.

Fresh Strawberry Gelato

INGREDIENTS

3/4 cup sugar
1 Tbsp. cornstarch
1 cup whole milk
3/4 cup heavy whipping cream
1/2 tsp. pure vanilla extract
2 1/2 cups sliced very ripe, fresh strawberries

DIRECTIONS

  1. In a medium saucepan, whisk together the sugar and cornstarch. Gradually whisk in the milk and whipping cream.
  2. Place the pan over medium heat and cook, whisking constantly, until the mixture begins to bubble and thickens, 5-10 minutes. Remove from the heat and stir in the vanilla.
  3. Pour the mixture into a bowl and cool completely (either by pressing plastic wrap directly on the surface and refrigerating or nesting the bowl in a larger bowl filled with ice and stirring until it is cool to the touch).
  4. Puree the strawberries in a blender until the mixture is very smooth.
  5. Once the gelato base has cooled completely, strain the strawberry mixture through a fine mesh strainer into the creamy mixture. Use a rubber spatula or the back of a large spoon to press the strawberry puree through the strainer so all the pretty strawberry liquid gets strained into the gelato but the seeds are left behind. Stir well.
  6. Cover the gelato by pressing plastic wrap directly on the surface. Refrigerate 3 hours or up 24 hours.
  7. Process the gelato in your ice cream maker following the manufacturer’s instructions. Scrape the ice cream into a container, cover and freeze for at least two hours or longer before serving.

Adapted from Epicurious via Mel’s Kitchen Cafe

Mini Cheesecakes

June 12, 2020

A couple years ago my friend Anna (who is an incredibly talented at cakes!) started a baking club for her girls and some friends. They would play and learn to bake something new and always come home with a yummy treat. It became the highlight of Clara’s month! When Anna moved away I promised my girls we could start a baking club of our own and so we did- twice now in our two different homes. It’s always a huge mess but so much fun and I love seeing how excited they get about creating something delicious!

We made these mini cheesecakes for baking club earlier this year (before we all went into isolation). They were simple enough to bake with 5 kids and because they’re so tiny, they’re quick to set up. And they were a huge hit! I didn’t photograph them then, so we made them again last weekend and we still think they’re the best. I stretched the recipe to make 12, but if you want them a little larger just fill 9 muffin cups. We sprinkled some with mini chocolate chips before they went into the oven and the rest we left plain and served with homemade whipped cream and fresh berries.

Mini Cheesecakes

INGREDIENTS

Graham Cracker Crust:
2/3 cup graham cracker crumbs (about 4-5 full sheet graham crackers)
2 Tbsp. unsalted butter, melted
1 Tbsp. sugar

Cheesecake:
one 8-ounce block full-fat cream cheese, softened to room temperature
1/4 cup sugar
1/4 cup full-fat sour cream, at room temperature
1/2 tsp. pure vanilla extract
1 tsp. fresh lemon juice (optional, but recommended)
1 large egg, at room temperature

topping suggestions: mini chocolate chips, salted caramel, lemon curd, strawberry topping, chocolate ganache, fresh fruit or maraschino cherries, homemade whipped cream, or raspberry sauce

DIRECTIONS

  1. Preheat oven to 350 F. Line a 12-count muffin pan with 9-12 liners. This recipe yields only 9-12 mini cheesecakes, (depending how full you fill them). You could skip the liners and spray the pan with non-stick spray or grease with butter, but the mini cheesecakes are pretty stubborn to release from the pan. I recommend using liners to make things easier.
  2. Make the crust: Combine all of the crust ingredients in a medium bowl. Mixture will be sandy. Firmly press a heaping Tablespoon of crust mixture into each liner. (I use closer to 1 and 1/2 Tablespoons of crust per mini cheesecake.) Pre-bake for 5 minutes.
  3. Make the filling: Using a handheld or stand mixer fitted with a paddle or whisk attachment, beat the cream cheese and granulated sugar together on medium-high speed in a large bowl until the mixture is smooth and creamy, about 1 minute. Add the sour cream, vanilla extract, and lemon juice then beat until fully combined. On medium speed, add the egg and beat just until combined. Batter will be thick. Divide the batter between all the liners. (If you want to add mini chocolate chips, sprinkle some on top before you bake the cheesecakes.)
  4. Bake until the edges are set and the centers only slightly jiggle, about 18-20 minutes.
  5. Set the pan on a wire rack and allow cheesecakes to cool at room temperature for 30 minutes, then transfer to the refrigerator and chill for at least 2 hours and up to 1 day. If chilling for longer than 2 hours, loosely cover the cheesecakes. The cheesecakes will slightly sink in the middle as they chill. It gives you room for toppings!
  6. Once chilled, add toppings and serve. Cover and store leftover cheesecakes in the refrigerator for up to 5 days.

Makes 9-12 mini cheesecakes.

(Adapted from Sally’s Baking Addiction)

Oreo Layer Cake

May 22, 2020

oreo cake

On May 1st Clara turned 8! This year was definitely different having a birthday alone at home but we made the most of it. I might have driven an hour to pickup her favorite Mediterranean take-out near our old house… we’re crazy about food like that! She received lots of gifts and love from family afar and a surprise drive-by visit from friends. And she requested an Oreo Cake so that’s what we made!

oreo layer cake

I’ve never been much of an Oreo fan so I was skeptical that I would like any Oreo cake I baked her. But WOW was I wrong. This cake was amazing and slightly converted me to Oreos (at least in cake/buttercream form)! The original recipe comes from Preppy Kitchen and I didn’t deviate much from it. His site has lots of pictures of the cake baking and even a video on the decorating process. Definitely check it out if you have questions or need more tips.

My cake didn’t turn out as picture perfect but I learned a few things along the way: Don’t crushed your Oreos too fine for the frosting (or cake batter) or they’ll turn it basically black. Not the prettiest color but it tasted amazing nonetheless. Also, pouring perfect chocolate ganache is harder than it looks. This was my first attempt EVER and in hindsight I should have let it cool a bit longer first. I didn’t use any ganache between the layers as I was worried about sliding and the ganache just on top was plenty rich. (I especially enjoyed licking it right out of the pot. So good.) And I skipped the white buttercream dollops on top. You could use this reserved buttercream to decorate in any way you wish. I went with white sprinkles because I was trying to please kids and didn’t feel like bothering with frosting tips.

Oreo Layer Cake

INGREDIENTS

Oreo Cake:
2 cups all-purpose flour
1 cup granulated sugar
1/4 tsp. baking soda
1 tsp. baking powder
1/4 tsp. kosher salt
3/4 cup unsalted butter, room temperature
3 egg whites
1 tsp. vanilla extract
1/2 cup sour cream, room temperature
1/2 cup whole milk, room temperature
1 cup chopped Oreos

Oreo Buttercream:
1 1/2 cups butter, room temperature
5 cups confectioners’ sugar
1 1/3 cups crushed Oreos (don’t crush them too finely or your frosting will turn out super dark like mine)
1/4 cup heavy cream
pinch salt kosher

Chocolate Ganache:
1 cup semisweet chocolate chips
1/2 cup heavy cream, heated

DIRECTIONS

For the Cake:

  1. Butter and flour three six inch pans. I use cake strips on my pans for more even baking as well. (I did it without cake strips and it turned out fine.) Preheat oven to 340F.
  2. In a standing mixture fitted with a paddle attachment, beat butter until light and fluffy.
  3. Sift the dry ingredients together in a large bowl.
  4. Beat the dry ingredients into the butter until well incorporated, scrape the bowl at least once.
  5. Beat the wet ingredients together in a medium bowl.
  6. Add the wet to the butter mixture and mix until just combined. Fold in the crushed Oreos at the very end and mix until just combined.
  7. Divide the mixture evenly into the cake pans
  8. Bake at 340 for about 25-30 minutes or until the centers are springy to the touch.

For the buttercream:

  1. Beat the butter until light and fluffy. Add the confectioners’ sugar and cream and mix.
  2. Reserve about a cup of the buttercream for the white dollops. Which will be piped with an 869 tip. (I didn’t end up doing white dollops, and just used white sprinkles on top.)
  3. Mix in the crushed Oreos into the large batch of buttercream.

For the ganache:

  1. Melt chocolate and cream together on low heat. Whisk together and set aside. You might need to add more or less cream to achieve the desired consistency. (Then set aside to cool to the ride consistency for pouring.)

To assemble the cake:

  1. Oreo buttercream goes between each layer as well as a swirl of chocolate. Don’t go overboard with the ganache as it will overpower the other flavors. (I didn’t add the chocolate ganache between the layers)
  2. Coat outside with buttercream and smooth.
  3. Add a skirt of crushed Oreos at the bottom of the cake. (We decorated with whole Oreos instead.)
  4. Pour the ganache on top and allow to drip. Smooth top with an offset spatula.
  5. Pipe white buttercream dollops on top with an 869 tip. (Once again, we didn’t do this and added white sprinkles instead.)

Adapted from Preppy Kitchen

Vanilla Layer Cake with Vanilla Buttercream Frosting

April 18, 2020

For Clara’s 7th birthday last year (she turns 8 in less than 2 weeks now!) we had an Under the Sea party and this was her mermaid cake. With THE BEST vanilla cake recipe from Sally (her site is my go-to for cakes), several youtube ombre frosting tutorials, and the sea creatures purchased from etsy, it wasn’t too hard to make!

I added some pretty sprinkles to the batter (instructions included in the notes below) and frosted the cake with Sally’s classic vanilla buttercream. I did use three 6-inch cake pans instead of the 9-inch ones called for in the recipe, with a slightly reduced baking time. (I can’t remember what I did with the extra batter but making a few cupcakes on the side isn’t a bad idea!) This really is a wonderfully light, yet moist, and flavorful vanilla cake.

In keeping with the Under the Sea theme we had a shark watermelon (thanks to my sister, Brooke, who took the time to carve it) and crab croissant sandwiches (olives and croissants are two of Clara’s favorite foods)!

There was also a veggie tray and dip that had a little crab hanging out it it…

… and bowls of goldfish crackers and pretzels and a plate of peanut butter and jelly starfish!

I’m so glad we had a big party for her 7th birthday since this year we’ll be celebrating under “lockdown”. Of course there will still be good food and lots of love and cake!

If you want details about specific ingredients or substitutions, etc. follow the links to Sally’s original post. There are also tons of positive reviews… I’m not the only one who loves this recipe!

Vanilla Layer Cake with Vanilla Buttercream Frosting

INGREDIENTS

Vanilla Cake:

3 and 2/3 cups cake flour (spooned and leveled)
1 tsp. salt
1 tsp. baking powder
3/4 tsp. baking soda
1 1/2 cups unsalted butter, softened to room temperature
2 cups granulated sugar
3 large eggs + 2 additional egg whites, at room temperature
1 Tbsp. pure vanilla extract
1 1/2 cups buttermilk, at room temperature

Vanilla Buttercream Frosting:

1 1/2 cups unsalted butter, softened to room temperature
6 cups powdered sugar
1/3 cup whole milk or heavy cream
1 1/2 tsp. pure vanilla extract
1/8 tsp. salt

DIRECTIONS

  1. Preheat oven to 350 F. Grease three 9-inch cake pans, line with parchment paper, then grease the parchment paper. Parchment paper helps the cakes seamlessly release from the pans.
  2. Make the cake: Whisk the cake flour, salt, baking powder, and baking soda together. Set aside.
  3. Using a handheld or stand mixer fitted with a paddle or whisk attachment, beat the butter and sugar together on high speed until smooth and creamy, about 3 minutes. Scrape down the sides and up the bottom of the bowl with a rubber spatula as needed. Beat in the 3 eggs, 2 egg whites, and vanilla extract on high speed until combined, about 2 minutes. (Mixture will look curdled as a result of the egg liquid and solid butter combining.) Scrape down the sides and up the bottom of the bowl as needed. With the mixer on low speed, add the dry ingredients just until combined. With the mixer still running on low, pour in the buttermilk and mix just until combined. You may need to whisk it all by hand to make sure there are no lumps at the bottom of the bowl. The batter will be slightly thick.
  4. Pour batter evenly into cake pans. Weigh them to ensure accuracy, if desired. Bake for around 23-26 minutes or until the cakes are baked through. To test for doneness, insert a toothpick into the center of the cake. If it comes out clean, it’s done. Allow cakes to cool completely in the pans set on a wire rack. The cakes must be completely cool before frosting and assembling.
  5. Make the frosting: In a large bowl using a hand-held mixer or stand mixer fitted with a whisk or paddle attachment, beat the butter on medium speed until creamy, about 2 minutes. Add confectioners’ sugar, milk, vanilla extract, and salt with the mixer running on low. Increase to high speed and beat for 2 minutes. Add more confectioners’ sugar if frosting is too thin, more milk if frosting is too thick, or an extra pinch of salt if frosting is too sweet.
  6. Assemble and decorate: Using a large serrated knife, slice a thin layer off the tops of the cakes to create a flat surface. Discard (or crumble over ice cream!). Place 1 cake layer on your cake stand, cake turntable, or serving plate. Evenly cover the top with about 1 and 1/2 cups of frosting. Top with 2nd cake layer and evenly cover the top with about 1 and 1/2 cups of frosting. Top with the third cake layer. Spread the remaining frosting all over the top and sides. I use and recommend an icing spatula to apply the frosting.
  7. Refrigerate cake for at least 1 hour before slicing. This helps the cake hold its shape when cutting.
  8. Cover leftover cake tightly and store in the refrigerator for up to 5 days.

NOTE: To make a sprinkle cake, fold about 3/4 cup of sprinkles into the cake batter. Avoid nonpareils (the little balls), which tend to bleed their color.

From Sally’s Baking Addiction